Adobe 23101764 Tutorial - Page 30
Red Eye Removal
 |
UPC - 718659340025
View all Adobe 23101764 manuals
Add to My Manuals
Save this manual to your list of manuals |
Page 30 highlights
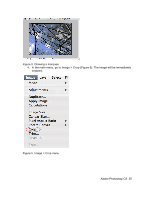
CORRECTING Digital cameras tend to cause various problems, such as "red eye" or "hot spots", if you use flash, or underexposure, if you don't. In Photoshop, you can correct these problems, as well as adjust the overall color of your digital photo. RED EYE REMOVAL The digital camera flash is located right above the lens, which causes the "red-eye"; however, you can fix your photos easily in Photoshop. To remove the "red eye", follow the steps below: 1. Open a photo you wish to correct. 2. Select the Zoom Tool from the Toolbox. Click and drag to draw a rectangle around the eye (Figure 1). Figure 1. Red eye zoomed in 3. Make sure your default Foreground and Background colors are black and white (Figure 2). Figure 2. Foreground and Background colors set to black and white Adobe Photoshop CS 30
-
 1
1 -
2
-
3
-
4
-
5
-
6
-
7
-
8
-
9
-
10
-
11
-
12
-
13
-
14
-
15
-
16
-
17
-
18
-
19
-
20
-
21
-
22
-
23
-
24
-
 25
25 -
 26
26 -
 27
27 -
 28
28 -
 29
29 -
 30
30 -
 31
31 -
 32
32 -
 33
33 -
 34
34 -
 35
35 -
36
-
37
-
38
-
39
 |
 |
