Adobe 23101764 Tutorial - Page 31
Hot Spot Removal
 |
UPC - 718659340025
View all Adobe 23101764 manuals
Add to My Manuals
Save this manual to your list of manuals |
Page 31 highlights
4. Click on the little black triangle of the Heeling Brush Tool button and select the Color Replacement Tool. 5. Click on the red and paint, holding down the mouse button. You will see how the red will disappear (Figure 3). Figure 3. Red eye corrected 6. Repeat the steps for the other eye. HOT SPOT REMOVAL Using a flash can also cause another problem - shiny areas on people's faces or the flash reflection in the shiny surfaces. To correct this problem, follow the steps below: 1. Open the photo you wish to correct. 2. Select the Clone Stamp Tool from the Toolbox. 3. In the Options bar, change the Blend Mode from Normal to Darken (Figure 4). Adobe Photoshop CS 31
-
 1
1 -
2
-
3
-
4
-
5
-
6
-
7
-
8
-
9
-
10
-
11
-
12
-
13
-
14
-
15
-
16
-
17
-
18
-
19
-
20
-
21
-
22
-
23
-
24
-
25
-
 26
26 -
 27
27 -
 28
28 -
 29
29 -
 30
30 -
 31
31 -
 32
32 -
 33
33 -
 34
34 -
 35
35 -
 36
36 -
37
-
38
-
39
 |
 |

Adobe Photoshop CS
31
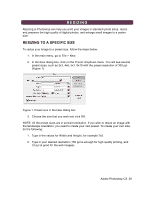
4.
Click on the little black triangle of the
Heeling Brush Tool
button and select the
Color Replacement Tool
.
5.
Click on the red and paint, holding down the mouse button. You will see how the
red will disappear (Figure 3).
Figure 3. Red eye corrected
6.
Repeat the steps for the other eye.
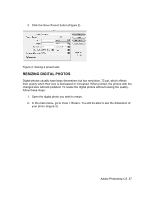
HOT SPOT REMOVAL
Using a flash can also cause another problem - shiny areas on people's faces or the
flash reflection in the shiny surfaces. To correct this problem, follow the steps below:
1.
Open the photo you wish to correct.
2. Select the
Clone Stamp Tool
from the
Toolbox
.
3. In the
Options
bar, change the
Blend Mode
from
Normal
to
Darken
(Figure 4).