Alesis PerformancePad Pro User Manual - Page 13
Selecting Individual Patterns, EMPTY PATTERN, Notes, Changing Pattern Tempo, Selecting Fill Patterns
 |
View all Alesis PerformancePad Pro manuals
Add to My Manuals
Save this manual to your list of manuals |
Page 13 highlights
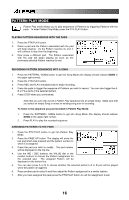
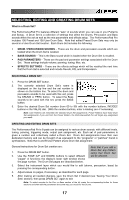
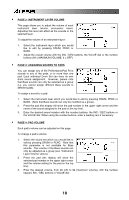
ƒ Selecting Individual Patterns 1. Make sure the PerformancePad Pro is in Pattern Mode. 2. Enter a two-digit Pattern number (remember to enter a leading 0 if necessary). 3. Press the A button to select the A Main Pattern, or B to select the B Main Pattern. To select a Fill Pattern, first select the desired Main Pattern (A or B) then press the Fill Button. 4. Press PRESET/USER to select either a Preset or User Pattern. 5. When a Main Pattern reaches its end, it will loop back to the beginning and continue playing from that point unless you select a new Pattern, selected a Fill Pattern initially, or stop the Pattern. If you select a User Pattern that contains no data, the display says EMPTY PATTERN. If you select a User Pattern that contains data but has not yet been named, the display says NO NAME. Notes ƒ If you change your mind or select the wrong Pattern, you can select a new Pattern number at any time before the next Pattern begins. ƒ If you press STOP before the next Pattern begins playing, the PerformancePad Pro will stop and remain on the currently selected Pattern. ƒ To immediately jump to the next Pattern in the sequence, press the PAGE UP button. ƒ To immediately return and begin playing from the start of the current Pattern, press PAGE DOWN. ƒ Changing Pattern Tempo The tempo range extends from 30 to 300 beats per minute. Tempo can be changed while the PerformancePad Pro is stopped or running. There are two ways to set tempo. 1. Before playing a Pattern, tap the TAP TEMPO button several times at the desired tempo. The PerformancePad Pro will average the time between taps and derive a tempo; the display will update the tempo with each tap. 2. Hold down the TAP TEMPO button and turn the VALUE dial to select a new tempo. Alternatively, you can use the INC / DEC buttons while holding down TAP TEMPO to increase or decrease by 1 BPM, or hold down to scroll through the tempo values. Note that you can customize how the PerformancePad Pro deals with tempo. In the System Setup pages (page 9), you can specify whether the PerformancePad Pro will follow the tempo associated with each Pattern or whether the unit will follow a global tempo setting, ignoring any tempo data associated with the Patterns. ƒ Selecting Fill Patterns Fill Patterns are the key to creating expressive drum parts. However, Fill is a sophisticated feature that requires some explanation. ƒ Fills are always the same length, and use the same Drum Set, as the associated Main Pattern. This lets you "drop in" a Fill at any time. As soon as you press the FILL button, the Fill takes over from the Main Pattern and starts playing until the end of the Fill. ƒ Fills are transitional Patterns. Example: Suppose an 8-beat A Main Pattern is playing and you press the FILL button on beat 4. The A Fill Pattern will play the last 4 beats and then automatically transition into the B Main Pattern. 13
-
 1
1 -
2
-
3
-
4
-
5
-
6
-
7
-
 8
8 -
 9
9 -
 10
10 -
 11
11 -
 12
12 -
 13
13 -
 14
14 -
 15
15 -
 16
16 -
 17
17 -
 18
18 -
19
-
20
-
21
-
22
-
23
-
24
-
25
-
26
-
27
-
28
-
29
-
30
-
31
-
32
-
33
-
34
-
35
-
36
-
37
-
38
-
39
-
40
-
41
-
42
-
43
-
44
 |
 |
