Alesis PerformancePad Pro User Manual - Page 14
Example, Background
 |
View all Alesis PerformancePad Pro manuals
Add to My Manuals
Save this manual to your list of manuals |
Page 14 highlights
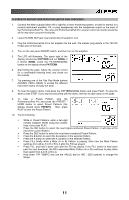
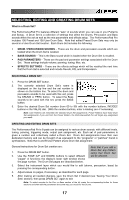
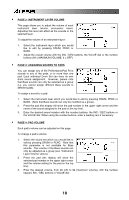
ƒ Conversely, if B Main is playing and you press Fill, after B Fill has played, the PerformancePad Pro will transition to the A Main Pattern. You can select the Fill at any time while the Main Pattern is playing. However, Fills do not have to be transitional Patterns. If you press the FILL button before the Fill has finished playing and hold it down until after the Fill has played (i.e., past the downbeat of the next Pattern), the PerformancePad Pro will return to the original Main Pattern. Example: Suppose an 8-beat A Main Pattern is playing and you press the FILL button on beat 4 but hold it down past beat 8. The A Fill Pattern will play the last 4 beats, then the PerformancePad Pro will return to the A Main Pattern. ƒ Fills cannot start on the downbeat since a Fill, by definition, starts at some point into the Main Pattern. However, anything you record on the Fill downbeat will play on the first downbeat following the Fill (i.e., the downbeat of the next Pattern). To show why this is a useful feature, consider that when coming out of a fill, you'll often want to hit something like a cymbal crash on the downbeat of the next Pattern yet not have that crash repeat every time the Pattern plays. This way of handling Fills lets the downbeat cymbal crash be part of the Fill instead of the Main Pattern. Background This way of handling Patterns explains the logic behind having A, B, and Fill Patterns. In typical pop tunes, A would be the verse and B the chorus. A Fill provides the Fill that transitions from verse to chorus, and B Fill provides the Fill that transitions from chorus to verse. Thus, one of the numbered Patterns may be all you need to put together a tune. This structure makes it possible to put together songs in minutes using the Preset Patterns. It also makes it easy to play drum parts live. For example, if there's a solo happening over the A Main Pattern, you can keep the Pattern repeating until the solo is about to end, at which point you select the Fill that leads out of the A Main Pattern. ƒ The MUTE Button The MUTE button can be used to mute the different instrument layers while the PerformancePad Pro is playing. To Mute Parts: 1. Play a Pattern. 2. Press and hold the MUTE button 3. Press one of the Instrument buttons (DRUM, PERC or BASS.) That particular instrument sound will be muted. 4. To un-mute the instrument layer, press the corresponding button (DRUM, PERC, BASS) while holding down MUTE. ƒ Playing Songs 1. To play a Song, press the PATTERN / SONG button until SONG is displayed in the upper corner of the screen. 2. Select the Song you want to play with the INC / DEC buttons or the VALUE dial. 3. After you select the Song press the PLAY button. 4. To stop playback, press the STOP button. 14
-
 1
1 -
2
-
3
-
4
-
5
-
6
-
7
-
8
-
 9
9 -
 10
10 -
 11
11 -
 12
12 -
 13
13 -
 14
14 -
 15
15 -
 16
16 -
 17
17 -
 18
18 -
 19
19 -
20
-
21
-
22
-
23
-
24
-
25
-
26
-
27
-
28
-
29
-
30
-
31
-
32
-
33
-
34
-
35
-
36
-
37
-
38
-
39
-
40
-
41
-
42
-
43
-
44
 |
 |
