Archos 501123 User Manual - Page 65
Connecting to, the WiFi, Using the Virtual Keyboard
 |
UPC - 690590511231
View all Archos 501123 manuals
Add to My Manuals
Save this manual to your list of manuals |
Page 65 highlights
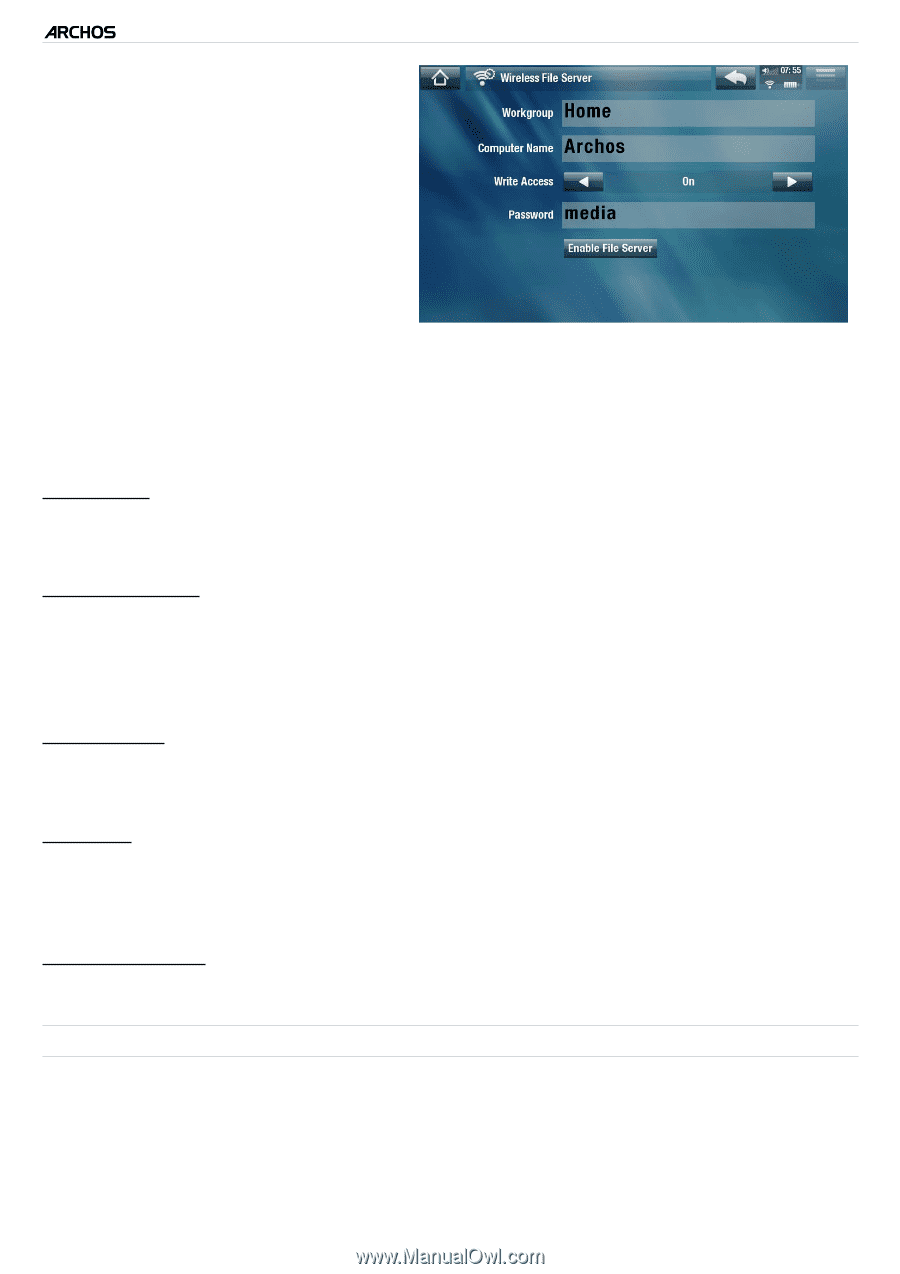
5 & 7 MANUAL V2.0 Other Functions > P. 65 • First, you need to connect to a WiFi network. See Connecting to the WiFi. The device you want to share files with needs to be connected to the same WiFi network. • To enable the file server directly, tap on "Tools" from the Home Screen, choose "File Sharing", and tap on the "Enable File Server" button. While the file server is turned on, other functions of your device are disabled • Your ARCHOS hard drive will then be accessible from your computer's network neighborhood. • If you want to set up your ARCHOS device to appear with a particular name in a particular workgroup on the network, you can change the following parameters (in the "File Sharing" screen): Workgroup - enter the name of the workgroup, using the virtual keyboard. - see: Using the Virtual Keyboard. Computer name - enter the name for the ARCHOS device in the network, using the virtual keyboard (see Using the Virtual Keyboard). - normally, you do not need to change this parameter unless more than one ARCHOS device of the same model name is in the workgroup. Write access - "On" will allow other computers to write to your ARCHOS hard drive. - "Off" will prevent other computers from writing to your device. Password - only appears if the "Write access" parameter is set to "On". - Type in the password for other computers to be able to write to your hard drive (see Using the Virtual Keyboard). Enable file server - tap on this button to turn on the file server. HELP • Select this icon to display a list of useful PDF documents such as this full PDF manual, or other useful guides. • The documents will be in the language that you selected in the "Language and Region" settings. • Tap on a document to open it with the PDF reader. See PDF Documents.
-
 1
1 -
2
-
3
-
4
-
5
-
6
-
7
-
8
-
9
-
10
-
11
-
12
-
13
-
14
-
15
-
16
-
17
-
18
-
19
-
20
-
21
-
22
-
23
-
24
-
25
-
26
-
27
-
28
-
29
-
30
-
31
-
32
-
33
-
34
-
35
-
36
-
37
-
38
-
39
-
40
-
41
-
42
-
43
-
44
-
45
-
46
-
47
-
48
-
49
-
50
-
51
-
52
-
53
-
54
-
55
-
56
-
57
-
58
-
59
-
 60
60 -
 61
61 -
 62
62 -
 63
63 -
 64
64 -
 65
65 -
 66
66 -
 67
67 -
 68
68 -
 69
69 -
 70
70 -
71
-
72
-
73
-
74
-
75
 |
 |