Asus Intel BNU31 Quick Start Guide - Page 16
Microsoft Windows 2000 and Windows NT, Installation
 |
View all Asus Intel BNU31 manuals
Add to My Manuals
Save this manual to your list of manuals |
Page 16 highlights
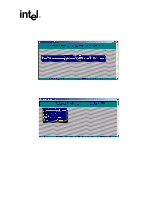
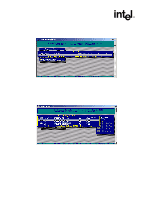
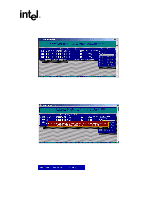
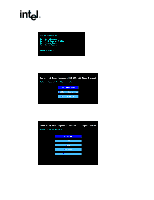
Microsoft Windows 2000 and Win- 2.5 2.5.1 2.5.2 6. A DOS screen will appear. Follow the instructions to extract the image to diskette. After the diskette is created, the Select an OS to Create screen reappears (Figure 2-12). 7. Remove the diskette from the floppy drive and set it aside. You will be instructed when to use it during the OS installation. 8. In the Select an OS to Create screen, select Main Menu. The Select a Type of Diskette to Create screen appears (Figure 2-11). 9. Select Exit & Reboot to reboot the system. 10. Change your computer's BIOS setting so that your system boots normally (not from the CD-ROM). Go to the section for your choice of operating system and continue the installation. Microsoft Windows 2000 and Windows NT Installation Minimum Requirements Microsoft Windows 2000 • RAID Software Suite CD-ROM • 9 MB of free hard disk space (for the RAID Software Suite) • Microsoft Windows 2000 Professional†, Server† or Advanced Server† • RAID Software Suite Driver Installation diskette (see Section 2.4 for instructions to create this diskette) - One blank high density floppy diskette† may be required to create the installation diskette Microsoft Windows NT 4.0 • RAID Software Suite CD-ROM • 9 MB of free hard disk space (for the RAID Software Suite) • RAID Software Suite Driver Installation diskette (see Section 2.4 for instructions to create this diskette) - One blank high density floppy diskette† may be required to create the installation diskette • Microsoft Windows NT 4.0 Workstation†, Server† or Server Enterprise Edition† † Not supplied OS Installation Procedures The following installation procedures highlight the Windows setup options that you must install during OS installation to successfully prepare the operating system for the installation of the RAID Software Suite. 16 Installation Quick Start Guide
-
 1
1 -
2
-
3
-
4
-
5
-
6
-
7
-
8
-
9
-
10
-
 11
11 -
 12
12 -
 13
13 -
 14
14 -
 15
15 -
 16
16 -
 17
17 -
 18
18 -
 19
19 -
 20
20 -
 21
21 -
22
-
23
-
24
-
25
-
26
-
27
-
28
-
29
 |
 |