Asus M4N98TD EVO User Manual - Page 70
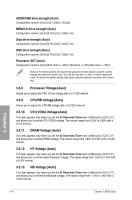
Processor Voltage [Auto], CPU/NB Voltage [Auto], CPU VDDA Voltage [Auto], DRAM Voltage [Auto], HT
 |
View all Asus M4N98TD EVO manuals
Add to My Manuals
Save this manual to your list of manuals |
Page 70 highlights
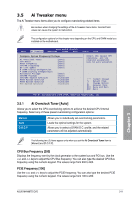
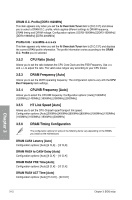
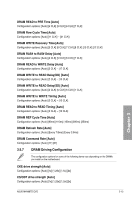
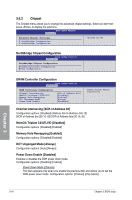
ADDR/CMD drive strength [Auto] Configuration options: [Auto] [1x] [1.25x] [1.5x] [2x] MEMCLK drive strength [Auto] Configuration options: [Auto] [0.75x] [1x] [1.25x] [1.5x] Data drive strength [Auto] Configuration options: [Auto] [0.75x] [1x] [1.25x] [1.5x] DQS drive strength [Auto] Configuration options: [Auto] [0.75x] [1x] [1.25x] [1.5x] Processor ODT [Auto] Configuration options: [Auto] [240 ohms +/- 20%] [120 ohms +/- 20%] [60 ohms +/- 20%] Some of the following items are adjusted by typing the desired values using the numeric keypad and press the key. You can also use the and keys to adjust the value. To restore the default setting, type [auto] using the keyboard and press the key. 3.5.8 Processor Voltage [Auto] Allows you to adjust the CPU VCore voltage with a 0.0125V interval. 3.5.9 CPU/NB Voltage [Auto] Allows you to adjust the CPU/NB voltage with a 0.0125V interval. 3.5.10 CPU VDDA Voltage [Auto] This item appears only when you set the Ai Overclock Tuner item to [Manual] or [D.O.C.P], and allows you to set the CPU VDDA voltage. The values range from 2.50V to 2.80V with a 0.10V interval. 3.5.11 DRAM Voltage [Auto] This item appears only when you set the Ai Overclock Tuner item to [Manual] or [D.O.C.P], and allows you to set the DRAM voltage. The values range from 1.80V to 2.50V with a 0.02V interval. 3.5.12 HT Voltage [Auto] This item appears only when you set the Ai Overclock Tuner item to [Manual] or [D.O.C.P], and allows you to set the HyperTransport voltage. The values range from 1.20V to 1.50V with a 0.02V interval. 3.5.13 NB Voltage [Auto] This item appears only when you set the Ai Overclock Tuner item to [Manual] or [D.O.C.P], and allows you to set the NorthBridge voltage. The values range from 1.10V to 1.40V with a 0.02V interval. Chapter 3 3-14 Chapter 3: BIOS setup
-
 1
1 -
2
-
3
-
4
-
5
-
6
-
7
-
8
-
9
-
10
-
11
-
12
-
13
-
14
-
15
-
16
-
17
-
18
-
19
-
20
-
21
-
22
-
23
-
24
-
25
-
26
-
27
-
28
-
29
-
30
-
31
-
32
-
33
-
34
-
35
-
36
-
37
-
38
-
39
-
40
-
41
-
42
-
43
-
44
-
45
-
46
-
47
-
48
-
49
-
50
-
51
-
52
-
53
-
54
-
55
-
56
-
57
-
58
-
59
-
60
-
61
-
62
-
63
-
64
-
 65
65 -
 66
66 -
 67
67 -
 68
68 -
 69
69 -
 70
70 -
 71
71 -
 72
72 -
 73
73 -
 74
74 -
 75
75 -
76
-
77
-
78
-
79
-
80
-
81
-
82
-
83
-
84
-
85
-
86
-
87
-
88
-
89
-
90
-
91
-
92
-
93
-
94
-
95
-
96
-
97
-
98
-
99
-
100
-
101
-
102
-
103
-
104
-
105
-
106
-
107
-
108
-
109
-
110
-
111
-
112
-
113
-
114
-
115
-
116
-
117
-
118
 |
 |
