Asus OPlay TV Pro User Manual - Page 15
Rear panel - smart tv
 |
View all Asus OPlay TV Pro manuals
Add to My Manuals
Save this manual to your list of manuals |
Page 15 highlights
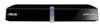
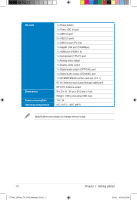
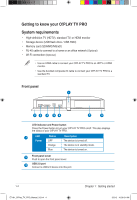
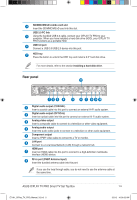
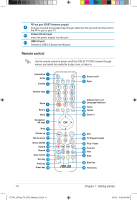
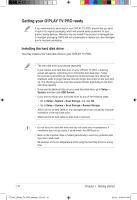
4 SD/MMC/MS/xD combo card slot Insert the SD/MMC/MS/xD card into this slot. USB 3.0 PC link 5 Using the bundled USB 3.0 cable, connect your O!PLAY TV PRO to your computer. When you have installed a hard disk drive (HDD), your O!PLAY TV PRO functions as a portable HDD. 6 USB 3.0 port Connect a USB 3.0/USB 2.0 device into this port. 7 HDD tray Press the button to unlock the HDD tray and install a 3.5" hard disk drive. For more details, refer to the section Installing a hard disk drive. Rear panel 11 12 3 4 5 6 7 8 9 10 1 Digital audio output (COAXIAL) Insert a coaxial cable into this port to connect an external Hi-Fi audio system. 2 Digital audio output (OPTICAL) Insert an optical cable into this port to connect an external Hi-Fi audio system. 3 Analog video output Insert a composite cable to connect to a television or other video equipment. 4 Analog audio output Insert the audio cable jacks to connect to a television or other audio equipment. 5 Component output Insert a YPbPr video cable to connect to a TV or monitor. 6 LAN port Connect to a Local Area Network (LAN) through a network hub. HDMI port 7 Insert an HDMI cable into this port to connect to a high-definition multimedia interface (HDMI) device. 8 RF-in port (DVBT Antenna input) Insert the bundled antenna cable into this port. If you use the loop through cable, you do not need to use the antenna cable at the same time. ASUS O!PLAY TV PRO Smart TV Set Top Box E7161_O!Play_TV_PRO_Manual_V2.in5 5 1-5 3/2/12 10:36:32 AM
-
 1
1 -
2
-
3
-
4
-
5
-
6
-
7
-
8
-
9
-
 10
10 -
 11
11 -
 12
12 -
 13
13 -
 14
14 -
 15
15 -
 16
16 -
 17
17 -
 18
18 -
 19
19 -
 20
20 -
21
-
22
-
23
-
24
-
25
-
26
-
27
-
28
-
29
-
30
-
31
-
32
-
33
-
34
-
35
-
36
-
37
-
38
-
39
-
40
-
41
-
42
-
43
-
44
-
45
-
46
-
47
-
48
-
49
-
50
-
51
-
52
-
53
-
54
-
55
-
56
-
57
-
58
-
59
-
60
-
61
-
62
-
63
-
64
-
65
-
66
-
67
-
68
-
69
-
70
-
71
-
72
-
73
-
74
-
75
-
76
-
77
-
78
 |
 |