Asus P3V133 P3V133 User Manual - Page 16
Hardware Setup Steps, Motherboard Settings
 |
View all Asus P3V133 manuals
Add to My Manuals
Save this manual to your list of manuals |
Page 16 highlights
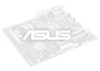
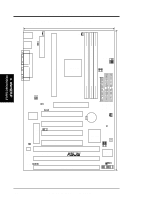
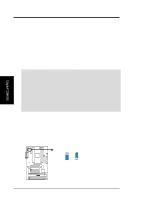
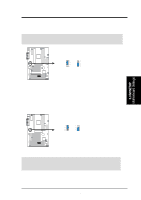
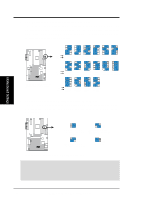
3. H/W SETUP Layout Contents 3. HARDWARE SETUP 3.3 Hardware Setup Steps Before using your computer, you must complete the following steps: 1. Check Motherboard Settings 2. Install Memory Modules 3. Install the Central Processing Unit (CPU) 4. Install Expansion Cards 5. Connect Ribbon Cables, Panel Wires, and Power Supply 6. Setup the BIOS Software 3.4 Motherboard Settings This section explains in detail how to change your motherboard's function settings through the use of switches and/or jumpers. WARNING! Computer motherboards and expansion cards contain very delicate Integrated Circuit (IC) chips. To protect them against damage from static electricity, you should follow some precautions whenever you work on your computer. 1. Unplug your computer when working on the inside. 2. Use a grounded wrist strap before handling computer components. If you do not have one, touch both of your hands to a safely grounded object or to a metal object, such as the power supply case. 3. Hold components by the edges and try not to touch the IC chips, leads or connectors, or other components. 4. Place components on a grounded antistatic pad or on the bag that came with the component whenever the components are separated from the system. Jumpers 1. Keyboard Power Up Setting (KBPWR) This allows you to disable or enable the keyboard power up function. Set to Enable if you want to use your keyboard (by pressing ) to power up your computer. This feature requires an ATX power supply that can supply at least 300mA on the +5VSB lead. The default is set to Disable because not all computers have the appropriate ATX power supply. Your computer will not function if you set this to Enable and if you do not have the right ATX power supply. KBPWR 3 2 1 Disable (Default) 3 2 1 Enable P3V133 R P3V133 Keyboard Power Up 16 ASUS P3V133 User's Manual
-
 1
1 -
2
-
3
-
4
-
5
-
6
-
7
-
8
-
9
-
10
-
 11
11 -
 12
12 -
 13
13 -
 14
14 -
 15
15 -
 16
16 -
 17
17 -
 18
18 -
 19
19 -
 20
20 -
 21
21 -
22
-
23
-
24
-
25
-
26
-
27
-
28
-
29
-
30
-
31
-
32
-
33
-
34
-
35
-
36
-
37
-
38
-
39
-
40
-
41
-
42
-
43
-
44
-
45
-
46
-
47
-
48
-
49
-
50
-
51
-
52
-
53
-
54
-
55
-
56
-
57
-
58
-
59
-
60
-
61
-
62
-
63
-
64
-
65
-
66
-
67
-
68
-
69
-
70
-
71
-
72
-
73
-
74
-
75
-
76
-
77
-
78
-
79
-
80
-
81
-
82
-
83
-
84
-
85
-
86
-
87
-
88
-
89
-
90
-
91
-
92
-
93
-
94
-
95
-
96
 |
 |