Asus PIKE 2108 PIKE 2108 user's manual - Page 24
Add To Array, Access Policy
 |
View all Asus PIKE 2108 manuals
Add to My Manuals
Save this manual to your list of manuals |
Page 24 highlights
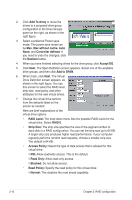
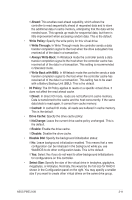
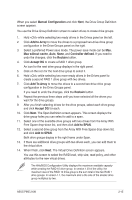
2. Click Add To Array to move the drives to a proposed drive group configuration in the Drive Groups panel on the right, as shown in the right figure. 3. Select a preferred Power save mode. The power save mode can be Max, Max without cache, Auto, None, and Controller defined. If you need to undo the changes, click the Reclaim button. 4. When you have finished selecting drives for the drive group, click Accept DG. 5. Click Next. The Span Definition screen appears. Select one of the available drive groups, and then click Add to SPAN. 6. When finish, click Next. The Virtual Drive Definition screen appears, as shown in the right figure. You use this screen to select the RAID level, strip size, read policy, and other attributes for the new virtual drives. 7. Change the virtual drive options from the defaults listed on the screen as needed. Here are brief explanations of the virtual drive options: • RAID Level: The drop-down menu lists the possible RAID levels for the virtual drive. Select RAID 0. • Strip Size: The strip size specifies the size of the segment written to each disk in a RAID configuration. You can set the strip size up to 64 KB. A larger strip size produces higher read performance. If your computer regularly performs random read requests, choose a smaller strip size. The default is 64 KB. • Access Policy: Select the type of data access that is allowed for this virtual drive: ◊ RW: Allow read/write access. This is the default. ◊ Read Only: Allow read-only access. ◊ Blocked: Do not allow access. • Read Policy: Specify the read policy for this virtual drive: ◊ Normal: This disables the read ahead capability. 2-10 Chapter 2: RAID configuration
-
 1
1 -
2
-
3
-
4
-
5
-
6
-
7
-
8
-
9
-
10
-
11
-
12
-
13
-
14
-
15
-
16
-
17
-
18
-
 19
19 -
 20
20 -
 21
21 -
 22
22 -
 23
23 -
 24
24 -
 25
25 -
 26
26 -
 27
27 -
 28
28 -
 29
29 -
30
-
31
-
32
-
33
-
34
-
35
-
36
-
37
-
38
-
39
-
40
-
41
-
42
-
43
-
44
-
45
-
46
-
47
-
48
-
49
-
50
-
51
-
52
-
53
-
54
-
55
-
56
-
57
-
58
-
59
-
60
-
61
-
62
-
63
-
64
-
65
-
66
-
67
-
68
-
69
-
70
-
71
-
72
-
73
-
74
-
75
-
76
-
77
-
78
-
79
-
80
-
81
-
82
-
83
-
84
 |
 |
