Asus T2-P T2-P User Manual - Page 35
Installing a second optical drive
 |
View all Asus T2-P manuals
Add to My Manuals
Save this manual to your list of manuals |
Page 35 highlights
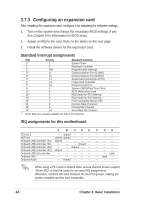
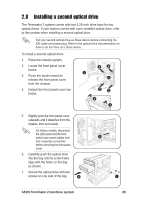
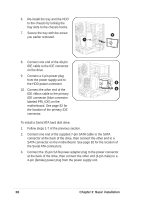
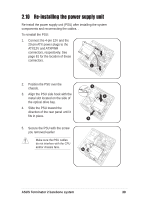
2.8 Installing a second optical drive The Terminator 2 system comes with two 5.25-inch drive bays for two optical drives. If your system comes with a pre-installed optical drive, refer to this section when installing a second optical drive. Set your second optical drive as Slave device before connecting the IDE cable and power plug. Refer to the optical drive documentation on how to set the drive as a Slave device. To install a second optical drive: 1. Place the chassis upright. 2. Locate the front panel cover hooks. 3. Press the hooks inward to release the front panel cover from the chassis. 4. Detach the front panel cover top hooks. 3 3 1 2 3 3 4 4 5. Slightly push the front panel cover outwards until it detaches from the chassis, then set it aside. On Deluxe models, disconnect the LED panel and the front audio button panel cables from their respective connectors before removing the front panel cover. 6. Carefully push the optical drive into the bay until its screw holes align with the holes on the bay as shown. 7. Secure the optical drive with two screws on one side of the bay. 6 5 7 ASUS Terminator 2 barebone system 35
-
 1
1 -
2
-
3
-
4
-
5
-
6
-
7
-
8
-
9
-
10
-
11
-
12
-
13
-
14
-
15
-
16
-
17
-
18
-
19
-
20
-
21
-
22
-
23
-
24
-
25
-
26
-
27
-
28
-
29
-
 30
30 -
 31
31 -
 32
32 -
 33
33 -
 34
34 -
 35
35 -
 36
36 -
 37
37 -
 38
38 -
 39
39 -
 40
40 -
41
-
42
-
43
-
44
-
45
-
46
-
47
-
48
-
49
-
50
-
51
-
52
-
53
-
54
-
55
-
56
-
57
-
58
-
59
-
60
-
61
-
62
-
63
-
64
-
65
-
66
-
67
-
68
-
69
-
70
-
71
-
72
-
73
-
74
-
75
-
76
-
77
-
78
-
79
-
80
-
81
-
82
-
83
-
84
-
85
-
86
-
87
-
88
-
89
-
90
-
91
-
92
-
93
-
94
-
95
-
96
-
97
-
98
-
99
-
100
-
101
-
102
-
103
-
104
-
105
-
106
-
107
-
108
-
109
-
110
-
111
-
112
-
113
-
114
-
115
-
116
-
117
-
118
-
119
-
120
-
121
-
122
-
123
-
124
-
125
-
126
-
127
-
128
-
129
-
130
 |
 |
