Asus T2-P T2-P User Manual - Page 37
Installing a hard disk drive HDD
 |
View all Asus T2-P manuals
Add to My Manuals
Save this manual to your list of manuals |
Page 37 highlights
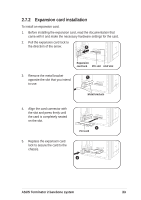
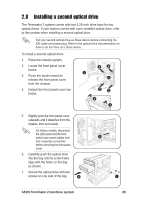
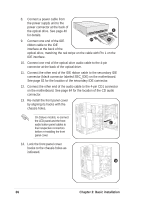
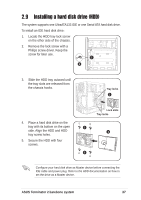
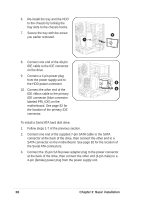
2.9 Installing a hard disk drive (HDD) The system supports one UltraATA133 IDE or one Serial ATA hard disk drive. To install an IDE hard disk drive: 1. Locate the HDD tray lock screw on the other side of the chassis. 2. Remove the lock screw with a Philips screw driver. Keep the screw for later use. 1 2 3. Slide the HDD tray outward until the tray slots are released from the chassis hooks. Tray locks 3 4. Place a hard disk drive on the tray with its bottom on the open side. Align the HDD and HDD tray screw holes. 5. Secure the HDD with four screws. Lock slots Tray locks 5 4 5 Configure your hard disk drive as Master device before connecting the IDE cable and power plug. Refer to the HDD documentation on how to set the drive as a Master device. ASUS Terminator 2 barebone system 37
-
 1
1 -
2
-
3
-
4
-
5
-
6
-
7
-
8
-
9
-
10
-
11
-
12
-
13
-
14
-
15
-
16
-
17
-
18
-
19
-
20
-
21
-
22
-
23
-
24
-
25
-
26
-
27
-
28
-
29
-
30
-
31
-
 32
32 -
 33
33 -
 34
34 -
 35
35 -
 36
36 -
 37
37 -
 38
38 -
 39
39 -
 40
40 -
 41
41 -
 42
42 -
43
-
44
-
45
-
46
-
47
-
48
-
49
-
50
-
51
-
52
-
53
-
54
-
55
-
56
-
57
-
58
-
59
-
60
-
61
-
62
-
63
-
64
-
65
-
66
-
67
-
68
-
69
-
70
-
71
-
72
-
73
-
74
-
75
-
76
-
77
-
78
-
79
-
80
-
81
-
82
-
83
-
84
-
85
-
86
-
87
-
88
-
89
-
90
-
91
-
92
-
93
-
94
-
95
-
96
-
97
-
98
-
99
-
100
-
101
-
102
-
103
-
104
-
105
-
106
-
107
-
108
-
109
-
110
-
111
-
112
-
113
-
114
-
115
-
116
-
117
-
118
-
119
-
120
-
121
-
122
-
123
-
124
-
125
-
126
-
127
-
128
-
129
-
130
 |
 |
