Behringer MonoPoly Quick Start Guide - Page 13
MONOPOLY Getting started
 |
View all Behringer MonoPoly manuals
Add to My Manuals
Save this manual to your list of manuals |
Page 13 highlights
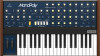
24 MONOPOLY MONOPOLY Getting started OVERVIEW This 'getting started' guide will help you set up the MONOPOLY analog synthesizer and briefly introduce its capabilities. CONNECTION To connect the MONOPOLY to your system, please consult the connection guide earlier in this document. SOFTWARE SETUP The MONOPOLY is a USB Class Compliant MIDI device, and so no driver installation is required. The MONOPOLY does not require any additional drivers to work with Windows and MacOS. The "Synthtool" application allows you to select the MIDI channel number and to set and adjust various parameters of the MONOPOLY to suit your preferences. SysEx commands can also be used. Please see the information later in this manual. HARDWARE SETUP Make all the connections in your system. Apply power to the MONOPOLY using the supplied power adapter only. Ensure your sound system is turned down. Turn on the MONOPOLY power switch. WARM UP TIME We recommend leaving 15 minutes or more time for the MONOPOLY to warm up before recording or live performance. (Longer if it has been brought in from the cold.) This will allow the precision analog circuits time to reach their normal operating temperature and tuned performance. FIRST SOUNDS The following steps will help you start making sounds from your new synthesizer: 1. Turn up the VOLUME a small amount, and make sure the adjacent switch is set to High or Low (not Off). 2. Turn the VCF CUTOFF to maximum. 3. Turn the VCA EG SUSTAIN to 5 or more, and ATTACK to 0. 4. Turn the VCO1 LEVEL to maximum, and its WAVEFORM to triangular. 5. For the wheels to work, set their INTENSITY knobs to 5 or more. Initially, set the MG1 wheel to minimum. 6. Play the keyboard and adjust the volume to a safe and comfortable level. 7. Adjust the LEVEL and WAVEFORM of the other VCOs and experiment with the settings and tuning. 8. The NOISE LEVEL can also be adjusted to add white noise. VCO SECTION The MONOPOLY has four voltage controlled oscillators (VCO), and an internal Noise generator. Each of these, and any combination, are used to generate sound. The VCO controls allows you to adjust the volume of each VCO, select its waveform, its octave, and its tuning. The MASTER TUNE adjusts all VCOs at the same time. DETUNE will slightly separate the tuning of each VCO to create a fatter sound similar to an ensemble. TRANSPOSE will move all VCOs up or down an octave. If you select PWM and PW waveforms, then you can adjust the modulation of the PWM, and the width of the PW. VCF FILTER AND EG SECTION The voltage controlled filter (VCF) is a low-pass filter, where audio frequencies above the cutoff frequency are attenuated. Adjust the Cutoff Frequency, Resonance, and Intensity, and listen to their effects on the sound. In the VCF EG envelope generator, adjust the Attack time, Decay time, Sustain level and Release time; they affect the cutoff frequency with time, when a note is played. The VCF EG can also affect the modulation of the PWM waveform, and the frequency modulation in the Effects section. The keyboard tracking knob affects how much the filter is affected by the frequency of notes that are played. VCA EG SECTION Adjust the voltage controlled amplifier envelope generator controls: Attack time, Decay time, Sustain level, and Release time. These affect the overall level with time, when a note is played. MG1 and MG2 These are two separate modulation generators, and each can modulate different parameters for very interesting effects. MG1 has a frequency control, and the waveform can be selected from triangle, reverse-sawtooth, sawtooth, and pulse. MG1 can be used to modulate the width of the PWM waveform, and the frequency modulation in the effects section. The MG1 wheel adjusts the intensity, and it can modulate VCO1 (or slave VCO, if EFFECTS is on), the pitch, or the VCF cutoff frequency. MG2 has a frequency control, and a triangular waveform. The frequency control can be used to adjust the Arpeggio tempo (make sure it is not on zero when using Arpeggio). MG2 can also modulate the width of the PWM waveform. KEY ASSIGN MODE These illuminated switches select how the keyboard is assigned to the synthesizer, with HOLD, 2 monophonic, and 2 Polyphonic modes. HOLD - holds all notes played. (Select a KEY ASSIGN switch, before pressing HOLD.) CHORD MEMORY - play and hold any desired chord in POLY or UNISON/SHARE mode, and then press CHORD MEMORY. The chord will be memorized and can be played back with a single key press. Any note played will represent the lowest note of the chord. Note: The memory is saved unless CHORD MEMORY is pressed when notes are still being held, or if the synthesizer is turned off. HOLD can be used to help create the chord, and CHORD MEMORY can also be used with the Arpeggiator. UNISON - this monophonic mode plays all the VCOs when playing one key. Each VCO can be adjusted individually. UNISON/SHARE - this polyphonic mode automatically shares the number of notes played, among the VCOs: 1 note: VCO1-4 2 notes: VCO1-2 (first note) and VCO3-4 (second) 3 notes: VCO 1,2,3 (no VCO4). 4 notes: VCO1,2,3,4 If more than 4 notes are played, then VCO1 will play the latest note. Use the AUTO DAMP switch to select if released notes are sustained, or are damped. POLY - this conventional polyphonic mode assigns the notes in the playing order to each VCO: 1 note: VCO1 2 notes: VCO1 (first note), VCO2 (second) 3 notes: VCO1 (first note), VCO2 (second), VCO3 (third) 4 notes: VCO1 (first note), VCO2 (second), VCO3 (third), VCO4 (fourth) If more than 4 notes are played, then the lowest available VCO will play the latest note. Use the AUTO DAMP switch to select if released notes are sustained or damped. EFFECTS The X-MOD, FREQ-MOD, and MODE controls are used to setup the effects, and the EFFECTS switch is used to turn these on or off. The effects are based upon the relationship between master and slave VCOs (as set by the SINGLE/DOUBLE switch). X-MOD - adjusts the level of cross-modulation when in X-MOD or S & X mode. Slave VCOs are frequencymodulated by the Master VCOs. FREQ MOD - the knob and switch control the frequency modulation given to the slave VCOs only. The knob controls the intensity of the frequency modulation on the slave VCOs. The VCF EG/MG1 switch selects the source to sweep the slave VCOs, either by the triggering of the VCF envelope generator, or by modulation generator 1. MOD MODES - SYNC - the slave VCOs are synchronised in tune with their respective master VCO. This can also be used to prevent VCOs from beating in and out if they are slightly out of tune. S & X - a combination of synchronised oscillators (S) and cross-modulation (X). X-MOD - cross-modulation. SINGLE - VCO1 is the master and VCO2-4 are slaves DOUBLE - VCO1 is a master and VCO2 its slave. VCO3 is a master and VCO4 its slave. ARPEGGIATOR SECTION Three switches allow you to set up the arpeggiator, and the MG2 FREQUENCY knob adjusts the tempo. ALL/2OCT/1OCT - selects the octave range. UP/DOWN/UP-DOWN - selects the order in which notes are played back, ascending, descending, or both. LATCH/ON/OFF - select LATCH to hold the arpeggio when all notes are released. Select ON or OFF to engage/disengage the arpeggio. Note: Make sure the MG2 FREQUENCY knob is not on zero when first creating an arpeggio. The arpeggio can also be triggered by an external device, using the rear panel arpeggio input. AUTO CALIBRATION To enter the automatic calibration mode, hold the EFFECTS button while powering on the unit. The VCOs will be calibrated in sequence. If successful, each related VCO LED will flash; if not successful, they will not light up. To return to the factory calibration, hold the HOLD and EFFECTS buttons while you power on the unit. FIRMWARE UPDATE The SynthTool App is available as a free download from the MONOPOLY product page of our website: behringer.com. The latest file can be downloaded and stored on your computer, and then used to update the MONOPOLY if required. HAVE FUN The MONOPOLY has Trigger and CV inputs and outputs that allow for further experimentation and expansion to other MONOPOLY units and modular synthesizer equipment. Make copies of the patch sheet at the end of this manual, and record your favorite settings. We hope that you will enjoy your new MONOPOLY synthesizer. Quick Start Guide 25
-
 1
1 -
2
-
3
-
4
-
5
-
6
-
7
-
 8
8 -
 9
9 -
 10
10 -
 11
11 -
 12
12 -
 13
13 -
 14
14 -
 15
15 -
 16
16 -
 17
17 -
 18
18 -
19
-
20
-
21
-
22
-
23
 |
 |
