Behringer MonoPoly Quick Start Guide - Page 6
MONOPOLY Controls
 |
View all Behringer MonoPoly manuals
Add to My Manuals
Save this manual to your list of manuals |
Page 6 highlights
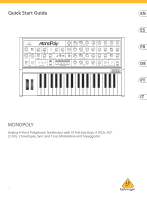
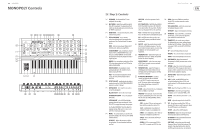
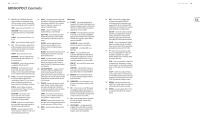
10 MONOPOLY MONOPOLY Controls (9) (10) (11) (12) (13) (14) (15)(16) (17) (18) (19) (8) (20) (21) (7) (22) (6) (23) (5) (24) (4) (25) (3) (2) (1) (26) (27) (28) (29) (30) (31) (32) (33) (34) (35) (36) (37) Quick Start Guide 11 (EN) Step 2: Controls (1) KEYBOARD - the keyboard has 37 semiweighted, full-size keys. (2) MG1 WHEEL - adjust the modulation depth from off to maximum. The operation of both wheels can be adjusted and customized using the WHEEL controls (7). (3) BEND WHEEL - raise or lower the pitch, with a center detent position. (4) KEY ASSIGN MODE - these switches select how the keyboard is assigned to the synthesizer. (See "Getting Started" for more details. HOLD - holds all notes played. (Select a KEY ASSIGN switch, before pressing HOLD.) CHORD MEMORY - play and hold any desired chord in POLY or UNISON/SHARE mode, and then press CHORD MEMORY. The chord will be memorized and can be played back with a single key press. UNISON - this monophonic mode plays all the VCOs when playing one key. Each VCO can be adjusted individually. UNISON/SHARE - this polyphonic mode automatically shares the number of notes played, among the VCOs POLY - this conventional polyphonic mode assigns the notes in the playing order to each VCO. (5) EFFECTS ON/OFF - enable/disable the effects produced using the X-MOD/FREQ-MOD/MODE controls (see item 11 below). (6) ARPEGGIATOR - three switches are used to set up the arpeggiator: ALL/2OCT/1OCT - selects the octave range. UP/DOWN/UP-DOWN - selects the playback note order. LATCH/ON/OFF - select LATCH to hold the arpeggio when all notes are released. Select ON or OFF to engage/disengage the arpeggio. Use the MG2 FREQUENCY knob to adjust the arpeggio tempo. Make sure it is not on zero when first creating an arpeggio. (7) WHEEL - this section allows you to select the operation and adjust the intensity of the BEND and MG1 wheels. INTENSITY - adjusts the intensity or effect of each wheel. On zero, the wheels will have no effect. SELECTOR - select the operation of each wheel: VC0 1/SLAVE VCOs - the BEND wheel affects VCO1 if the EFFECTS switch is Off. If EFFECTS is On, then it affects the slave VCOs. The MG1 wheel can modulate VCO1 or the slave VCOs. Pitch - the BEND wheel can pitch bend all VCOs. The MG1 wheel can modulate the pitch. VCF - the BEND wheel directly affects the filter cutoff frequency, and the MG1 wheel modulates it. (8) OUTPUT - adjust the overall volume level of the main and headphone outputs. Turn this down before turning on power, or connecting headphones or external amplifiers and equipment. (9) FREQUENCY MG1 - adjust the frequency of Modulation Generator 1 (MG1). The LED will flash at the current frequency. WAVEFORM MG1 - select the wave shape of MG1 from: triangular, reverse sawtooth, sawtooth, or pulse. (10) FREQUENCY MG2 - adjust the frequency of Modulation Generator 2 (MG2). The LED will flash at the current frequency. The MG2 waveform is triangular. (11) X-MOD/FREQ-MOD/MODE - use these controls to setup the effects, and then use the EFFECTS switch to turn these on or off. The various effects are based upon the relationship between a master VCO, and slave VCOs. X-MOD - adjusts the level of cross-modulation when in X-MOD or S & X mode. FREQ MOD - the knob and switch control the frequency modulation given to the slave VCOs only (as set by the SINGLE/DOUBLE switch). MOD MODES - SYNC - the slave VCOs are synchronised in tune with their respective master VCO. S & X - a combination of synchronised oscillators (S) and cross-modulation (X). X-MOD - cross-modulation, where VCOs are frequency-modulated by another VCO. SINGLE - VCO1 is the master and VCO2-4 are all slaves DOUBLE - VCO1 is a master and VCO2 its slave. VCO3 is a master and VCO4 its slave. (12) PWM- if you select PWM as a waveform for the VCOs, use these controls to make adjustments: VCO EG/MG1/MG2 - selects the source used to modulate the pulse width. INTENSITY - adjusts the modulation intensity. (13) PW WIDTH - if you select PW as a waveform for the VCOs, use this control to adjust the pulse width from narrow to wide. (14) TRANSPOSE - this switch raises or lowers the keyboard by one octave, without having to adjust any VCO settings. It also affects the rear panel CV OUT, and the VCF's KYB TRACK control. UP - raises the keyboard by one octave. NORMAL - this is the normal octave position. DOWN - lowers the keyboard by one octave. (15) PORTAMENTO - adjust the amount of Portamento (or Glide), between notes as they are played. (16) DETUNE - adjust this control in Unison mode to detune the 4 VCOs in opposite directions to produce a fatter sound. Reset to zero to return all the VCOs for polyphonic playing. (17) MASTER TUNE - adjust the frequency of all VCOs 1 to 4. (18) VCO 1, 2, 3, 4 - the MONOPOLY has four voltage controlled oscillators (VCO), with similar controls. An LED indicates when each VCO is on. TUNE- adjust the frequency of VCO 2, 3, or 4. WAVEFORM - select the wave shape from: triangular, reverse sawtooth, PWM, or PW. OCTAVE - select the VCO octave from 2', 4', 8', and 16'. LEVEL - adjust the output level of each VCO. (19) VCF - the voltage controlled filter (VCF) is a low-pass filter, where audio frequencies above the cutoff frequency are attenuated. CUTOFF - adjusts the cutoff frequency. RESONANCE - adjusts the amount of volume level boost given at the cutoff frequency. EG INTENSITY - adjusts how much the Filter Envelope affects the VCF. KYB TRACK - adjusts how much the cutoff frequency follows (tracks) the keyboard. (For example, if you play higher notes, does the cutoff frequency also increase, or stay fixed.)
-
 1
1 -
 2
2 -
 3
3 -
 4
4 -
 5
5 -
 6
6 -
 7
7 -
 8
8 -
 9
9 -
 10
10 -
 11
11 -
 12
12 -
13
-
14
-
15
-
16
-
17
-
18
-
19
-
20
-
21
-
22
-
23
 |
 |
