Behringer MonoPoly Quick Start Guide - Page 7
Paso 2: Controles
 |
View all Behringer MonoPoly manuals
Add to My Manuals
Save this manual to your list of manuals |
Page 7 highlights
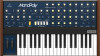
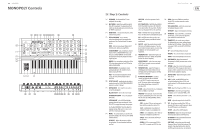
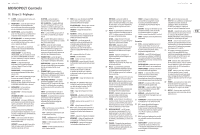
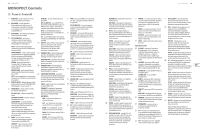
12 MONOPOLY MONOPOLY Controls (20) VCF EG - these knobs adjust the envelope generator (EG) affecting the voltage controlled filter (VCF). The controls affect the change in cutoff frequency with time. ATTACK - adjust the time for the cutoff frequency to reach the frequency set by the CUTOFF control. DECAY TIME - adjust the time for the cutoff frequency to decay down to the SUSTAIN frequency after the attack time is over. SUSTAIN - adjust the cutoff to a frequency which is sustained after the attack time and initial decay time have been reached. RELEASE - adjust the time taken for the cutoff frequency to release after the note is released. (21) VCA EG - these knobs adjust the envelope generator (EG) affecting the voltage controlled amplifier (VCA). The controls affect the change in volume with time. ATTACK - adjust the time for the amplitude to reach its maximum level. DECAY TIME - adjust the time for the amplitude to decay down to the SUSTAIN level after the attack time is over. SUSTAIN - adjust the amplitude to a level which is sustained after the attack time and initial decay time have been reached. RELEASE - adjust the time taken for the amplitude level to decrease after the note is released. (22) POWER - turn the synthesizer on or off. Make sure all the connections are made before turning on the unit. The LED shows when power is applied and the synthesizer is turned on. (23) AUTO DAMP ON/OFF - when OFF, and a chord is played in POLY mode, the chord will continue to play until all notes are released, or a new note is played. When ON, only non-released notes will continue to play; the others are damped. (24) TRIGGER - there are two options for how the attack cycle of both envelope generators are triggered by the keyboard. (This also affects the rear panel TRIG OUT.) SINGLE - a new note will trigger the attack cycle, but not if previous notes are being held, or HOLD is on. MULTIPLE - a new note will trigger the attack cycle, even if previous notes are being held, or HOLD is on. (25) NOISE - adjust the level of the internal Noise source. Rear Panel (26) DC INPUT - connect the supplied 12V DC power adapter here. The power adapter can be plugged into an AC outlet capable of supplying from 100V to 240V at 50 Hz/60 Hz. Use only the power adapter supplied. (27) USB PORT - This USB type B jack allows connection to a computer. The MONOPOLY will show up as a class-compliant USB MIDI device, capable of supporting MIDI in and out. USB MIDI IN - accepts incoming MIDI data from an application. USB MIDI OUT - sends MIDI data to an application. (28) MIDI IN - this 5-pin DIN jack receives MIDI data from an external source. This will commonly be an external MIDI keyboard, hardware sequencer, or a computer equipped with a MIDI interface. MIDI OUT - this 5-pin DIN jack outputs MIDI data. MIDI THRU - this 5-pin DIN jack is used to pass through MIDI data received at the MIDI INPUT. (29) ARPEGGIO - use this 1/4" TRS clock input to trigger the Arpeggio using an external device. (30) PORTAMENTO - use this to engage or disengage the portamento using a footswitch. (31) VCF - the filter's cutoff frequency can be modulated using a pedal, such as the Behringer FCV100 V2 or FC600 V2 expression pedal (with the CV polarity set to TRS, and using a TRS cord). (32) VCO - the pitch can also be controlled using an pedal, such as those mentioned above. (33) TRIG POLARITY - selects the triggering polarity of TRIG In and Out, from either +15V (positive-going, Voltage triggering) or ground (negative-going, Switch triggering). (34) TRIG - connect to the trigger inputs and outputs of another MONOPOLY unit, compatible monophonic synthesizers, or other modular equipment. Set the TRIG POLARITY switch to match the trigger inputs and outputs of your external equipment. TRIG OUT - connect this output to the trigger input of your external equipment. The output type is set by the TRIG POLARITY switch and follows the SINGLE/MULTIPLE TRIGGER front panel switch. TRIG IN - connect this input to the trigger output of your external equipment. A trigger signal will turn all VCOs on and trigger the VCF and VCA Envelope Generators. (35) CV - connect to the CV inputs and outputs of another MONOPOLY unit, compatible monophonic synthesizer, or other modular equipment. These should use the (1V/octave) control voltage system. CV IN - connect this input to the CV output of your external equipment. Only the external voltages applied to this input will control the note. The VCOs will be in mono unison mode. CV OUT - connect this output to the CV input of your external equipment. The output is of the highest note, last played. The front panel TRANSPOSE switch will affect the CV OUT value by 1 volt changes per octave. (36) PHONES - connect your headphones to this 1/4" TRS output. Make sure the headphone volume is turned down before putting on headphones. (37) OUTPUT - connect this 1/4" TS output to the line-level input of your external equipment. Quick Start Guide 13 (ES) Paso 2: Controles (1) TECLADO - el teclado tiene 37 teclas de (7) WHEEL - esta sección le permite elegir el MOD MODES - tamaño standard semicontrapesadas. (2) RUEDA MG1 - ajusta la profundidad de funcionamiento y ajustar la intensidad del efecto de las ruedas BEND y MG1. SYNC - los VCOs esclavos están sincronizados y afinados con sus VCO modulación entre off y máximo. Puede ajustar INTENSITY - ajusta la intensidad o efecto de máster respectivos. y personalizar el funcionamiento de ambas ruedas usando los controles WHEEL (7). cada una de las ruedas. En la posición cero, las ruedas no tendrán ningún efecto. S & X - una combinación de osciladores sincronizados (S) y modulación cruzada (X). (3) RUEDA BEND - le permite producir una inflexión tonal (subir o bajar el tono), con una posición de muesca central. SELECTOR - elige el funcionamiento de cada rueda: VC0 1/SLAVE VCOs - la rueda BEND afectará X-MOD - modulación cruzada, en la que la frecuencia de los VCOs es modulada por otro VCO. (4) KEY ASSIGN MODE - estos interruptores le permiten elegir cómo es asignado el teclado al sintetizador. (Vea "Primeros pasos" para más al VCO1 si el interruptor EFFECTS está en Off. Si EFFECTS está en On, entonces afectará a los VCOs esclavos. La rueda MG1 puede modular SINGLE - VCO1 es el máster y los VCO2-4 son los esclavos detalles). VCO1 o los VCOs esclavos. DOUBLE - VCO1 es un máster y VCO2 su HOLD - mantiene el sonido de todas las notas que estén siendo tocadas. (Elija un interruptor PITCH - la rueda BEND puede producir una inflexión tonal en todos los VCOs. La rueda esclavo. VCO3 es un máster y VCO4 su esclavo. KEY ASSIGN antes de pulsar HOLD). MG1 puede modular el tono. (12) PWM- si elige PWM como una forma de onda CHORD MEMORY - reproduzca y mantenga pulsado cualquier acorde que quiera en los VCF - la rueda BEND afecta de forma directa a la frecuencia de corte del filtro, mientras que para los VCOs, use estos controles para realizar los ajustes: modos POLY o UNISON/SHARE y pulse después la rueda MG1 la modula. VCO EG/MG1/MG2 - elige la fuente usada CHORD MEMORY. El acorde será memorizado y podrá ser reproducido después con solo pulsar una tecla. (8) OUTPUT - ajusta el nivel de volumen global de las salidas principales y de auriculares. Reduzca esto al mínimo cuando encienda para modular la amplitud de pulso. INTENSITY - ajusta la intensidad de modulación. UNISON - este modo monofónico reproduce todos los VCOs cuando toque una sola tecla. Cada VCO puede ser ajustado de forma individual. UNISON/SHARE - este modo polifónico comparte de forma automática entre los VCOs el número de notas que esté tocando la unidad o cuando vaya a conectar unos auriculares u otros amplificadores o aparatos externos. (9) FREQUENCY MG1 - ajusta la frecuencia del generador de modulación 1 (MG1). El piloto LED parpadeará de forma sincronizada con la frecuencia activa. (13) PW WIDTH - si elige PW como forma de onda para los VCOs, use este control para ajustar la amplitud de pulso de estrecha a ancha. (14) TRANSPOSE - este interruptor sube o baja el teclado en una octava sin que tenga que ajustar ninguno de los valores del VCO. También afecta a la salida CV OUT del panel POLY - este modo polifónico convencional WAVEFORM MG1 - elige la forma de onda trasero, así como al control KYB TRACK del VCF. asigna las notas a cada VCO en el orden en el que las toque. de MG1 entre: triangular, diente de sierra invertida, diente de sierra o pulso. UP - sube el teclado en una octava. (5) EFFECTS ON/OFF - active/desactive los efectos producidos al usar los controles (10) FREQUENCY MG2 - ajusta la frecuencia del generador de modulación 2 (MG2). El piloto NORMAL - esta es la posición de octava normal. X-MOD/FREQ-MOD/MODE (vea el elemento 11 LED parpadeará de forma sincronizada con la DOWN - baja el teclado una octava. más adelante). (6) ARPEGGIATOR - estos tres interruptores se frecuencia activa. La forma de onda de MG2 siempre es triangular. (15) PORTAMENTO - ajusta la cantidad de portamento (o ligadura) existente entre las usan para configurar el arpegiador: (11) X-MOD/FREQ-MOD/MODE - use estos notas que toque. ALL/2OCT/1OCT - elige el rango de octava. UP/DOWN/UP-DOWN - elige el orden de las notas a reproducir. LATCH/ON/OFF - elija LATCH si quiere que se controles para ajustar los efectos y use después el interruptor EFFECTS para activarlos o desactivarlos. Los distintos efectos se basan en la relación entre un VCO máster y un VCO esclavo. (16) DETUNE - ajuste este control en el modo Unison (unísono) para desafinar los 4 VCOs en sentidos opuestos para producir un sonido más grueso. Reajuste esto a cero para hacer que todos los VCOs vuelvan a su mantenga el arpegio cuando deje de pulsar las X-MOD - ajusta el nivel de la modulación funcionamiento polifónico. notas. Elija ON u OFF para activar/desactivar el arpegio. cruzada en el modo X-MOD o S & X. FREQ MOD - el mando y el interruptor (17) MASTER TUNE - ajusta la frecuencia de los VCOs 1 a 4. Use el mando MG2 FREQUENCY para ajustar el controlan la modulación de frecuencia tempo del arpegio. Asegúrese de no ajustarlo aplicada únicamente a los VCOs esclavos (de a cero la primera vez que cree un arpegio. acuerdo al ajuste del interruptor SINGLE/ DOUBLE).
-
 1
1 -
 2
2 -
 3
3 -
 4
4 -
 5
5 -
 6
6 -
 7
7 -
 8
8 -
 9
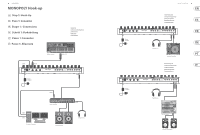
9 -
 10
10 -
 11
11 -
 12
12 -
13
-
14
-
15
-
16
-
17
-
18
-
19
-
20
-
21
-
22
-
23
 |
 |
