BenQ WDC20 User Manual - Page 11
Installation, Environment check
 |
View all BenQ WDC20 manuals
Add to My Manuals
Save this manual to your list of manuals |
Page 11 highlights
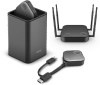
Installation This section will guide you on how to prepare the unit before its initial use. Environment check Before installing your InstaShow™ S kit, check the environmental conditions. 1. Do not install the device near heat sources like radiators or direct sunlight, or in a site with excessive dust or humidity. 2. Ambient temperature conditions are listed as below. Maximum ambient temperature should be +40°C or 104°F. Minimum ambient temperature should be +0°C or 32°F. Storage temperature should be -10°C to +60°C (14°F to 140°F). 3. Humidity conditions are listed as below. For storage, the relative humidity should be 5% to 90% (non-condensing). For operation, the relative humidity should be10% to 80% (non-condensing). As the product works with different displays, the steps required to complete the installation may vary according to the actual environment and your display specifications. Follow the procedures below and refer to the specified sections for details. 1. Assemble the Host with the antennas. See Assembling the Host on page 12 for details. 2. Connect the Host to the display and power properly. See Connecting the HDMI cable and power on page 17 for details. Four installation methods are provided. • Attaching the Host to the ceiling • Attaching the Host to a ceiling mount • Placing the Host on a table • Installing the Host on the wall or trolley 3. Connect the Buttons to the desired devices and power properly. See Setting up and powering a Button on page 20 for details. 4. Make sure that all the connected devices have been powered on. Press the source button of the display and make sure that the HDMI source has been transmitted. See Pairing a Button and Host on page 24 for details. Installation 11
-
 1
1 -
2
-
3
-
4
-
5
-
 6
6 -
 7
7 -
 8
8 -
 9
9 -
 10
10 -
 11
11 -
 12
12 -
 13
13 -
 14
14 -
 15
15 -
 16
16 -
17
-
18
-
19
-
20
-
21
-
22
-
23
-
24
-
25
-
26
-
27
-
28
-
29
-
30
-
31
-
32
-
33
-
34
-
35
-
36
-
37
-
38
-
39
-
40
-
41
-
42
-
43
-
44
-
45
-
46
-
47
-
48
-
49
-
50
-
51
-
52
-
53
-
54
-
55
-
56
-
57
-
58
-
59
-
60
-
61
-
62
-
63
-
64
-
65
-
66
-
67
-
68
-
69
-
70
-
71
 |
 |
