BenQ WDC20 User Manual - Page 9
Overview, Button, Host
 |
View all BenQ WDC20 manuals
Add to My Manuals
Save this manual to your list of manuals |
Page 9 highlights
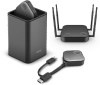
Overview Button 4 1 3 2 5 Bottom of a Button 1. Present key with LED indicator Press to start or stop presenting. 2. Split screen key Press to enable split screen presentations. 3. USB 3.0 connector Connect to a computer or laptop. 4. HDMI 1.4 connector Connect to a computer or laptop. 5. RESET Poke the RESET hole to reset the device if the device stops responding. Refer to Resetting a Host on page 26 for more information. Host 8 1 7 1 1 1 6543 2 1. Fixture parts for the Antennas Refer to Assembling the Host on page 12 for more information. 2. USB-A Ports Connect to a touchscreen display, mouse, or keyboard, to control the projected screen. 3. HDMI port Connect to a display using a Cable HDMI A(M) to A(M). 4. LAN port Allows users access to the web management interface through a direct or network connection. 5. RESET Poke the RESET hole to reset the device if the device stops responding. Refer to Resetting a Host on page 26 for more information. 6. DC 2A port Connect to the supplied adapter extender power cable and adapter to power the Host. 7. PAIRING key Press to pair with a Button. 8. Standby button with LED indicator Press to turn the Host on and off. Introduction 9
-
 1
1 -
2
-
3
-
 4
4 -
 5
5 -
 6
6 -
 7
7 -
 8
8 -
 9
9 -
 10
10 -
 11
11 -
 12
12 -
 13
13 -
 14
14 -
15
-
16
-
17
-
18
-
19
-
20
-
21
-
22
-
23
-
24
-
25
-
26
-
27
-
28
-
29
-
30
-
31
-
32
-
33
-
34
-
35
-
36
-
37
-
38
-
39
-
40
-
41
-
42
-
43
-
44
-
45
-
46
-
47
-
48
-
49
-
50
-
51
-
52
-
53
-
54
-
55
-
56
-
57
-
58
-
59
-
60
-
61
-
62
-
63
-
64
-
65
-
66
-
67
-
68
-
69
-
70
-
71
 |
 |
