Bosch HGI8056UC Use and Care Manual - Page 20
Special Features
 |
View all Bosch HGI8056UC manuals
Add to My Manuals
Save this manual to your list of manuals |
Page 20 highlights
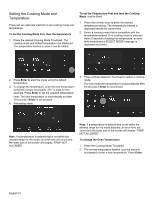
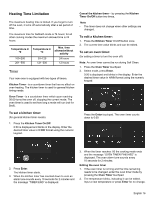
3. The timer value blinks, indicating it can be edited. Input the new time and restart the timer by pressing the Enter touchpad. The oven timer may be cleared by entering 0:00. Special Features The special features provide you with additional conveniences when cooking. Learn more about these special features in the following sections: • Probe (some models) • Sabbath Mode • Panel Lock Probe (some models) The probe measures the internal temperature of the food. The probe is available for Bake, Roast and all convection cooking modes. Remove Safety Cap before Using Probe Some models include a temperature probe used to sense internal tempererature of meats during cooking. The probe ships with a black plastic safety cap over the pointed metal end of the probe. The cap must be removed prior to use. . To use the probe: 1. Insert the probe into the meat as described above. The probe symbol is displayed. 2. Connect the probe to the oven. If the probe is not connected to the oven prior to starting Probe mode, an error tone sounds and the message "INSERT PROBE" is displayed. 3. Set the cooking mode and temperature. 4. The Set Probe Temp screen is displayed. A three digit input prompt "- - -" blinks in the lower right corner. Use the numeric keypad to enter the desired probe temperature and press Enter on the numeric keypad. Note: The minimum probe temperature that can be set is 100° F (40° C) and the maximum is 200° F (100° C). If the probe temperature entered is outside this range, an error is displayed. 5. The probe current temperature and target temperature are both displayed in the format "105 / 180" at the lower right corner of the display. The actual temperature will display < 80 until the food temperature reaches 80° F. The displayed probe temperature is updated in increments of 5° during the cooking process. Inserting the probe: Insert the tip of the probe in the middle and thickest part of the meat. Make sure the probe is not touching fat, bone, or parts of the oven or the pan. Note: Food must be completely thawed before inserting the probe into the meat. 6. When the probe temperature reaches the set temperature, the cooking mode turns off. The current time is displayed and the message "COOKING COMPLETE" blinks at the bottom left of the display. An alarm tone sounds every 10 seconds for 2 minutes. English 17
-
 1
1 -
2
-
3
-
4
-
5
-
6
-
7
-
8
-
9
-
10
-
11
-
12
-
13
-
14
-
 15
15 -
 16
16 -
 17
17 -
 18
18 -
 19
19 -
 20
20 -
 21
21 -
 22
22 -
 23
23 -
 24
24 -
 25
25 -
26
-
27
-
28
-
29
-
30
-
31
-
32
-
33
-
34
-
35
-
36
-
37
-
38
-
39
-
40
-
41
-
42
-
43
-
44
-
45
-
46
-
47
-
48
-
49
-
50
-
51
-
52
-
53
-
54
-
55
-
56
-
57
-
58
-
59
-
60
-
61
-
62
-
63
-
64
-
65
-
66
-
67
-
68
-
69
-
70
-
71
-
72
-
73
-
74
-
75
-
76
-
77
-
78
-
79
-
80
-
81
-
82
-
83
-
84
-
85
-
86
-
87
-
88
-
89
-
90
-
91
-
92
-
93
-
94
-
95
-
96
-
97
-
98
-
99
-
100
-
101
-
102
-
103
-
104
 |
 |
