Bosch WTMC5530UC Operating, Care, Installation - Page 23
Cleaning
 |
View all Bosch WTMC5530UC manuals
Add to My Manuals
Save this manual to your list of manuals |
Page 23 highlights
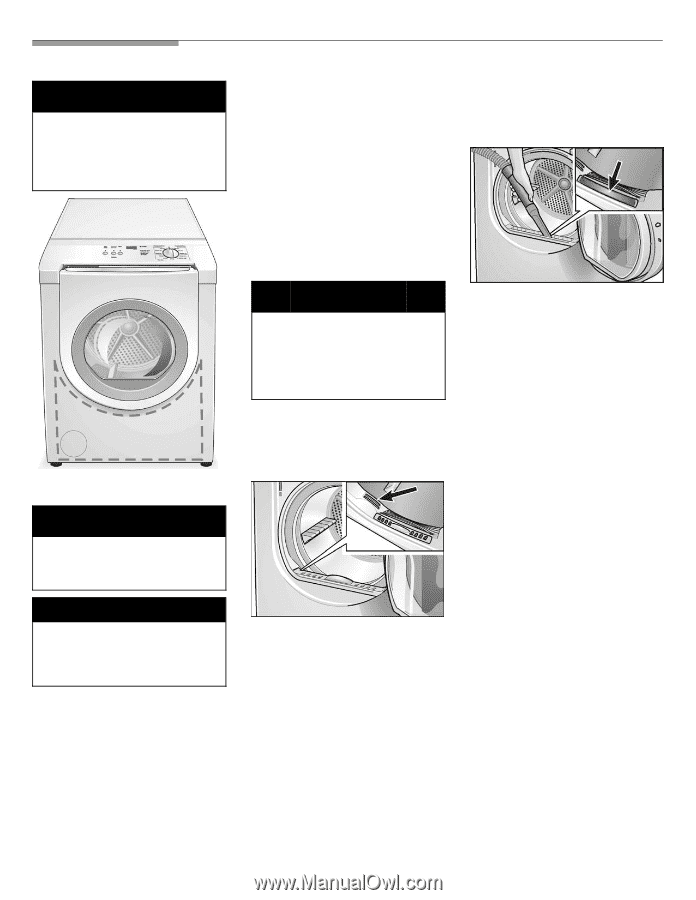
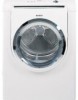
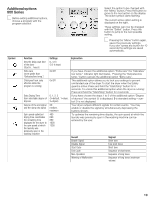
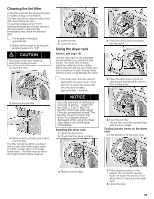
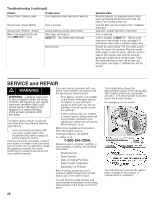
Cleaning and care d CAUTION The access panel located on the bottom left of the dryer is for Service Access and is to be opened only by an Authorized or Qualified Service Technician. (Panel may be hidden from view by door extension). access panel Cleaning the dryer d WARNING TO AVOID RISK OF EXPLOSION! Never use solvents or highly flammable liquids for cleaning. NOTICE Incorrect cleaning may damage the dryer. Do not spray with a water jet. Do not use scouring agents or allĆpurpose cleaners. Do not use steam cleaners. Wipe the housing and fascia with a soft cloth and soapy water only. Wipe the drum, door seal and inside of the door with a damp cloth only. Cleaning the exhaust duct Inspect and clean the exhaust ducting at least once a year to prevent clogging. A partially clogged exhaust will lengthen the drying time and will result in poor performance of the dryer. q Turn off the circuit breaker q Pull out power supply plug q Close the shutĆoff valve. q Disconnect the duct from the dryer. q Vacuum and reconnect the duct. d WARNING Remove gas connection before moving the dryer to clean the duct. Be careful not to damage the gas connection when cleaning the duct. Refer to page 10 for instructions on how to re-establish the gas connection. Cleaning the moisture sensor The moisture sensor has to be cleaned because a fine layer of transparent buildup is deposited on the sensors. This deposit can easily be removed by wiping the sensors (the two bars next to the lint filter) with a cloth and a little white vinegar. Use white vinegar only! Clean the moisture sensor once a month. Cleaning the bearing shield Over time, fluff from the drying process collects in the bearing shield. This fluff can be easily removed using your vacuum cleaner, at least once a month. Cleaning the MISTCAREt Nozzle Once a year inspect the nozzle outlet. If you suspect blockage, wipe the outside of the nozzle with a cloth moistened with vinegar. If the nozzle is completely blocked, consult the troubleshooting guide (see page 26) for removal and cleaning instructions. If the nozzle remains blocked, call customer service (see page 26). 23
-
 1
1 -
2
-
3
-
4
-
5
-
6
-
7
-
8
-
9
-
10
-
11
-
12
-
13
-
14
-
15
-
16
-
17
-
 18
18 -
 19
19 -
 20
20 -
 21
21 -
 22
22 -
 23
23 -
 24
24 -
 25
25 -
 26
26 -
 27
27 -
 28
28 -
29
-
30
-
31
-
32
-
33
-
34
-
35
-
36
-
37
-
38
-
39
-
40
-
41
-
42
-
43
-
44
-
45
-
46
-
47
-
48
-
49
-
50
-
51
-
52
-
53
-
54
-
55
-
56
-
57
-
58
-
59
-
60
-
61
-
62
-
63
-
64
-
65
-
66
-
67
-
68
-
69
-
70
-
71
-
72
-
73
-
74
-
75
-
76
-
77
-
78
-
79
-
80
-
81
-
82
-
83
-
84
-
85
-
86
-
87
-
88
 |
 |