Brother International HE-800A Instruction Manual - English - Page 93
Error Code Table
 |
View all Brother International HE-800A manuals
Add to My Manuals
Save this manual to your list of manuals |
Page 93 highlights
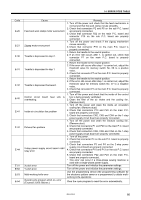
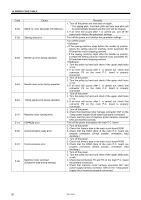
14. ERROR CODE TABLE 14. ERROR CODE TABLE DANGER Wait at least 5 minutes after turning off the power switch and disconnecting the power cord from the wall outlet before opening the face plate of the control box. Touching areas where high voltages are present can result in severe injury. If a malfunction should occur with the sewing machine, a buzzer will sound and an error code will appear in the display window. Follow the remedy procedure to eliminate the cause of the problem. For errors which do not require the power to be turned off (i.e. errors which can be reset), two short beeps will sound. For error E-02, three short beeps will sound. For errors which require the power to be turned off (i.e. errors which cannot be reset), a single long beep will sound. Code E-00 E-01 E-02 E-05 E-06 E-07 E-08 Cause STOP switch was pressed. Upper thread breakage Needle up sensor is OFF. Zigzag positioning is not carried out. Feed positioning is not carried out. Work clamp positioning is not carried out. Cutter home position sensor is off. Remedy 1. Release the STOP switch. To restart sewing, press the parameter DOWN key and then depress the treadle to step 2. To cancel sewing, press the RESET key. 2. If an error still occurs after 1. is carried out, check that connector P10 on the main P.C. board is properly connected. 1. Thread the thread, or check that the thread has been passed through the thread guide. To restart sewing, press the parameter DOWN key and then depress the treadle to step 2. To cancel sewing, press the RESET key. 2. If an error still occurs after 1. is carried out, check that connector P10 on the main P.C. board is properly connected. 1. Turn the pulley by hand to set the needle to its highest position. 2. Check if the sewing machine operation is sluggish because of a reason such as thread tangled around the rotary hook. 3. If an error still occurs after 1. and 2. are carried out, check that connector P3 on the main P.C. board is properly connected. 1. Turn off the power. 2. Check that connector P11 on the main P.C. board is properly connected. 3. Check the operation of the zigzag home position sensor monitor lamp. 1. Turn off the power. 2. Check that connector P11 on the main P.C. board is properly connected. 3. Check the operation of the feed home position sensor monitor lamp. Turn off the power. 1. Check that connector P11 on the main P.C. board is properly connected. 2. Check the operation of the work clamp home position sensor monitor lamp. 1. Check the upper thread trimming mechanism, particularly for wear in the opening cam. 2. Apply grease to the inclined face of the opening cam. 1. Turn off the power. 2. Check if the solenoid stopper tightening nut or the cutter sensor mounting screw is loose and if the cutter solenoid (shaft, etc.) is damaged. 3. Check that connector P23 on the main P.C. board and connector P13 on the sub P.C. board are properly connected. 4. Check the operation of the cutter home position sensor monitor lamp. 85 HE-800A
-
 1
1 -
2
-
3
-
4
-
5
-
6
-
7
-
8
-
9
-
10
-
11
-
12
-
13
-
14
-
15
-
16
-
17
-
18
-
19
-
20
-
21
-
22
-
23
-
24
-
25
-
26
-
27
-
28
-
29
-
30
-
31
-
32
-
33
-
34
-
35
-
36
-
37
-
38
-
39
-
40
-
41
-
42
-
43
-
44
-
45
-
46
-
47
-
48
-
49
-
50
-
51
-
52
-
53
-
54
-
55
-
56
-
57
-
58
-
59
-
60
-
61
-
62
-
63
-
64
-
65
-
66
-
67
-
68
-
69
-
70
-
71
-
72
-
73
-
74
-
75
-
76
-
77
-
78
-
79
-
80
-
81
-
82
-
83
-
84
-
85
-
86
-
87
-
 88
88 -
 89
89 -
 90
90 -
 91
91 -
 92
92 -
 93
93 -
 94
94 -
 95
95 -
 96
96 -
 97
97 -
 98
98 -
99
-
100
-
101
-
102
-
103
-
104
-
105
-
106
-
107
-
108
-
109
-
110
-
111
-
112
-
113
-
114
-
115
-
116
-
117
-
118
 |
 |