Brother International MFC 8890DW Users Manual - English - Page 179
Replacing the drum unit - replacement parts
 |
UPC - 012502622673
View all Brother International MFC 8890DW manuals
Add to My Manuals
Save this manual to your list of manuals |
Page 179 highlights
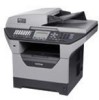
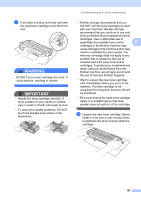
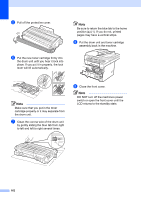
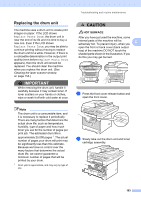
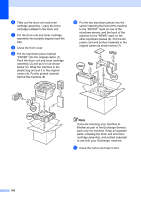
Troubleshooting and routine maintenance Replacing the drum unit C The machine uses a drum unit to create print images on paper. If the LCD shows Replace Parts Drum, the drum unit is near the end of its life and it is time to buy a new one. Even if the LCD shows Replace Parts Drum, you may be able to continue printing without having to replace the drum unit for a while. However, if there is a noticeable deterioration in the output print quality (even before Replace Parts Drum appears), then the drum unit should be replaced. You should clean the machine when you replace the drum unit. (See Cleaning the laser scanner window on page 154.) IMPORTANT While removing the drum unit, handle it carefully because it may contain toner. If toner scatters on your hands or clothes, wipe or wash it off with cold water at once. CAUTION HOT SURFACE After you have just used the machine, some internal parts of the machine will be C extremely hot. To prevent injury, when you open the front or back cover (back output tray) of the machine DO NOT touch the shaded parts shown in the illustration. If you do this you may get burned. a Press the front cover release button and open the front cover. Note The drum unit is a consumable item, and it is necessary to replace it periodically. There are many factors that determine the actual drum life, such as temperature, humidity, type of paper and how much toner you use for the number of pages per print job. The estimated drum life is approximately 25,000 pages 1. The actual number of pages your drum will print may be significantly less than this estimate. Because we have no control over the many factors that determine the actual drum life, we cannot guarantee a minimum number of pages that will be printed by your drum. 1 Drum yield is approximate, and may vary by type of use. b Slowly take out the drum unit and toner cartridge assembly. 163
-
 1
1 -
2
-
3
-
4
-
5
-
6
-
7
-
8
-
9
-
10
-
11
-
12
-
13
-
14
-
15
-
16
-
17
-
18
-
19
-
20
-
21
-
22
-
23
-
24
-
25
-
26
-
27
-
28
-
29
-
30
-
31
-
32
-
33
-
34
-
35
-
36
-
37
-
38
-
39
-
40
-
41
-
42
-
43
-
44
-
45
-
46
-
47
-
48
-
49
-
50
-
51
-
52
-
53
-
54
-
55
-
56
-
57
-
58
-
59
-
60
-
61
-
62
-
63
-
64
-
65
-
66
-
67
-
68
-
69
-
70
-
71
-
72
-
73
-
74
-
75
-
76
-
77
-
78
-
79
-
80
-
81
-
82
-
83
-
84
-
85
-
86
-
87
-
88
-
89
-
90
-
91
-
92
-
93
-
94
-
95
-
96
-
97
-
98
-
99
-
100
-
101
-
102
-
103
-
104
-
105
-
106
-
107
-
108
-
109
-
110
-
111
-
112
-
113
-
114
-
115
-
116
-
117
-
118
-
119
-
120
-
121
-
122
-
123
-
124
-
125
-
126
-
127
-
128
-
129
-
130
-
131
-
132
-
133
-
134
-
135
-
136
-
137
-
138
-
139
-
140
-
141
-
142
-
143
-
144
-
145
-
146
-
147
-
148
-
149
-
150
-
151
-
152
-
153
-
154
-
155
-
156
-
157
-
158
-
159
-
160
-
161
-
162
-
163
-
164
-
165
-
166
-
167
-
168
-
169
-
170
-
171
-
172
-
173
-
 174
174 -
 175
175 -
 176
176 -
 177
177 -
 178
178 -
 179
179 -
 180
180 -
 181
181 -
 182
182 -
 183
183 -
 184
184 -
185
-
186
-
187
-
188
-
189
-
190
-
191
-
192
-
193
-
194
-
195
-
196
-
197
-
198
-
199
-
200
-
201
-
202
-
203
-
204
-
205
-
206
-
207
-
208
-
209
-
210
-
211
-
212
-
213
-
214
-
215
-
216
-
217
-
218
-
219
-
220
-
221
-
222
-
223
-
224
-
225
-
226
-
227
-
228
-
229
-
230
-
231
-
232
-
233
-
234
-
235
-
236
-
237
-
238
-
239
-
240
 |
 |