Brother International PEDESIGN 5.0 Users Manual - English - Page 244
Inserting points, Shift, Delete
 |
View all Brother International PEDESIGN 5.0 manuals
Add to My Manuals
Save this manual to your list of manuals |
Page 244 highlights
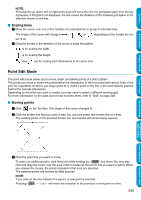
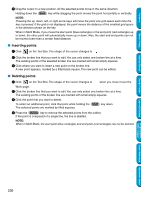
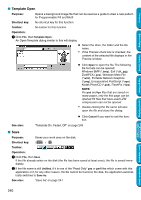
Contents Before Using Getting Started 4 Drag the cursor to a new position. All the selected points move in the same direction. Holding down the Shift key while dragging the point moves the point horizontally or vertically. NOTE: Pressing the up, down, left, or right arrow keys will move the point one grid space each time the key is pressed. If the grid is not displayed, the point moves the distance of the smallest grid space in the direction shown on the key. When in Motif Mode, if you move the start point (blue rectangle) or the end point (red rectangle) up or down, the other point will automatically move up or down. Also, the start and end points can not be moved closer than a certain fixed distance. I Inserting points 1 Click on the Tool Box. The shape of the cursor changes to . 2 Click the broken line that you want to edit. You can only select one broken line at a time. The existing points of the selected broken line are marked with small empty squares. 3 Click where you want to insert a new point on the broken line. A new point appears, marked by a filled black square. The new point can be edited. I Deleting points 1 Click on the Tool Box. The shape of the cursor changes to when you move it over the Work page. 2 Click the broken line that you want to edit. You can only select one broken line at a time. The existing points of the broken line are marked with small empty squares. 3 Click the point that you want to delete. To select an additional point, click that point while holding the Shift key down. The selected points are marked by filled squares. 4 Press the Delete key to remove the selected points from the outline. If the point is composed of a single line, the line is deleted. NOTE: When in Motif Mode, the start point (blue rectangle) and end point (red rectangle) can not be deleted. Design Center Layout & Editing Programmable Stitch Creator Quick Reference Alphabetic Index 236
-
 1
1 -
2
-
3
-
4
-
5
-
6
-
7
-
8
-
9
-
10
-
11
-
12
-
13
-
14
-
15
-
16
-
17
-
18
-
19
-
20
-
21
-
22
-
23
-
24
-
25
-
26
-
27
-
28
-
29
-
30
-
31
-
32
-
33
-
34
-
35
-
36
-
37
-
38
-
39
-
40
-
41
-
42
-
43
-
44
-
45
-
46
-
47
-
48
-
49
-
50
-
51
-
52
-
53
-
54
-
55
-
56
-
57
-
58
-
59
-
60
-
61
-
62
-
63
-
64
-
65
-
66
-
67
-
68
-
69
-
70
-
71
-
72
-
73
-
74
-
75
-
76
-
77
-
78
-
79
-
80
-
81
-
82
-
83
-
84
-
85
-
86
-
87
-
88
-
89
-
90
-
91
-
92
-
93
-
94
-
95
-
96
-
97
-
98
-
99
-
100
-
101
-
102
-
103
-
104
-
105
-
106
-
107
-
108
-
109
-
110
-
111
-
112
-
113
-
114
-
115
-
116
-
117
-
118
-
119
-
120
-
121
-
122
-
123
-
124
-
125
-
126
-
127
-
128
-
129
-
130
-
131
-
132
-
133
-
134
-
135
-
136
-
137
-
138
-
139
-
140
-
141
-
142
-
143
-
144
-
145
-
146
-
147
-
148
-
149
-
150
-
151
-
152
-
153
-
154
-
155
-
156
-
157
-
158
-
159
-
160
-
161
-
162
-
163
-
164
-
165
-
166
-
167
-
168
-
169
-
170
-
171
-
172
-
173
-
174
-
175
-
176
-
177
-
178
-
179
-
180
-
181
-
182
-
183
-
184
-
185
-
186
-
187
-
188
-
189
-
190
-
191
-
192
-
193
-
194
-
195
-
196
-
197
-
198
-
199
-
200
-
201
-
202
-
203
-
204
-
205
-
206
-
207
-
208
-
209
-
210
-
211
-
212
-
213
-
214
-
215
-
216
-
217
-
218
-
219
-
220
-
221
-
222
-
223
-
224
-
225
-
226
-
227
-
228
-
229
-
230
-
231
-
232
-
233
-
234
-
235
-
236
-
237
-
238
-
 239
239 -
 240
240 -
 241
241 -
 242
242 -
 243
243 -
 244
244 -
 245
245 -
 246
246 -
 247
247 -
 248
248 -
 249
249 -
250
-
251
-
252
-
253
-
254
-
255
-
256
-
257
-
258
-
259
-
260
-
261
-
262
-
263
-
264
-
265
-
266
-
267
-
268
-
269
-
270
-
271
-
272
-
273
-
274
 |
 |