Brother International PEDESIGN 5.0 Users Manual - English - Page 89
Using the Menu Bar and the Toolbar, File Menu
 |
View all Brother International PEDESIGN 5.0 manuals
Add to My Manuals
Save this manual to your list of manuals |
Page 89 highlights
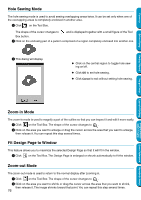
Contents Before Using Using the Menu Bar and the Toolbar File Edit Sew Display Option Stage Help Handles file input/output, such as opening and saving. Performs simple actions on selected objects, such as cutting and pasting. Allows you to control the way the pattern will be sewn. Modifies the appearance of the screen. Allows you to start the other applications and to set the Design Page size and unit system. Allows you to move from one stage to the next or previous one. Gives you access to the on-screen help information system. page 81 page 91 page 96 page 103 page 106 page 108 page 113 Many functions available on the menu can also be accessed by clicking an icon on the Toolbar or by pressing a shortcut key or key combination. When you leave the cursor for a while on a button of the Toolbar, a label indicating the function of the button displays. Getting Started Design Center Layout & Editing Programmable Stitch Creator Quick Reference Alphabetic Index File Menu The File menu handles file input/output, such as opening, saving and printing. New Line Image Creates a new blank Design Page and switches to Stage 2. New Figure Data Creates a new blank Design Page and switches to Stage 3. Wizard Gives a step-by-step guide for creating pattern data, according the type of data you want to create. Open Opens a previously saved file (*.PEM, *.PEL) or image file (Windows BMP (*.bmp), Exif (*.tif, *.jpg), ZSoftPCX (*.pcx), Windows Meta File (*.wmf), Portable Network Graphics (*.png), Encapsulated PostScript (*.eps), Kodak PhotoCD (*.pcd), FlashPix (*.fpx), JPEG2000 (*.j2k). Select TWAIN device Selects which TWAIN device installed in the computer to use. Input from TWAIN device Operates a TWAIN standardized scanner or other device to import an image. Input from Clipboard Opens a new design page in Stage 1, and puts the image data on the clipboard. Output to Clipboard Copies the Stage 1 image data to the clipboard. Import Figure Adds a *.pem file to your Design Page (available only in Stage 3). Save Saves your Design Page on the disk as latest Version file (default). page 82 page 82 page 83 page 85 page 86 page 86 page 87 page 88 page 88 page 89 81
-
 1
1 -
2
-
3
-
4
-
5
-
6
-
7
-
8
-
9
-
10
-
11
-
12
-
13
-
14
-
15
-
16
-
17
-
18
-
19
-
20
-
21
-
22
-
23
-
24
-
25
-
26
-
27
-
28
-
29
-
30
-
31
-
32
-
33
-
34
-
35
-
36
-
37
-
38
-
39
-
40
-
41
-
42
-
43
-
44
-
45
-
46
-
47
-
48
-
49
-
50
-
51
-
52
-
53
-
54
-
55
-
56
-
57
-
58
-
59
-
60
-
61
-
62
-
63
-
64
-
65
-
66
-
67
-
68
-
69
-
70
-
71
-
72
-
73
-
74
-
75
-
76
-
77
-
78
-
79
-
80
-
81
-
82
-
83
-
 84
84 -
 85
85 -
 86
86 -
 87
87 -
 88
88 -
 89
89 -
 90
90 -
 91
91 -
 92
92 -
 93
93 -
 94
94 -
95
-
96
-
97
-
98
-
99
-
100
-
101
-
102
-
103
-
104
-
105
-
106
-
107
-
108
-
109
-
110
-
111
-
112
-
113
-
114
-
115
-
116
-
117
-
118
-
119
-
120
-
121
-
122
-
123
-
124
-
125
-
126
-
127
-
128
-
129
-
130
-
131
-
132
-
133
-
134
-
135
-
136
-
137
-
138
-
139
-
140
-
141
-
142
-
143
-
144
-
145
-
146
-
147
-
148
-
149
-
150
-
151
-
152
-
153
-
154
-
155
-
156
-
157
-
158
-
159
-
160
-
161
-
162
-
163
-
164
-
165
-
166
-
167
-
168
-
169
-
170
-
171
-
172
-
173
-
174
-
175
-
176
-
177
-
178
-
179
-
180
-
181
-
182
-
183
-
184
-
185
-
186
-
187
-
188
-
189
-
190
-
191
-
192
-
193
-
194
-
195
-
196
-
197
-
198
-
199
-
200
-
201
-
202
-
203
-
204
-
205
-
206
-
207
-
208
-
209
-
210
-
211
-
212
-
213
-
214
-
215
-
216
-
217
-
218
-
219
-
220
-
221
-
222
-
223
-
224
-
225
-
226
-
227
-
228
-
229
-
230
-
231
-
232
-
233
-
234
-
235
-
236
-
237
-
238
-
239
-
240
-
241
-
242
-
243
-
244
-
245
-
246
-
247
-
248
-
249
-
250
-
251
-
252
-
253
-
254
-
255
-
256
-
257
-
258
-
259
-
260
-
261
-
262
-
263
-
264
-
265
-
266
-
267
-
268
-
269
-
270
-
271
-
272
-
273
-
274
 |
 |
