Brother International PT-2730VP Users Manual - English - Page 66
Attaching Labels, Printing from the Label Collection - canada
 |
UPC - 012502626596
View all Brother International PT-2730VP manuals
Add to My Manuals
Save this manual to your list of manuals |
Page 66 highlights
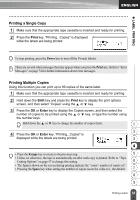
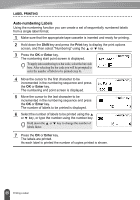
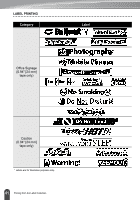
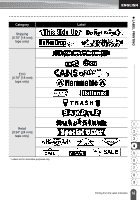
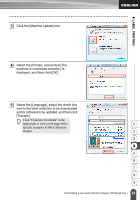
LABEL PRINTING Attaching Labels 1 If necessary, trim the printed label to the desired shape and length using scissors, etc. 2 Peel the backing from the label. 3 Position the label and then press firmly from top to bottom with your finger to attach the label. • The backing of some types of tapes may be pre-cut to make it easier to peel the backing.To remove the backing, simply fold the label lengthwise with the text facing inward, to expose the inside edges of the backing. Next, peel off the backing one piece at a time. • Labels may be difficult to attach to surfaces that are wet, dirty, or uneven. The labels may peel off easily from these surfaces. • Be sure to read the instructions provided with Fabric Iron-On Tapes, Extra Strength Adhesive Tapes or other special tapes and observe all precautions noted in the instructions. Printing from the Label Collection Printing a label from the Label Collection Stored in the Machine Pages 60 to 63 show the many labels that are stored in your Label Collection. Printing these pre-designed labels saves you time. 1 Press the Label Collection key. 2 Select the language of the label to be printed using the or key, and then press the OK or Enter key. The language can be selected from "English(United States)", "French(Canada)", "Portuguese", "Spanish(United States)", or "Turkish". 3 Select the category using the or key, and then press the OK or Enter key. Refer to the Label Collection Lists to view all of the available labels. 4 The first label image is displayed. Select a label using the or key, and then press the OK or Enter key. To add the label to your "Favorites", select "Add to Favorites" using the or key, and then press the OK or Enter key to register the selected label image in the Favorites category. Registering your most frequently used label images allows you to quickly and easily display them when needed again. 59 Attaching Labels
-
 1
1 -
2
-
3
-
4
-
5
-
6
-
7
-
8
-
9
-
10
-
11
-
12
-
13
-
14
-
15
-
16
-
17
-
18
-
19
-
20
-
21
-
22
-
23
-
24
-
25
-
26
-
27
-
28
-
29
-
30
-
31
-
32
-
33
-
34
-
35
-
36
-
37
-
38
-
39
-
40
-
41
-
42
-
43
-
44
-
45
-
46
-
47
-
48
-
49
-
50
-
51
-
52
-
53
-
54
-
55
-
56
-
57
-
58
-
59
-
60
-
 61
61 -
 62
62 -
 63
63 -
 64
64 -
 65
65 -
 66
66 -
 67
67 -
 68
68 -
 69
69 -
 70
70 -
 71
71 -
72
-
73
-
74
-
75
-
76
-
77
-
78
-
79
-
80
-
81
-
82
-
83
-
84
-
85
-
86
-
87
-
88
 |
 |
