Brother International SE725 Operation Manual - Page 11
Getting Ready
 |
View all Brother International SE725 manuals
Add to My Manuals
Save this manual to your list of manuals |
Page 11 highlights
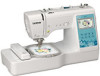
Names of Machine Parts 1 Chapter GETTING READY Note • Be sure to install the latest software. Refer to "Updating Your Machine's Software" on page 97. Names of Machine Parts ■ Main parts b cde a f g m l h k j i o n p q x r w v s t u 1 Bobbin winding thread guide and pretension disk (page 20) 2 Thread guide (page 20) 3 Spool cap (page 20) 4 Spool pin (page 20) 5 Hole for extra spool pin This holds an extra spool pin for sewing with twin needle. (page 56) This is not a hole for lubrication. Do not insert oil into this hole. 6 Bobbin winder (page 19) 7 LCD (liquid crystal display) (page 13) 8 Operation panel (page 10) 9 Operation buttons and sewing speed controller (page 10) 0 Flat bed attachment (page 37) A Thread cutter (page 25) B Needle threader lever (page 25) C Thread tension dial (page 36, page 72) D Handwheel Turn the handwheel toward you (counterclockwise) to raise and lower the needle to sew one stitch. E Thread guide cover (page 20) F Handle Carry the machine by its handle when transporting. G Presser foot lever Raise and lower the presser foot lever to raise and lower the presser foot. H Feed dog position switch Use when lowering the feed dogs for free motion quilting* or button fitting, and when raising the feed dogs. (page 49) When the feed dogs are lowered, return to their original raised position after sewing is finished. The feed dogs are raised when the machine starts sewing. * For free motion quilting, purchase a quilting foot sold separately. I Main power switch (page 12) J Power supply jack (page 12) K Foot controller (page 32) L Foot controller jack (page 32) M Air vent The air vent allows the air surrounding the motor to circulate. Do not cover the air vent while the machine is being used. N USB port (for a USB flash drive) (page 59, page 80) IMPORTANT • Do not insert anything other than a USB flash drive into the USB port. Anything else may damage the machine. ■ Needle and presser foot section i a h b g c f d e 1 Needle bar thread guide (page 25) 2 Needle plate (page 38) 3 Needle plate cover (page 22) 4 Bobbin cover/bobbin case (page 22, page 84) 5 Feed dogs The feed dogs feed the fabric in the sewing direction. 6 Presser foot The presser foot applies pressure consistently on the fabric as the sewing takes place. Attach the appropriate presser foot for the selected stitch. 7 Presser foot holder (page 30) 8 Presser foot holder screw (page 30) 9 Buttonhole lever (page 48) GETTING READY 1 9
-
 1
1 -
2
-
3
-
4
-
5
-
 6
6 -
 7
7 -
 8
8 -
 9
9 -
 10
10 -
 11
11 -
 12
12 -
 13
13 -
 14
14 -
 15
15 -
 16
16 -
17
-
18
-
19
-
20
-
21
-
22
-
23
-
24
-
25
-
26
-
27
-
28
-
29
-
30
-
31
-
32
-
33
-
34
-
35
-
36
-
37
-
38
-
39
-
40
-
41
-
42
-
43
-
44
-
45
-
46
-
47
-
48
-
49
-
50
-
51
-
52
-
53
-
54
-
55
-
56
-
57
-
58
-
59
-
60
-
61
-
62
-
63
-
64
-
65
-
66
-
67
-
68
-
69
-
70
-
71
-
72
-
73
-
74
-
75
-
76
-
77
-
78
-
79
-
80
-
81
-
82
-
83
-
84
-
85
-
86
-
87
-
88
-
89
-
90
-
91
-
92
-
93
-
94
-
95
-
96
-
97
-
98
-
99
-
100
-
101
-
102
-
103
-
104
 |
 |
