Canon 1692B002 Service Manual - Page 37
Disposing of the Lithium Battery
 |
View all Canon 1692B002 manuals
Add to My Manuals
Save this manual to your list of manuals |
Page 37 highlights
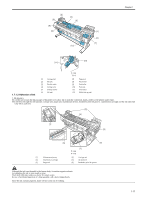
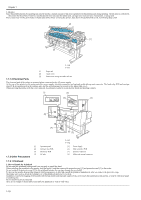
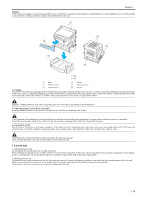
Chapter 1 4. Refilling the ink After removing the ink in the printer according to the automatic or manual ink draining procedure to disassemble, reassemble, or transport/ship the printer, refill the ink as soon as possible upon completion of those tasks. If the ink remaining in the printer after the removal has dried up, the ink deposits on the surfaces of the components may cause damage or abnormal operation. 1.7.3 Precautions When Servicing Printer 1.7.3.1 Notes on the Data Stored in the Printer 0013-5942 This printer counts the print length, number of ink tank replacements, carriage driving time, number of cleaning operations, number of cutter operations, and so on and stores them in the main controller's EEPROM as a COUNTER in Service mode. COUNTER provides important information about the printer usage status. You can check this information by printing it in the service mode or displaying it on the display. Following the precautions below when servicing the printer. a) Repairing/replacing the PCB When replacing the main controller, follow the specified replacement procedure. b) After replacing the carriage unit The information about the carriage driving time arises in the carriage unit. After replacing the carriage unit, select INITIALIZE > CARRIAGE in the service mode to initialize the information about the carriage driving time. c) After replacing the purge unit The information about the number of cleanings arises in the purge unit. After replacing the purge unit, select INITIALIZE > PURGE in the service mode to initialize the information about the number of cleanings. Reference: For the main controller replacement procedure, see Disassembly/Reassembly > Points to Note on Disassembly and Reassembly > PCBs. You cannot check the counter information once it is initialized. Be careful not to initialize the counter information before checking it. You cannot modify the counter information from the operation panel. 1.7.3.2 Confirming the Firmware Version 0013-5945 Firmware has been downloaded to the main controller. When you have replaced the main controller, check that the firmware is the latest version. If not, update it to the latest version. Reference: For how to up update the main controller, refer to TROUBLESHOOTING > Version Up. 1.7.3.3 Precautions Against Static Electricity 0013-5947 Certain clothing may generate static electricity, causing an electrical charge to build up on your body. Such a charge can damage electrical devices. To prevent this, discharge any static buildup by touching a grounded metal fitting before you start disassembling the printer. 1.7.3.4 Precautions for Disassembly/Reassembly 0013-5948 The precautions for disassembly/Reassembly are described in DISASSEMBLY/REASSEMBLY 1.7.3.5 Self-diagnostic feature 0013-5950 The printer has a diagnostic feature which analyzes printer problems (which may occur). The diagnostic results will be displayed on the display and indicated by a light. For detailed information, see ERROR CODE. 1.7.3.6 Disposing of the Lithium Battery 0013-5952 The main controller PCB mounted in the printer has one lithium battery to back up various data. Lisk of explosion if battery is replaced by an incorrect type. Dispose of used batteries according to the instructions. 1-21
-
 1
1 -
2
-
3
-
4
-
5
-
6
-
7
-
8
-
9
-
10
-
11
-
12
-
13
-
14
-
15
-
16
-
17
-
18
-
19
-
20
-
21
-
22
-
23
-
24
-
25
-
26
-
27
-
28
-
29
-
30
-
31
-
 32
32 -
 33
33 -
 34
34 -
 35
35 -
 36
36 -
 37
37 -
 38
38 -
 39
39 -
 40
40 -
 41
41 -
 42
42 -
43
-
44
-
45
-
46
-
47
-
48
-
49
-
50
-
51
-
52
-
53
-
54
-
55
-
56
-
57
-
58
-
59
-
60
-
61
-
62
-
63
-
64
-
65
-
66
-
67
-
68
-
69
-
70
-
71
-
72
-
73
-
74
-
75
-
76
-
77
-
78
-
79
-
80
-
81
-
82
-
83
-
84
-
85
-
86
-
87
-
88
-
89
-
90
-
91
-
92
-
93
-
94
-
95
-
96
-
97
-
98
-
99
-
100
-
101
-
102
-
103
-
104
-
105
-
106
-
107
-
108
-
109
-
110
-
111
-
112
-
113
-
114
-
115
-
116
-
117
-
118
-
119
-
120
-
121
-
122
-
123
-
124
-
125
-
126
-
127
-
128
-
129
-
130
-
131
-
132
-
133
-
134
-
135
-
136
-
137
-
138
-
139
-
140
-
141
-
142
-
143
-
144
-
145
-
146
-
147
-
148
-
149
-
150
-
151
-
152
-
153
-
154
-
155
-
156
-
157
-
158
-
159
-
160
-
161
-
162
-
163
-
164
-
165
-
166
-
167
-
168
-
169
-
170
-
171
-
172
-
173
-
174
-
175
-
176
-
177
-
178
-
179
-
180
-
181
-
182
-
183
-
184
-
185
-
186
-
187
-
188
-
189
-
190
-
191
-
192
-
193
-
194
-
195
-
196
-
197
-
198
-
199
-
200
 |
 |