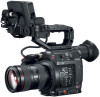
Canon EOS C200 EOS C200 EOS C200B Instruction Manual - Page 26
Using a Power Outlet, Checking the Remaining Battery Charge, Attaching the Ferrite Core
 |
View all Canon EOS C200 manuals
Add to My Manuals
Save this manual to your list of manuals |
Page 26 highlights
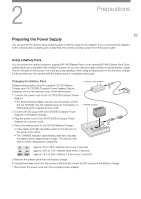
Preparing the Power Supply Checking the Remaining Battery Charge When the camera is turned on, you can check the approximate remaining battery usage time (in minutes) by looking at any recording/playback screen or the [Battery/Hour Meter] status screen (A 203). You can also 26 check the approximate charge level on the battery pack itself. Press the CHECK button on the battery pack. An indicator will light for approximately 3 seconds and show the approximate remaining battery charge. 0-25% 26-50% 51-75% 76-100% Battery charge indicator CHECK button Using a Power Outlet You can also power the camera directly from a power outlet using the supplied CA-A10 AC Adapter. While the camera is powered using a power outlet, you can replace the battery pack even when the camera is turned on. North America only: The power cord for the CA-A10 AC Adapter is different from that for the CA-CP200B Compact Power Adapter. If you do not use the correct power cord, it will not connect to the AC adapter. Attaching the Ferrite Core Before using the supplied CA-A10 AC Adapter, attach the supplied ferrite core to the power cord. This can help reduce the likelihood of RF interference. 1 Attach the ferrite core to the power cord about 4 cm (1.6 in.) from the plug that goes into the AC adapter. 2 Pass the cable through the center of the core and wrap it around the core twice and close the ferrite core. 4 cm • For use in North America, you only need to wrap the cable around the core once.
-
 1
1 -
2
-
3
-
4
-
5
-
6
-
7
-
8
-
9
-
10
-
11
-
12
-
13
-
14
-
15
-
16
-
17
-
18
-
19
-
20
-
 21
21 -
 22
22 -
 23
23 -
 24
24 -
 25
25 -
 26
26 -
 27
27 -
 28
28 -
 29
29 -
 30
30 -
 31
31 -
32
-
33
-
34
-
35
-
36
-
37
-
38
-
39
-
40
-
41
-
42
-
43
-
44
-
45
-
46
-
47
-
48
-
49
-
50
-
51
-
52
-
53
-
54
-
55
-
56
-
57
-
58
-
59
-
60
-
61
-
62
-
63
-
64
-
65
-
66
-
67
-
68
-
69
-
70
-
71
-
72
-
73
-
74
-
75
-
76
-
77
-
78
-
79
-
80
-
81
-
82
-
83
-
84
-
85
-
86
-
87
-
88
-
89
-
90
-
91
-
92
-
93
-
94
-
95
-
96
-
97
-
98
-
99
-
100
-
101
-
102
-
103
-
104
-
105
-
106
-
107
-
108
-
109
-
110
-
111
-
112
-
113
-
114
-
115
-
116
-
117
-
118
-
119
-
120
-
121
-
122
-
123
-
124
-
125
-
126
-
127
-
128
-
129
-
130
-
131
-
132
-
133
-
134
-
135
-
136
-
137
-
138
-
139
-
140
-
141
-
142
-
143
-
144
-
145
-
146
-
147
-
148
-
149
-
150
-
151
-
152
-
153
-
154
-
155
-
156
-
157
-
158
-
159
-
160
-
161
-
162
-
163
-
164
-
165
-
166
-
167
-
168
-
169
-
170
-
171
-
172
-
173
-
174
-
175
-
176
-
177
-
178
-
179
-
180
-
181
-
182
-
183
-
184
-
185
-
186
-
187
-
188
-
189
-
190
-
191
-
192
-
193
-
194
-
195
-
196
-
197
-
198
-
199
-
200
-
201
-
202
-
203
-
204
-
205
-
206
-
207
-
208
-
209
-
210
-
211
-
212
-
213
-
214
-
215
-
216
-
217
-
218
-
219
-
220
-
221
-
222
-
223
-
224
-
225
-
226
-
227
-
228
-
229
-
230
-
231
-
232
-
233
-
234
-
235
-
236
-
237
 |
 |
