Canon HF10 VIXIA HF10/VIXIA HF100 Instruction Manual - Page 55
Audio Recording Level
 |
UPC - 013803091991
View all Canon HF10 manuals
Add to My Manuals
Save this manual to your list of manuals |
Page 55 highlights
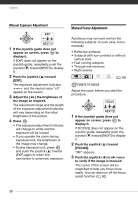
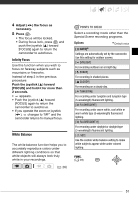
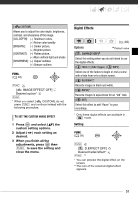
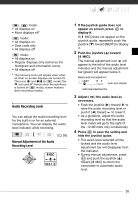
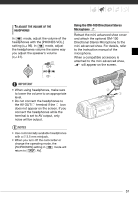
, mode: • All displays on • Most displays off* mode: • All displays on • Data code only • All displays off mode: • All displays on • Regular displays only (removes the histogram and information icons) • All displays off * The following icons will appear even when all other on-screen displays are turned off: The icons and (in mode), the icon and AF frames when the autofocus is locked (in mode), screen markers (both recording modes). Audio Recording Level You can adjust the audio recording level for the built-in or for an external microphone. You can display the audio level indicator while recording. ( 26) Manual Adjustment of the Audio Recording Level 1 If the joystick guide does not appear on screen, press to display it. If [ MIC] does not appear on the joystick guide, repeatedly push the joystick ( ) toward [NEXT] to display it. 2 Push the joystick ( ) toward [ MIC]. The manual adjustment icon will appear to the left of the audio level indicator and the manual adjustment bar (green) will appear below it. Manual audio level adjustment Audio level indicator Audio level adjustment bar 3 Adjust ( ) the audio level as necessary. • Push the joystick ( ) toward to raise the audio recording level or push it ( ) toward to lower it. • As a guideline, adjust the audio recording level so that the audio level meter will go to the right of the -12 dB mark only occasionally. 4 Press to save the setting and hide the joystick guide. • The audio level selected will be locked and the audio level adjustment bar will disappear from the indicator. • During manual adjustment, press and push the joystick ( ) toward [ MIC] to return the camcorder to automatic audio level. 55
-
 1
1 -
2
-
3
-
4
-
5
-
6
-
7
-
8
-
9
-
10
-
11
-
12
-
13
-
14
-
15
-
16
-
17
-
18
-
19
-
20
-
21
-
22
-
23
-
24
-
25
-
26
-
27
-
28
-
29
-
30
-
31
-
32
-
33
-
34
-
35
-
36
-
37
-
38
-
39
-
40
-
41
-
42
-
43
-
44
-
45
-
46
-
47
-
48
-
49
-
 50
50 -
 51
51 -
 52
52 -
 53
53 -
 54
54 -
 55
55 -
 56
56 -
 57
57 -
 58
58 -
 59
59 -
 60
60 -
61
-
62
-
63
-
64
-
65
-
66
-
67
-
68
-
69
-
70
-
71
-
72
-
73
-
74
-
75
-
76
-
77
-
78
-
79
-
80
-
81
-
82
-
83
-
84
-
85
-
86
-
87
-
88
-
89
-
90
-
91
-
92
-
93
-
94
-
95
-
96
-
97
-
98
-
99
-
100
-
101
-
102
-
103
-
104
-
105
-
106
-
107
-
108
-
109
-
110
-
111
-
112
-
113
-
114
-
115
-
116
-
117
-
118
-
119
-
120
-
121
-
122
-
123
-
124
-
125
-
126
-
127
-
128
-
129
 |
 |