Canon HF10 VIXIA HF10/VIXIA HF100 Instruction Manual - Page 81
Playback on a TV Screen
 |
UPC - 013803091991
View all Canon HF10 manuals
Add to My Manuals
Save this manual to your list of manuals |
Page 81 highlights
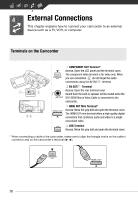
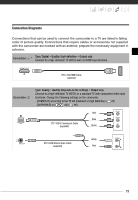
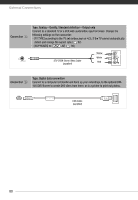
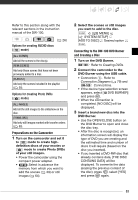
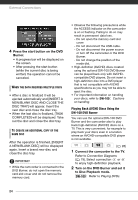
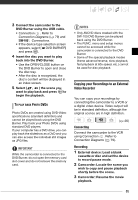
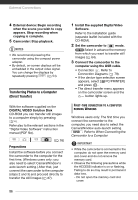
Playback on a TV Screen Connect the camcorder to a TV to enjoy your recordings with family and friends. Playback on an HDTV using one of the high-definition connections will ensure the best playback quality. ( 26) 1 Turn off the camcorder and the TV. 2 Connect the camcorder to the TV. Refer to Connection Diagrams ( 79) and select the most appropriate connection for your TV. 3 Turn on the connected TV. On the TV, select as the video input the same terminal to which you connected the camcorder. Refer to the instruction manual of the connected TV. 4 Turn on the camcorder and set it to mode ( 39) or mode ( 63). Start the playback of movies or still images. NOTES • We recommend powering the camcorder using the compact power adapter. • Sound from the built-in speaker will be muted while the STV-250N Stereo Video Cable is connected to the camcorder. • Connection : When you play back your 16:9 movies on standard TV sets with a 4:3 aspect ratio, the TV set will switch automatically to widescreen mode if it is compatible with the Video ID-1 system. Otherwise, change the aspect ratio of the TV manually. About the HDMI terminal The HDMI (High-Definition Multimedia Interface) connection ( ) is a convenient alldigital connection using a single cable for both video and audio. When you connect the camcorder to an HDTV equipped with an HDMI terminal, you can enjoy video and audio playback at the highest quality. - The HDMI OUT mini terminal on the camcorder is for output only. Do not connect it to an HDMI output terminal on an external device, as this may damage the camcorder. - Correct operation cannot be guaranteed when connecting the camcorder to DVI monitors. - Depending on the HDTV, correct playback of personal video content may not be possible using connection . Try one of the other connections. - While the camcorder is connected to an HDTV using connection , there will no video output from other terminals. 81
-
 1
1 -
2
-
3
-
4
-
5
-
6
-
7
-
8
-
9
-
10
-
11
-
12
-
13
-
14
-
15
-
16
-
17
-
18
-
19
-
20
-
21
-
22
-
23
-
24
-
25
-
26
-
27
-
28
-
29
-
30
-
31
-
32
-
33
-
34
-
35
-
36
-
37
-
38
-
39
-
40
-
41
-
42
-
43
-
44
-
45
-
46
-
47
-
48
-
49
-
50
-
51
-
52
-
53
-
54
-
55
-
56
-
57
-
58
-
59
-
60
-
61
-
62
-
63
-
64
-
65
-
66
-
67
-
68
-
69
-
70
-
71
-
72
-
73
-
74
-
75
-
 76
76 -
 77
77 -
 78
78 -
 79
79 -
 80
80 -
 81
81 -
 82
82 -
 83
83 -
 84
84 -
 85
85 -
 86
86 -
87
-
88
-
89
-
90
-
91
-
92
-
93
-
94
-
95
-
96
-
97
-
98
-
99
-
100
-
101
-
102
-
103
-
104
-
105
-
106
-
107
-
108
-
109
-
110
-
111
-
112
-
113
-
114
-
115
-
116
-
117
-
118
-
119
-
120
-
121
-
122
-
123
-
124
-
125
-
126
-
127
-
128
-
129
 |
 |