Canon MX860 MX860 Getting Started For Mac Users - Page 10
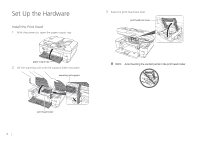
Install the Ink Tanks
 |
UPC - 013803102963
View all Canon MX860 manuals
Add to My Manuals
Save this manual to your list of manuals |
Page 10 highlights
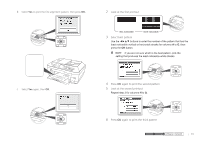
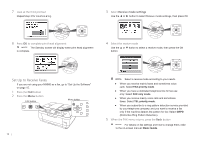
Install the Ink Tanks 1 Unwrap the first ink tank Pull the orange tape off to remove the protective wrap. 3 Insert the ink tank into the print head a Slide the ink tank into the matching color slot. 2 Remove protective cap Hold the ink tank as shown, and twist the cap off. b Press the PUSH mark until it clicks into place. Do not grip the tank with force or hold the tank on the sides to avoid squeezing ink from the tank. ink light will turn red Take care to match the inks with the labels in the print head. 4 Repeat steps 1-3 until all remaining ink tanks are in place and all ink lights are red. 10
-
 1
1 -
2
-
3
-
4
-
 5
5 -
 6
6 -
 7
7 -
 8
8 -
 9
9 -
 10
10 -
 11
11 -
 12
12 -
 13
13 -
 14
14 -
 15
15 -
16
-
17
-
18
-
19
-
20
-
21
-
22
-
23
-
24
-
25
-
26
-
27
-
28
-
29
-
30
-
31
-
32
-
33
-
34
-
35
-
36
-
37
-
38
 |
 |

10
Install the Ink Tanks
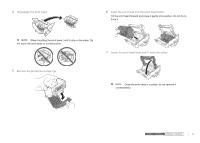
Unwrap the first ink tank
1
Pull the orange tape off to remove the protective wrap.
Remove protective cap
2
Hold the ink tank as shown, and twist the cap off.
Do not grip the tank with force or hold the tank on the
sides to avoid squeezing ink from the tank.
Insert the ink tank into the print head
3
Slide the ink tank into the matching color slot.
a
Press the PUSH mark until it clicks into place.
b
ink light will turn red
Take care to match the inks with the labels in the print
head.
Repeat steps 1–3 until all remaining ink tanks are in place and all
4
ink lights are red.