Canon MX860 MX860 Getting Started For Mac Users - Page 22
Add the Printer OS X v10.3.9, Select the Scanner - mac
 |
UPC - 013803102963
View all Canon MX860 manuals
Add to My Manuals
Save this manual to your list of manuals |
Page 22 highlights
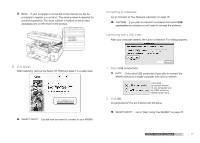
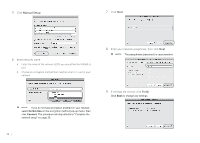
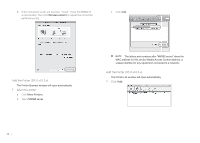
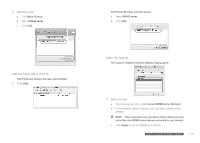
c Click Add. Add the Printer (OS X v10.3.9) The Printer List window will open automatically. 1 Click Add The Printer Browser window opens. a Select MX860 series. 22 b Click Add. Select the Scanner The Canon IJ Network Scanner Selector dialog opens. 1 Select scanner a From the pop-up menu, select Canon MX860 series Network. b In the Network Device List pane, select the MAC address of the MX860. There should be only one device listed unless you have more than one MX860 series device connected to your network. c Click Apply to use the MX860 as a scanner. d Confirm that a checkmark appears next to the selected device, then click Exit. Congratulations! You are finished with the setup. Go to "Start Using Your MX860!" on page 37.
-
 1
1 -
2
-
3
-
4
-
5
-
6
-
7
-
8
-
9
-
10
-
11
-
12
-
13
-
14
-
15
-
16
-
 17
17 -
 18
18 -
 19
19 -
 20
20 -
 21
21 -
 22
22 -
 23
23 -
 24
24 -
 25
25 -
 26
26 -
 27
27 -
28
-
29
-
30
-
31
-
32
-
33
-
34
-
35
-
36
-
37
-
38
 |
 |

22
Click
c
Add
.
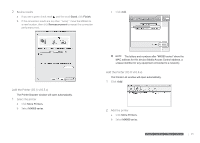
Add the Printer (OS X v10.3.9)
The Printer List window will open automatically.
Click
1
Add
The Printer Browser window opens.
Select
a
MX860 series
.
Click
b
Add
.
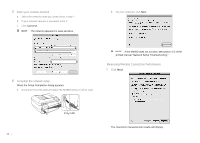
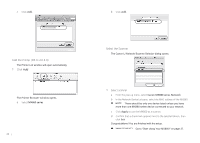
Select the Scanner
The Canon IJ Network Scanner Selector dialog opens.
Select scanner
1
From the pop-up menu, select
a
Canon MX860 series Network
.
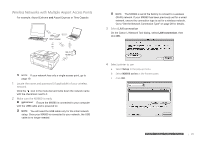
In the Network Device List pane, select the MAC address of the MX860.
b
There should be only one device listed unless you have
more than one MX860 series device connected to your network.
Click
c
Apply
to use the MX860 as a scanner.
Confirm that a checkmark appears next to the selected device, then
d
click
Exit
.
Congratulations! You are finished with the setup.
Go to
"Start Using Your MX860!" on page 37.