Canon PC740 Service Manual - Page 119
Control, Panel
 |
View all Canon PC740 manuals
Add to My Manuals
Save this manual to your list of manuals |
Page 119 highlights
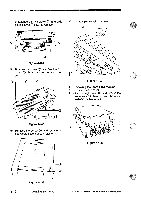
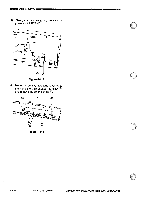
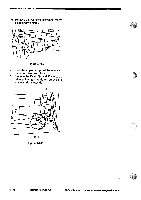
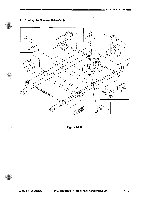
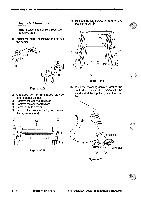
MECHANICAL SYSTEM- 3) While disengaging the three claws ®, remove the lower front cover S. B. Control Panel 1. Removing the Control Panel 1) Open the copier's top unit. 2) Remove the two screws C), and remove the front upper cover Z. 0 0 O Figure 4-109 Caution: When installing the multifeeder, go through the:following steps: 1) Turn on the power switch, and select multifeeder mode; then, press, the Copy Start key. . .2) When the'.pick-.1p..gear unit has riserito its topmost position, .turn:: off the power switch. 0 Figure 4-111 3) Disengage the three claws ®, and remove the control panel cover (D. Pick-up gear unit Figure 4-110 3) After installing the multifeeder unit, select multifeeder mode and make one copy. 00 0 Figure 4-112 COPYRIGHT © 1994 CANON INC. CANON PC720174017501770 REY.O AUG.1994 PRINTEDINJAPAN oMPRIMEAU JAPON) 4 - 3
-
 1
1 -
2
-
3
-
4
-
5
-
6
-
7
-
8
-
9
-
10
-
11
-
12
-
13
-
14
-
15
-
16
-
17
-
18
-
19
-
20
-
21
-
22
-
23
-
24
-
25
-
26
-
27
-
28
-
29
-
30
-
31
-
32
-
33
-
34
-
35
-
36
-
37
-
38
-
39
-
40
-
41
-
42
-
43
-
44
-
45
-
46
-
47
-
48
-
49
-
50
-
51
-
52
-
53
-
54
-
55
-
56
-
57
-
58
-
59
-
60
-
61
-
62
-
63
-
64
-
65
-
66
-
67
-
68
-
69
-
70
-
71
-
72
-
73
-
74
-
75
-
76
-
77
-
78
-
79
-
80
-
81
-
82
-
83
-
84
-
85
-
86
-
87
-
88
-
89
-
90
-
91
-
92
-
93
-
94
-
95
-
96
-
97
-
98
-
99
-
100
-
101
-
102
-
103
-
104
-
105
-
106
-
107
-
108
-
109
-
110
-
111
-
112
-
113
-
 114
114 -
 115
115 -
 116
116 -
 117
117 -
 118
118 -
 119
119 -
 120
120 -
 121
121 -
 122
122 -
 123
123 -
 124
124 -
125
-
126
-
127
-
128
-
129
-
130
-
131
-
132
-
133
-
134
-
135
-
136
-
137
-
138
-
139
-
140
-
141
-
142
-
143
-
144
-
145
-
146
-
147
-
148
-
149
-
150
-
151
-
152
-
153
-
154
-
155
-
156
-
157
-
158
-
159
-
160
-
161
-
162
-
163
-
164
-
165
-
166
-
167
-
168
-
169
-
170
-
171
-
172
-
173
-
174
-
175
-
176
-
177
-
178
-
179
-
180
-
181
-
182
-
183
-
184
-
185
-
186
-
187
-
188
-
189
-
190
-
191
-
192
-
193
-
194
-
195
-
196
-
197
-
198
-
199
-
200
 |
 |
