Canon PIXMA iP2600 Quick Start Guide - Page 13
Paper Handling, Recommended Paper and Requirements, Media Type, Model, Paper, Support Load, Limit - printer manual
 |
View all Canon PIXMA iP2600 manuals
Add to My Manuals
Save this manual to your list of manuals |
Page 13 highlights
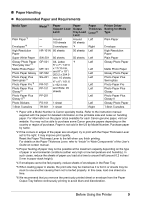
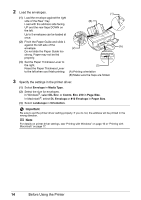
„ Paper Handling z Recommended Paper and Requirements Media Type Plain Paper*3 Envelopes*4 High Resolution Paper Super White Paper Glossy Photo Paper "Everyday Use"*5 Matte Photo Paper Photo Paper Glossy Photo Paper Plus Semi-gloss*5 Photo Paper Pro*5 Photo Paper Plus Glossy*5 Photo Paper Plus Glossy II*5 Photo Stickers T-Shirt Transfers Model*1 - - HR-101N SW-201 GP-501 MP-101 GP-502 SG-201 PR-101 PP-101 PP-201 PS-101 TR-301 Paper Support Load Limit Around 100 sheets 5 envelopes 80 sheets 80 sheets A4, Letter, 5" x 7" / 127.0 x 177.8 mm, and 8" x 10" / 203.2 x 254.0 mm: 10 sheets 4" x 6" / 101.6 x 152.4 mm and Wide: 20 sheets 1 sheet 1 sheet Paper Output Tray Load Limit Around 50 sheets *6 50 sheets 50 sheets *6 Paper Thickness Lever*2 Left Right Left Left Left Left Left Left Left Left Left Left Right Printer Driver Setting for Media Type Plain Paper Envelope High Resolution Paper Plain Paper Glossy Photo Paper Matte Photo Paper Glossy Photo Paper Photo Paper Plus Semi-gloss Photo Paper Pro Photo Paper Plus Glossy Photo Paper Plus Glossy II Glossy Photo Paper T-Shirt Transfers *1 Paper with a Model Number is Canon specialty media. Refer to the instruction manual supplied with the paper for detailed information on the printable side and notes on handling paper. For information on the paper sizes available for each Canon genuine paper, visit our website. You may not be able to purchase some Canon genuine papers depending on the country or region of purchase. Paper is not sold in the US by Model Number. Purchase paper by name. *2 If the corners or edges of the paper are smudged, try to print with the Paper Thickness Lever set to the right. It may improve print quality. Reset the Paper Thickness Lever to the left when you finish printing. For details on the Paper Thickness Lever, refer to "Inside" in "Main Components" of the User's Guide on-screen manual. *3 Proper feeding of paper may not be possible at the maximum capacity depending on the type of paper or environmental conditions (either very high or low temperature and humidity). In such cases, reduce the sheets of paper you load at a time to around half (around 0.2 inches / 5 mm in paper stack height). *4 If envelopes cannot be fed properly, reduce sheets of envelopes in the Rear Tray. *5 When loading paper in stacks, the print side may be marked as it is fed in or sheets may be stuck to one another causing them not to be fed properly. In this case, load one sheet at a time. *6 We recommend that you remove the previously printed sheet or envelope from the Paper Output Tray before continuously printing to avoid blurs and discoloration. Before Using the Printer 9
-
 1
1 -
2
-
3
-
4
-
5
-
6
-
7
-
 8
8 -
 9
9 -
 10
10 -
 11
11 -
 12
12 -
 13
13 -
 14
14 -
 15
15 -
 16
16 -
 17
17 -
 18
18 -
19
-
20
-
21
-
22
-
23
-
24
-
25
-
26
-
27
-
28
-
29
-
30
-
31
-
32
-
33
-
34
-
35
-
36
-
37
-
38
-
39
-
40
-
41
-
42
-
43
-
44
-
45
-
46
-
47
-
48
-
49
-
50
-
51
-
52
-
53
-
54
-
55
-
56
-
57
-
58
-
59
-
60
-
61
-
62
-
63
-
64
-
65
-
66
-
67
-
68
-
69
-
70
-
71
-
72
 |
 |
