Canon PowerShot SX620 HS User Manual - Page 128
Configuring Print Settings
 |
View all Canon PowerShot SX620 HS manuals
Add to My Manuals
Save this manual to your list of manuals |
Page 128 highlights
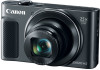
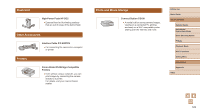
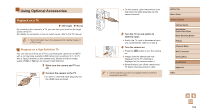
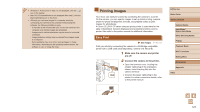
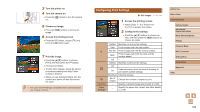
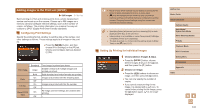
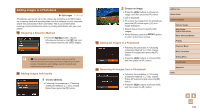
3 Turn the printer on. 4 Turn the camera on. ●●Press the [ ] button to turn the camera on. 5 Choose an image. ●●Press the [ ][ ] buttons to choose an image. 6 Access the printing screen. ●●Press the [ ] button, choose [ ], and press the [ ] button again. 7 Print the image. ●●Press the [ ][ ] buttons to choose [Print], and then press the [ ] button. ●●Printing now begins. ●●To print other images, repeat the above procedures starting from step 5 after printing is finished. ●●When you are finished printing, turn the camera and printer off and disconnect the cable. ●● For Canon-brand PictBridge-compatible printers (sold separately), see "Printers" (= 123). Configuring Print Settings Still Images Movies 1 Access the printing screen. ●●Follow steps 1 - 6 in "Easy Print" (=127) to access this screen. 2 Configure the settings. ●●Press the [ ][ ] buttons to choose an item, and then press the [ ][ ] buttons to choose an option. Cropping Paper Settings Default Matches current printer settings. Date Prints images with the date added. File No. Prints images with the file number added. Both Prints images with both the date and file number added. Off - Default Matches current printer settings. Off - On Uses information from the time of shooting to print under optimal settings. Red-Eye1 Corrects red-eye. No. of Copies Choose the number of copies to print. - Specify a desired image area to print (=129). - Specify the paper size, layout, and other details (= 129). Before Use Basic Guide Advanced Guide Camera Basics Auto Mode / Hybrid Auto Mode Other Shooting Modes P Mode Playback Mode Wi-Fi Functions Setting Menu Accessories Appendix Index 128
-
 1
1 -
2
-
3
-
4
-
5
-
6
-
7
-
8
-
9
-
10
-
11
-
12
-
13
-
14
-
15
-
16
-
17
-
18
-
19
-
20
-
21
-
22
-
23
-
24
-
25
-
26
-
27
-
28
-
29
-
30
-
31
-
32
-
33
-
34
-
35
-
36
-
37
-
38
-
39
-
40
-
41
-
42
-
43
-
44
-
45
-
46
-
47
-
48
-
49
-
50
-
51
-
52
-
53
-
54
-
55
-
56
-
57
-
58
-
59
-
60
-
61
-
62
-
63
-
64
-
65
-
66
-
67
-
68
-
69
-
70
-
71
-
72
-
73
-
74
-
75
-
76
-
77
-
78
-
79
-
80
-
81
-
82
-
83
-
84
-
85
-
86
-
87
-
88
-
89
-
90
-
91
-
92
-
93
-
94
-
95
-
96
-
97
-
98
-
99
-
100
-
101
-
102
-
103
-
104
-
105
-
106
-
107
-
108
-
109
-
110
-
111
-
112
-
113
-
114
-
115
-
116
-
117
-
118
-
119
-
120
-
121
-
122
-
 123
123 -
 124
124 -
 125
125 -
 126
126 -
 127
127 -
 128
128 -
 129
129 -
 130
130 -
 131
131 -
 132
132 -
 133
133 -
134
-
135
-
136
-
137
-
138
-
139
-
140
-
141
-
142
-
143
-
144
-
145
-
146
-
147
-
148
-
149
-
150
-
151
-
152
-
153
-
154
-
155
-
156
-
157
 |
 |