Canon REALiS WX6500 Pro AV User Manual - Page 110
Submenu, Function, Left, Right, Top, Bottom, Width, Start, position, Option, Red/Green/Blue
 |
View all Canon REALiS WX6500 Pro AV manuals
Add to My Manuals
Save this manual to your list of manuals |
Page 110 highlights
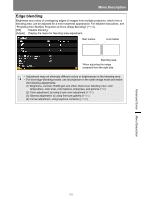
Menu Description Submenu Side Color blending adjustment Left, Right, Top, Bottom Width Start position Function Select the direction of the blending area to adjust. Specify the width between the start and end markers. Moves the position of the start marker. • Large blending areas may cover input signal dialog boxes and other interface elements. In this case, momentarily set edge blending to [Off] and check the display. • Although the starting marker is normally aligned with the image edge, it can also be aligned toward the center of the image. In this case, the black blending area will lie outside of the starting marker. Adjust unwanted colors or discrepancies between colors in the blending area. Submenu Function Off Do not adjust colors of blended images. Adjust unwanted colors or discrepancies between colors in the blending area. Adjust Option White Red/Green/Blue Function Simultaneously adjust red, green, and blue to correct unwanted colors or discrepancies in the blending area. Individually adjust red, green, and blue to correct unwanted colors or discrepancies in the blending area. 110
-
 1
1 -
2
-
3
-
4
-
5
-
6
-
7
-
8
-
9
-
10
-
11
-
12
-
13
-
14
-
15
-
16
-
17
-
18
-
19
-
20
-
21
-
22
-
23
-
24
-
25
-
26
-
27
-
28
-
29
-
30
-
31
-
32
-
33
-
34
-
35
-
36
-
37
-
38
-
39
-
40
-
41
-
42
-
43
-
44
-
45
-
46
-
47
-
48
-
49
-
50
-
51
-
52
-
53
-
54
-
55
-
56
-
57
-
58
-
59
-
60
-
61
-
62
-
63
-
64
-
65
-
66
-
67
-
68
-
69
-
70
-
71
-
72
-
73
-
74
-
75
-
76
-
77
-
78
-
79
-
80
-
81
-
82
-
83
-
84
-
85
-
86
-
87
-
88
-
89
-
90
-
91
-
92
-
93
-
94
-
95
-
96
-
97
-
98
-
99
-
100
-
101
-
102
-
103
-
104
-
 105
105 -
 106
106 -
 107
107 -
 108
108 -
 109
109 -
 110
110 -
 111
111 -
 112
112 -
 113
113 -
 114
114 -
 115
115 -
116
-
117
-
118
-
119
-
120
-
121
-
122
-
123
-
124
-
125
-
126
-
127
-
128
-
129
-
130
-
131
-
132
-
133
-
134
-
135
-
136
-
137
-
138
-
139
-
140
-
141
-
142
-
143
-
144
-
145
-
146
-
147
-
148
-
149
-
150
-
151
-
152
-
153
-
154
-
155
-
156
-
157
-
158
-
159
-
160
-
161
-
162
-
163
-
164
-
165
-
166
-
167
-
168
-
169
-
170
-
171
-
172
-
173
-
174
-
175
-
176
-
177
-
178
-
179
-
180
-
181
-
182
-
183
-
184
-
185
-
186
-
187
-
188
-
189
-
190
-
191
-
192
-
193
-
194
-
195
-
196
-
197
-
198
-
199
-
200
-
201
-
202
-
203
-
204
-
205
-
206
-
207
-
208
 |
 |
