Canon REALiS WX6500 Pro AV User Manual - Page 113
Screen color, On screen, Menu position, Guide
 |
View all Canon REALiS WX6500 Pro AV manuals
Add to My Manuals
Save this manual to your list of manuals |
Page 113 highlights
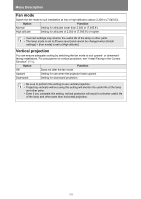
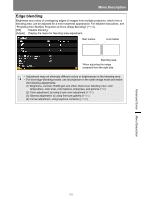
Menu Description Screen color > [Install settings] > [Screen color] You can adjust the color quality of the images projected according to the color of the projection screen. Submenu Normal Greenboard Adjust Function Select this if a standard type of projection screen is used. The images are projected in a light quality similar to that of natural light. Select if a dark green surface such as a blackboard is used as the screen. The color quality similar to [Normal] is obtained on the greenboard. Select to fine-tune red, green and blue. On screen > [Install settings] > [On screen] Specify display details for on-screen menus, help, and warning or precaution icons. Advanced Guide Menu Description Menu position Reposition menu display. Use the buttons to move the menu to the desired position. Guide Shows the guide screen. Option Function Off Hides the guide screen. On Shows the guide screen. The guide screen is shown at the following cases. • No input signal is detected. (P54) • An invalid button is pressed in [BLANK], [FREEZE], or [D.ZOOM] mode. (P35) • When positional lock (P105) is set to [On] and buttons locked by this feature are pressed. • When the projector is already on and the POWER button is pressed. 113
-
 1
1 -
2
-
3
-
4
-
5
-
6
-
7
-
8
-
9
-
10
-
11
-
12
-
13
-
14
-
15
-
16
-
17
-
18
-
19
-
20
-
21
-
22
-
23
-
24
-
25
-
26
-
27
-
28
-
29
-
30
-
31
-
32
-
33
-
34
-
35
-
36
-
37
-
38
-
39
-
40
-
41
-
42
-
43
-
44
-
45
-
46
-
47
-
48
-
49
-
50
-
51
-
52
-
53
-
54
-
55
-
56
-
57
-
58
-
59
-
60
-
61
-
62
-
63
-
64
-
65
-
66
-
67
-
68
-
69
-
70
-
71
-
72
-
73
-
74
-
75
-
76
-
77
-
78
-
79
-
80
-
81
-
82
-
83
-
84
-
85
-
86
-
87
-
88
-
89
-
90
-
91
-
92
-
93
-
94
-
95
-
96
-
97
-
98
-
99
-
100
-
101
-
102
-
103
-
104
-
105
-
106
-
107
-
 108
108 -
 109
109 -
 110
110 -
 111
111 -
 112
112 -
 113
113 -
 114
114 -
 115
115 -
 116
116 -
 117
117 -
 118
118 -
119
-
120
-
121
-
122
-
123
-
124
-
125
-
126
-
127
-
128
-
129
-
130
-
131
-
132
-
133
-
134
-
135
-
136
-
137
-
138
-
139
-
140
-
141
-
142
-
143
-
144
-
145
-
146
-
147
-
148
-
149
-
150
-
151
-
152
-
153
-
154
-
155
-
156
-
157
-
158
-
159
-
160
-
161
-
162
-
163
-
164
-
165
-
166
-
167
-
168
-
169
-
170
-
171
-
172
-
173
-
174
-
175
-
176
-
177
-
178
-
179
-
180
-
181
-
182
-
183
-
184
-
185
-
186
-
187
-
188
-
189
-
190
-
191
-
192
-
193
-
194
-
195
-
196
-
197
-
198
-
199
-
200
-
201
-
202
-
203
-
204
-
205
-
206
-
207
-
208
 |
 |
