Canon REALiS WX6500 Pro AV User Manual - Page 97
Image mode, Create profile, IMAGE
 |
View all Canon REALiS WX6500 Pro AV manuals
Add to My Manuals
Save this manual to your list of manuals |
Page 97 highlights
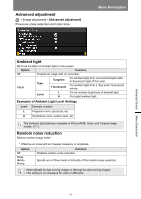
Menu Description Image mode > [Image adjustment] > [Image mode] Select the overall image quality for projected images. Can also be selected by pressing the IMAGE button on the remote control. (P70) Option Standard Types of Images Computer screens, or media played with video software Characteristics Bright overall; white, with natural colors Presentation Images mainly consisting of text Bright overall Dynamic VividPhoto Video Video content Digital photos Video from camcorders Bright overall Subdued brightness overall, with vibrant colors Somewhat dark; colors resemble TV Photo/sRGB Digital photos from sRGBcompatible cameras Somewhat dark; conforms to the sRGB standard Cinema User 1 - 5 Movies Designed especially for movies Up to five user profiles can be stored for your selected image quality settings. Stored profiles are available in this setting as an image mode. Menus that are not available are grayed out or hidden. You can adjust the image quality by adjusting the following items in each image mode: [Brightness], [Contrast], [Sharpness], [Gamma], [Color adjustment], [Advanced adjustment], and [Lamp mode] Create profile > [Image adjustment] > [Create profile] Save desired image quality settings in up to five user profiles. • The saved settings consist of the brightness, contrast, sharpness, gamma, color adjustment, advanced adjustment, and lamp mode. • Although only five user profiles are displayed, different profiles can be created to apply depending on whether the projector is connected to a computer (with Analog PC, Digital PC, HDMI (when [HDMI image input] (P121) is [Computer]), or HDBaseT (when [HDBaseT image input] (P121) is [Computer])), AV equipment (with Component, HDMI (when [HDMI image input] (P121) is [Auto]), or HDBaseT (when [HDBaseT image input] (P121) is [Auto])), a LAN, or a USB flash drive. As a result, it is possible to save up to 10 settings. • The image mode name which was the basis for the settings change is also saved in the user memory. When a user memory is selected as the image mode, the image mode that was the base for that user memory is displayed in the menu as [Baseline image mode]. Advanced Guide Menu Description 97
-
 1
1 -
2
-
3
-
4
-
5
-
6
-
7
-
8
-
9
-
10
-
11
-
12
-
13
-
14
-
15
-
16
-
17
-
18
-
19
-
20
-
21
-
22
-
23
-
24
-
25
-
26
-
27
-
28
-
29
-
30
-
31
-
32
-
33
-
34
-
35
-
36
-
37
-
38
-
39
-
40
-
41
-
42
-
43
-
44
-
45
-
46
-
47
-
48
-
49
-
50
-
51
-
52
-
53
-
54
-
55
-
56
-
57
-
58
-
59
-
60
-
61
-
62
-
63
-
64
-
65
-
66
-
67
-
68
-
69
-
70
-
71
-
72
-
73
-
74
-
75
-
76
-
77
-
78
-
79
-
80
-
81
-
82
-
83
-
84
-
85
-
86
-
87
-
88
-
89
-
90
-
91
-
 92
92 -
 93
93 -
 94
94 -
 95
95 -
 96
96 -
 97
97 -
 98
98 -
 99
99 -
 100
100 -
 101
101 -
 102
102 -
103
-
104
-
105
-
106
-
107
-
108
-
109
-
110
-
111
-
112
-
113
-
114
-
115
-
116
-
117
-
118
-
119
-
120
-
121
-
122
-
123
-
124
-
125
-
126
-
127
-
128
-
129
-
130
-
131
-
132
-
133
-
134
-
135
-
136
-
137
-
138
-
139
-
140
-
141
-
142
-
143
-
144
-
145
-
146
-
147
-
148
-
149
-
150
-
151
-
152
-
153
-
154
-
155
-
156
-
157
-
158
-
159
-
160
-
161
-
162
-
163
-
164
-
165
-
166
-
167
-
168
-
169
-
170
-
171
-
172
-
173
-
174
-
175
-
176
-
177
-
178
-
179
-
180
-
181
-
182
-
183
-
184
-
185
-
186
-
187
-
188
-
189
-
190
-
191
-
192
-
193
-
194
-
195
-
196
-
197
-
198
-
199
-
200
-
201
-
202
-
203
-
204
-
205
-
206
-
207
-
208
 |
 |
