Canon SELPHY CP790 SELPHY CP790 Printer User Guide - Page 23
Getting the Best Results with Auto Correction Image Optimize
 |
View all Canon SELPHY CP790 manuals
Add to My Manuals
Save this manual to your list of manuals |
Page 23 highlights
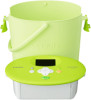
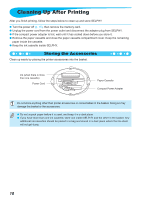
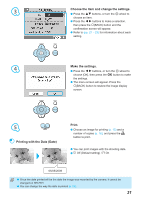
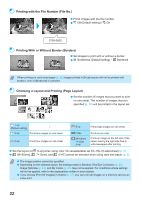
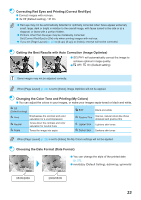
Correcting Red Eyes and Printing (Correct Red-Eye) Correct images with red-eye. Off (Default setting) / On Red-eye may not be automatically detected or optimally corrected when faces appear extremely small, large, dark or bright in relation to the overall image, with faces turned to the side or at a diagonal, or faces with a portion hidden. Portions other than the eyes may be mistakenly corrected. Set [Correct Red-Eye] to [On] only when printing images with red-eye. If you set [Page Layout] (p. 22) to [4-up], [8-up], or [Index], red-eye will not be corrected. Getting the Best Results with Auto Correction (Image Optimize) SELPHY will automatically correct the image to achieve optimum image quality. Off / On (Default setting) Some images may not be adjusted correctly. When [Page Layout] (p. 22) is set to [Index], Image Optimize will not be applied. Changing the Color Tone and Printing (My Colors) You can adjust the colors in your images, or make your images sepia-toned or black and white. Off (Default setting) - Vivid Neutral Emphasizes the contrast and color saturation for a vivid impression Tones down the contrast and color saturation for neutral hues Sepia Tones the image into sepia B/W Black and white Positive Film Intense, natural colors like those obtained with positive film Lighter Skin Lightens skin tones Darker Skin Darkens skin tones When [Page Layout] (p. 22) is set to [Index], the My Colors settings will not be applied. Choosing the Date Format (Date Format) You can change the style of the printed date (p. 21). mm/dd/yy (Default Setting), dd/mm/yy, yy/mm/dd 05/05/2009 2009/05/05 23
-
 1
1 -
2
-
3
-
4
-
5
-
6
-
7
-
8
-
9
-
10
-
11
-
12
-
13
-
14
-
15
-
16
-
17
-
 18
18 -
 19
19 -
 20
20 -
 21
21 -
 22
22 -
 23
23 -
 24
24 -
 25
25 -
 26
26 -
 27
27 -
 28
28 -
29
-
30
-
31
-
32
-
33
-
34
-
35
-
36
-
37
-
38
-
39
-
40
-
41
-
42
-
43
-
44
-
45
-
46
-
47
-
48
-
49
-
50
-
51
-
52
 |
 |