Canon SELPHY CP790 SELPHY CP790 Printer User Guide - Page 25
Make the setting., Print. - photo
 |
View all Canon SELPHY CP790 manuals
Add to My Manuals
Save this manual to your list of manuals |
Page 25 highlights
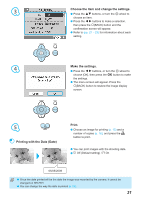
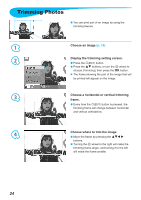
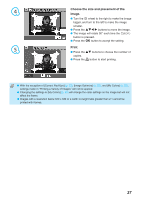
5 Make the setting. Once you have pressed the o button, the trimming frame is set and the printer restores the image display screen. To trim other images before printing at the same time, repeat Steps 1 to 5. To cancel trimming after the trimming frame has been set, press the m(EDIT) button, then choose [Reset trimming] from the menu and press the o button. Press the o button again to confirm. 6 Print. Press the ud buttons to choose the number of copies. Press the p button to start printing. After printing has finished, all trimming frame settings will be cleared. Images with a resolution smaller than 640 x 480 pixels, larger than 5616 × 3744 pixels, or with a width-to-height ratio narrower than 16:9 cannot be trimmed. You can set up to 50 trimming frames at a time. You can also trim images when using the [Frame Print] (p. 26), [Calendar Print] (p. 28), or [Photo Diary Print] (p. 30) settings. Trimming settings will not be saved if the power is turned off or the memory card is removed. 25
-
 1
1 -
2
-
3
-
4
-
5
-
6
-
7
-
8
-
9
-
10
-
11
-
12
-
13
-
14
-
15
-
16
-
17
-
18
-
19
-
 20
20 -
 21
21 -
 22
22 -
 23
23 -
 24
24 -
 25
25 -
 26
26 -
 27
27 -
 28
28 -
 29
29 -
 30
30 -
31
-
32
-
33
-
34
-
35
-
36
-
37
-
38
-
39
-
40
-
41
-
42
-
43
-
44
-
45
-
46
-
47
-
48
-
49
-
50
-
51
-
52
 |
 |
