Canon VIXIA HF R82 User Manual - Page 183
earching for, Point, word] field, touch [Not con d]. Enter
 |
View all Canon VIXIA HF R82 manuals
Add to My Manuals
Save this manual to your list of manuals |
Page 183 highlights
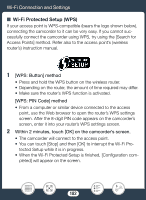
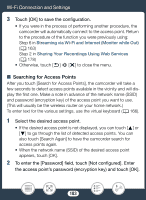
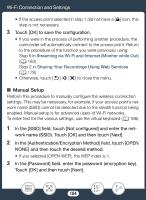
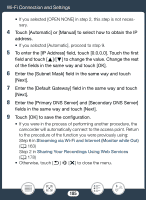
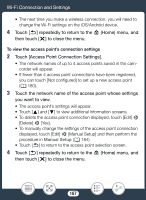
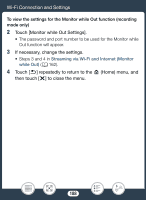
Wi-Fi Connection and Settings 3 Touch [OK] to save the configuration. • If you were in the process of performing another procedure, the camcorder will automatically connect to the access point. Return to the procedure of the function you were previously using: Step 6 in Streaming via Wi-Fi and Internet (Monitor while Out) (A 163) Step 2 in Sharing Your Recordings Using Web Services (A 178) • Otherwise, touch [K] > [X] to close the menu. ■ Searching for Access Points After you touch [Search for Access Points], the camcorder will take a few seconds to detect access points available in the vicinity and will display the first one. Make a note in advance of the network name (SSID) and password (encryption key) of the access point you want to use. (This will usually be the wireless router on your home network.) To enter text for the various settings, use the virtual keyboard (A 166). 1 Select the desired access point. • If the desired access point is not displayed, you can touch [Í] or [Î] to go through the list of detected access points. You can also touch [Search Again] to have the camcorder search for access points again. • When the network name (SSID) of the desired access point appears, touch [OK]. 2 To enter the [Password] field, touch [Not configured]. Enter the access point's password (encryption key) and touch [OK]. 183
-
 1
1 -
2
-
3
-
4
-
5
-
6
-
7
-
8
-
9
-
10
-
11
-
12
-
13
-
14
-
15
-
16
-
17
-
18
-
19
-
20
-
21
-
22
-
23
-
24
-
25
-
26
-
27
-
28
-
29
-
30
-
31
-
32
-
33
-
34
-
35
-
36
-
37
-
38
-
39
-
40
-
41
-
42
-
43
-
44
-
45
-
46
-
47
-
48
-
49
-
50
-
51
-
52
-
53
-
54
-
55
-
56
-
57
-
58
-
59
-
60
-
61
-
62
-
63
-
64
-
65
-
66
-
67
-
68
-
69
-
70
-
71
-
72
-
73
-
74
-
75
-
76
-
77
-
78
-
79
-
80
-
81
-
82
-
83
-
84
-
85
-
86
-
87
-
88
-
89
-
90
-
91
-
92
-
93
-
94
-
95
-
96
-
97
-
98
-
99
-
100
-
101
-
102
-
103
-
104
-
105
-
106
-
107
-
108
-
109
-
110
-
111
-
112
-
113
-
114
-
115
-
116
-
117
-
118
-
119
-
120
-
121
-
122
-
123
-
124
-
125
-
126
-
127
-
128
-
129
-
130
-
131
-
132
-
133
-
134
-
135
-
136
-
137
-
138
-
139
-
140
-
141
-
142
-
143
-
144
-
145
-
146
-
147
-
148
-
149
-
150
-
151
-
152
-
153
-
154
-
155
-
156
-
157
-
158
-
159
-
160
-
161
-
162
-
163
-
164
-
165
-
166
-
167
-
168
-
169
-
170
-
171
-
172
-
173
-
174
-
175
-
176
-
177
-
 178
178 -
 179
179 -
 180
180 -
 181
181 -
 182
182 -
 183
183 -
 184
184 -
 185
185 -
 186
186 -
 187
187 -
 188
188 -
189
-
190
-
191
-
192
-
193
-
194
-
195
-
196
-
197
-
198
-
199
-
200
-
201
-
202
-
203
-
204
-
205
-
206
-
207
-
208
-
209
-
210
-
211
-
212
-
213
-
214
-
215
-
216
-
217
-
218
-
219
-
220
-
221
-
222
-
223
-
224
-
225
-
226
-
227
-
228
-
229
-
230
-
231
-
232
-
233
-
234
-
235
-
236
-
237
-
238
-
239
-
240
-
241
-
242
-
243
-
244
-
245
-
246
-
247
-
248
-
249
-
250
-
251
-
252
-
253
-
254
-
255
-
256
-
257
-
258
-
259
-
260
-
261
-
262
-
263
-
264
-
265
-
266
-
267
-
268
-
269
-
270
-
271
-
272
-
273
-
274
-
275
-
276
-
277
-
278
-
279
-
280
-
281
-
282
-
283
-
284
-
285
-
286
-
287
-
288
 |
 |