Canon VIXIA HV30 HV30 Instruction Manual - Page 39
Std Play], 12bit], Auto], 2sec], Long Play] - reviews
 |
View all Canon VIXIA HV30 manuals
Add to My Manuals
Save this manual to your list of manuals |
Page 39 highlights
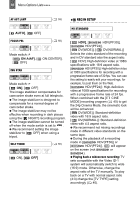
Menu Options Lists 39 DV REC MODE DV WIND SCREEN [ STD PLAY], [ LONG PLAY] When [HD STANDARD] is set to one of the DV standards, you can change the video quality and as a result, also the recording time available on the tape. Recording in LP mode extends the available recording time on the tape 1.5 times. Depending on the condition of the tape (long usage, imperfections, etc.) you may notice some video problems (blocky video artifacts, banding, etc.) in the playback picture when playing back recordings made in LP mode. We recommend using the SP mode for important recordings. If you make recordings in both SP and LP modes on the same tape, during playback you may notice some video problems in the picture at the point where the recording mode changes. When playing back in this camcorder tapes recorded in LP mode with other devices or vice versa, you may notice some problems in the playback picture or the sound may stop briefly. DV AUDIO DV [ 16bit], [ 12bit] When [HD STANDARD] is set to one of the DV standards, you can change the audio quality. [ 16bit]: To record sound at the highest quality. [ 12bit]: If you will dub audio or add a music track later with an external device. Mode switch: [ AUTO], [ OFF ] The camcorder automatically reduces the background sound of wind when recording outdoors. The wind screen cannot be turned off when the mode switch is set to . MIC ATT ( 61) [ ON], [ REVIEW OFF] [ OFF], [ 2sec], [ 4sec], [ 6sec], [ 8sec], [ 10sec] Selects the time to display a still image after it has been recorded. You can erase ( 65) the still image while you are reviewing it (or immediately after recording it, if set to [ OFF]). This menu item will not be available when the drive mode ( 56) is set to (continuous shooting), (high- speed continuous shooting) or (auto exposure bracketing). If you press DISP. while reviewing a still image, it will continue to be displayed indefinitely. Press PHOTO halfway to return to the normal display. AV DV ( 74) [ ON], [ OFF] Advanced Functions
-
 1
1 -
2
-
3
-
4
-
5
-
6
-
7
-
8
-
9
-
10
-
11
-
12
-
13
-
14
-
15
-
16
-
17
-
18
-
19
-
20
-
21
-
22
-
23
-
24
-
25
-
26
-
27
-
28
-
29
-
30
-
31
-
32
-
33
-
 34
34 -
 35
35 -
 36
36 -
 37
37 -
 38
38 -
 39
39 -
 40
40 -
 41
41 -
 42
42 -
 43
43 -
 44
44 -
45
-
46
-
47
-
48
-
49
-
50
-
51
-
52
-
53
-
54
-
55
-
56
-
57
-
58
-
59
-
60
-
61
-
62
-
63
-
64
-
65
-
66
-
67
-
68
-
69
-
70
-
71
-
72
-
73
-
74
-
75
-
76
-
77
-
78
-
79
-
80
-
81
-
82
-
83
-
84
-
85
-
86
-
87
-
88
-
89
-
90
-
91
-
92
-
93
-
94
-
95
-
96
-
97
-
98
-
99
-
100
-
101
-
102
-
103
-
104
-
105
-
106
-
107
-
108
-
109
 |
 |