Canon imageFORMULA DR-C125 Document Scanner User Manual - Page 13
Connecting to a Computer, STEP 3
 |
View all Canon imageFORMULA DR-C125 Document Scanner manuals
Add to My Manuals
Save this manual to your list of manuals |
Page 13 highlights
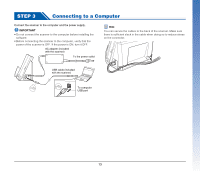
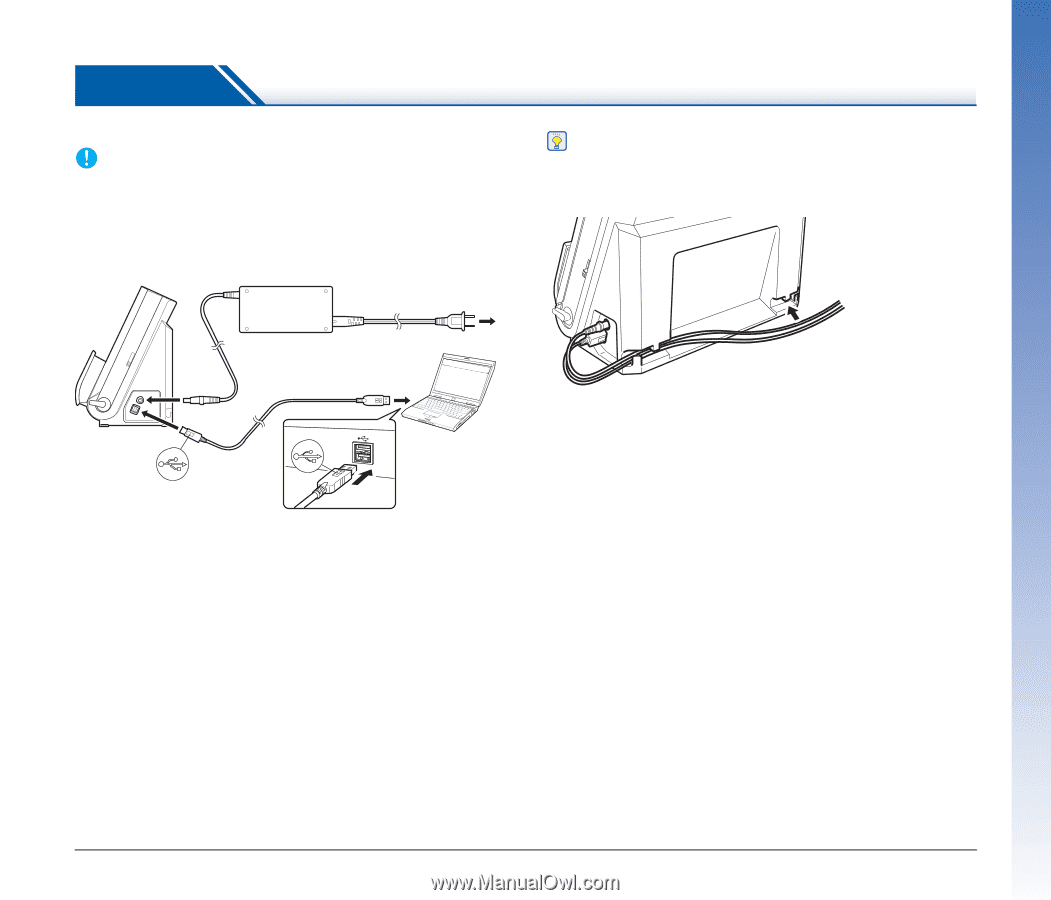
STEP 3 Connecting to a Computer Connect the scanner to the computer and the power supply. IMPORTANT • Do not connect the scanner to the computer before installing the software. • Before connecting the scanner to the computer, verify that the power of the scanner is OFF. If the power is ON, turn it OFF. AC adapter (included with the scanner) To the power outlet Hint You can secure the cables to the back of the scanner. Make sure there is sufficient slack in the cable when doing so to reduce stress on the connector. USB cable (included with the scanner) To computer USB port 13
-
 1
1 -
2
-
3
-
4
-
5
-
6
-
7
-
 8
8 -
 9
9 -
 10
10 -
 11
11 -
 12
12 -
 13
13 -
 14
14 -
 15
15 -
 16
16 -
 17
17 -
 18
18 -
19
-
20
-
21
-
22
-
23
-
24
-
25
-
26
-
27
-
28
-
29
-
30
-
31
-
32
-
33
-
34
-
35
-
36
-
37
-
38
-
39
-
40
-
41
-
42
-
43
-
44
-
45
-
46
-
47
-
48
-
49
-
50
-
51
-
52
-
53
-
54
-
55
-
56
-
57
-
58
-
59
-
60
-
61
-
62
-
63
-
64
-
65
-
66
-
67
-
68
-
69
-
70
-
71
-
72
-
73
-
74
-
75
-
76
-
77
-
78
-
79
-
80
-
81
-
82
-
83
-
84
-
85
-
86
-
87
-
88
-
89
-
90
-
91
-
92
-
93
-
94
-
95
-
96
-
97
-
98
-
99
-
100
-
101
-
102
-
103
-
104
-
105
-
106
 |
 |
13
STEP 3
Connecting to a Computer
Connect the scanner to the computer and the power supply.
IMPORTANT
• Do not connect the scanner to the computer before installing the
software.
• Before connecting the scanner to the computer, verify that the
power of the scanner is OFF. If the power is ON, turn it OFF.
Hint
You can secure the cables to the back of the scanner. Make sure
there is sufficient slack in the cable when doing so to reduce stress
on the connector.
To the power outlet
AC adapter (included
with the scanner)
USB cable (included
with the scanner)
To computer
USB port