Celestron Omni CG-4 Telescope Mount Astronomy Basics - Page 2
Otion, Atitude - and tripod
 |
View all Celestron Omni CG-4 Telescope Mount manuals
Add to My Manuals
Save this manual to your list of manuals |
Page 2 highlights
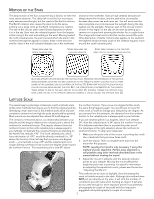
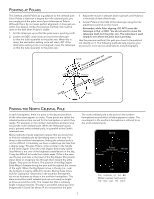
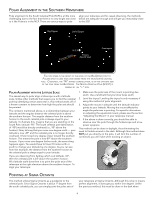
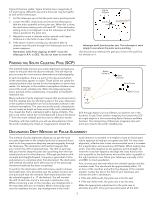
Motion of the Stars The daily motion of the Sun across the sky is familiar to even the most casual observer. This daily trek is not the Sun moving as early astronomers thought, but the result of the Earth's rotation. The Earth's rotation also causes the stars to do the same, scribing out a large circle as the Earth completes one rotation. The size of the circular path a star follows depends on where it is in the sky. Stars near the celestial equator form the largest circles rising in the east and setting in the west. Moving toward the north celestial pole, the point around which the stars in the northern hemisphere appear to rotate, these circles become smaller. Stars in the mid-celestial latitudes rise in the northeast and set in the northwest. Stars at high celestial latitudes are always above the horizon, and are said to be circumpolar because they never rise and never set. You will never see the stars complete one circle because the sunlight during the day washes out the starlight. However, part of this circular motion of stars in this region of the sky can be seen by setting up a camera on a tripod and opening the shutter for a couple hours. The image will reveal semicircles that revolve around the pole. (This description of stellar motions also applies to the southern hemisphere except all stars south of the celestial equator move around the south celestial pole.) Stars seen near the north celestial pole Stars seen near the celestial equator Stars seen looking in the opposite direction of the north celestial pole All stars appear to rotate around the celestial poles. However, the appearance of this motion varies depending on where you are looking in the sky. Near the north celestial pole the stars scribe out recognizable circles centered on the pole (1). Stars near the celestial equator also follow circular paths around the pole. But, the complete path is interrupted by the horizon. These appear to rise in the east and set in the west (2). Looking toward the opposite pole, stars curve or arc in the opposite direction scribing a circle around the opposite pole (3). Latitude Scale The easiest way to polar align a telescope is with a latitude scale. Unlike other methods that require you to find the celestial pole by identifying certain stars near it, this method works off of a known constant to determine how high the polar axis should be pointed. Most mounts can be adjusted from about 20 to 60 degrees. the northern horizon. If you move one degree further south, the same thing happens again. You would have to travel 70 miles north or south to change your latitude by one degree. As you can see from this example, the distance from the northern horizon to the celestial pole is always equal to your latitude. The constant, mentioned above, is a relationship between your latitude and the angular distance the celestial pole is above the northern (or southern) horizon. The angular distance from the northern horizon to the north celestial pole is always equal to your latitude. To illustrate this, imagine that you are standing on the North Pole, latitude +90°. The north celestial pole, which has a declination of +90°, would be directly overhead (i.e., 90° above the horizon). Now, let's say that you move one degree south - your latitude is now +89° and the celestial pole is no longer directly overhead. It has moved one degree closer toward the northern horizon. This means the pole is now 89° above If you are observing from Los Angeles, which is at latitude 34°, then the celestial pole is 34° above the northern horizon. All a latitude scale does then is to point the polar axis of the telescope at the right elevation above the northern (or southern) horizon. To align your telescope: 1. Make sure the polar axis of the mount is pointing due north. Use a landmark that you know faces north. 2. Level the tripod. There is a bubble level built into the mount for this purpose. NOTE: Leveling the tripod is only necessary if using this method of polar alignment. Perfect polar alignment is still possible using other methods described later in this manual without leveling the tripod. 3. Adjust the mount in altitude until the latitude indicator points to your latitude. Moving the mount affects the angle the polar axis is pointing. For specific information on adjusting the equatorial mount, please see the section "Adjusting the Mount." This method can be done in daylight, thus eliminating the need to fumble around in the dark. Although this method does NOT put you directly on the pole, it will limit the number of corrections you will make when tracking an object. It will also be accurate enough for short exposure prime focus planetary photography (a couple of seconds) and short exposure piggyback astrophotography (a couple of minutes). 2
-
 1
1 -
 2
2 -
 3
3 -
 4
4 -
 5
5 -
 6
6 -
 7
7 -
 8
8 -
9
-
10
-
11
-
12
-
13
-
14
-
15
-
16
-
17
-
18
-
19
-
20
-
21
-
22
-
23
-
24
-
25
-
26
-
27
-
28
-
29
-
30
-
31
-
32
-
33
-
34
-
35
 |
 |
