Cisco SPA1001 Administration Guide - Page 71
CTRL + F5, Tools, Internet Options, Security, Default level, Save - reset
 |
View all Cisco SPA1001 manuals
Add to My Manuals
Save this manual to your list of manuals |
Page 71 highlights
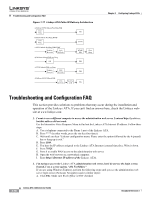
Chapter 3 Configuring Linksys ATAs Troubleshooting and Configuration FAQ B. Press CTRL + F5. This is a hard refresh, which forces Windows Explorer to load new webpages, not cached ones. C. Click Tools. Click Internet Options. Click the Security tab. Click the Default level button. Make sure the security level is Medium or lower. Then click the OK button. 3. How do I save my current SPA configuration? Currently, the only way is to do HTTPGET from an HTTP client, from which you get the entire HTML page. Alternatively, from your browser you can select File > Save as > HTML from any of the administration web server pages. Do this in Admin, Advanced mode. This saves all the tabs into one HTML file. This HTML file is helpful to provide to our support team when you have a problem or technical question. 4. How do I debug my SPA? Is there a syslog? SPA sends out debug information via syslog to a syslog server. The ports can be configured (by default the port is 514). A. Make sure you do not have firewall running on your PC that could block port 514. B. On the administration web server System tab, set as the IP address and port number of your syslog server. Note that this address has to be reachable from the Linksys ATA). C. Also, set to 3. You do not need to change the value of the parameter. D. To capture SIP signaling messages, under the Line tab, set to Full. The file output is syslog..log (for the default port setting, syslog.514.log) 5. How do I access the Linksys ATA if I forget my password? By default, the User and Admin accounts have no password. If the ITSP set the password for either account and you do not know what it is, you need to contact the ITSP. If the password for the user account was configured after you received the Linksys ATA, you can reset the device to the user factory default, which preserves any provisioning completed by the ITSP. If the Admin account needs to be reset, you have to perform a full factory reset, which also erases any provisioning. To reset the Linksys ATA to the factory defaults, perform the following steps: A. Connect an analog phone to the Linksys ATA and access the IVR by pressing ****. B. Press the appropriate code to reset the unit: • Press 877778# to reset the unit to the defaults as it shipped from the ITSP. This will reset the User account password to the default of blank. • Press 73738# to perform a full reset of unit to the defaults as it shipped from Linksys. This will reset the Admin account password to the default of blank. C. Press 1 to confirm the operation. Press * to cancel the operation. D. Login to the unit using the User or Admin account without a password and reconfigure the unit as necessary. 6. My Linksys ATA is behind a NAT device or firewall and I'm unable to make a call or I'm only receiving a one-way connection. What should I do? A. Configure your router to port forward "TCP port 80" to the ip address currently being used by SPA. If you do this often, we suggest that you use static IP address for the SPA, instead of DHCP. (For help with port forwarding, consult your router documentation) B. On the Line tab of the administration web server, change the value of to yes. On the SIP tab; change to yes, and to the IP address of your router. Document Version 3.1 Linksys ATA Administrator Guide 3-19
-
 1
1 -
2
-
3
-
4
-
5
-
6
-
7
-
8
-
9
-
10
-
11
-
12
-
13
-
14
-
15
-
16
-
17
-
18
-
19
-
20
-
21
-
22
-
23
-
24
-
25
-
26
-
27
-
28
-
29
-
30
-
31
-
32
-
33
-
34
-
35
-
36
-
37
-
38
-
39
-
40
-
41
-
42
-
43
-
44
-
45
-
46
-
47
-
48
-
49
-
50
-
51
-
52
-
53
-
54
-
55
-
56
-
57
-
58
-
59
-
60
-
61
-
62
-
63
-
64
-
65
-
 66
66 -
 67
67 -
 68
68 -
 69
69 -
 70
70 -
 71
71 -
 72
72 -
 73
73 -
 74
74 -
 75
75 -
 76
76 -
77
-
78
-
79
-
80
-
81
-
82
-
83
-
84
-
85
-
86
-
87
-
88
-
89
-
90
-
91
-
92
-
93
-
94
-
95
-
96
-
97
-
98
-
99
-
100
-
101
-
102
-
103
-
104
-
105
-
106
-
107
-
108
-
109
-
110
-
111
-
112
-
113
-
114
-
115
-
116
-
117
-
118
-
119
-
120
-
121
-
122
-
123
-
124
-
125
-
126
-
127
-
128
-
129
-
130
-
131
-
132
-
133
-
134
-
135
-
136
-
137
-
138
-
139
-
140
-
141
-
142
-
143
-
144
-
145
-
146
-
147
-
148
-
149
-
150
-
151
-
152
-
153
-
154
-
155
-
156
-
157
-
158
-
159
-
160
-
161
-
162
-
163
-
164
-
165
-
166
-
167
-
168
-
169
-
170
-
171
-
172
-
173
-
174
-
175
-
176
-
177
-
178
-
179
-
180
-
181
-
182
-
183
-
184
-
185
-
186
 |
 |