Cisco WAP4410N Administration Guide - Page 24
Navigating the Utility, Setup, Wireless - default password
 |
UPC - 745883583362
View all Cisco WAP4410N manuals
Add to My Manuals
Save this manual to your list of manuals |
Page 24 highlights
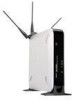
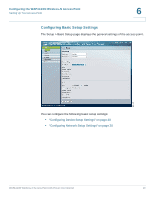
Setting Up the WAP4410N Wireless-N Access Point Navigating the Utility 5 system you are using. Use your computer's local Help and Support functionality and search for "IP Addressing." STEP 3 Launch a web browser, such as Internet Explorer or Mozilla Firefox. STEP 4 In the Address field enter the default DHCP address and press the Enter key. STEP 5 In the User Name and Password fields enter the default of admin. STEP 6 Click Log in. Navigating the Utility The web-based utility consists of the following main screens: • Setup • Wireless • Security Monitor • Administration • Status Setup This screen allows you to configure the host name and IP address settings and to set the time. This screen consists of the following screens: • Basic Setup-Configures the host name and IP address settings for this access point. • Time-Sets the time on this access point. • Advanced-Sets the HTTP Redirect and 802.1x supplicant settings for this access point. Wireless This screen allows you to enter a variety of wireless settings for the access point. WAP4410N Wireless-N Access Point with Power Over Internet 15
-
 1
1 -
2
-
3
-
4
-
5
-
6
-
7
-
8
-
9
-
10
-
11
-
12
-
13
-
14
-
15
-
16
-
17
-
18
-
 19
19 -
 20
20 -
 21
21 -
 22
22 -
 23
23 -
 24
24 -
 25
25 -
 26
26 -
 27
27 -
 28
28 -
 29
29 -
30
-
31
-
32
-
33
-
34
-
35
-
36
-
37
-
38
-
39
-
40
-
41
-
42
-
43
-
44
-
45
-
46
-
47
-
48
-
49
-
50
-
51
-
52
-
53
-
54
-
55
-
56
-
57
-
58
-
59
-
60
-
61
-
62
-
63
-
64
-
65
-
66
-
67
-
68
-
69
-
70
-
71
-
72
-
73
-
74
-
75
-
76
-
77
-
78
-
79
-
80
-
81
-
82
-
83
-
84
-
85
-
86
-
87
-
88
-
89
-
90
-
91
-
92
 |
 |
