D-Link DHP-W307AV User Manual
D-Link DHP-W307AV Manual
 |
View all D-Link DHP-W307AV manuals
Add to My Manuals
Save this manual to your list of manuals |
D-Link DHP-W307AV manual content summary:
- D-Link DHP-W307AV | User Manual - Page 1
- D-Link DHP-W307AV | User Manual - Page 2
Utility 22 PLC Settings 23 Wireless Setup Wizard 26 Add Wireless Device with WPS 31 D-Link DHP-W307AV User Manual Wireless Setup 33 LAN Setup - DHCP 35 LAN Setup - Static IP 36 MAC Address Filter 37 Advanced Wireless 38 User Limit 39 Admin 40 System 41 Firmware 42 Time 43 Schedules - D-Link DHP-W307AV | User Manual - Page 3
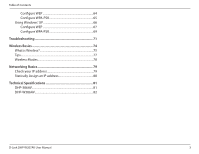
WEP 67 Configure WPA-PSK 69 Troubleshooting 71 Wireless Basics 74 What is Wireless 75 Tips 77 Wireless Modes 78 Networking Basics 79 Check your IP address 79 Statically Assign an IP address 80 Technical Specifications 81 DHP-306AV 81 DHP-W306AV 82 D-Link DHP-W307AV User Manual 3 - D-Link DHP-W307AV | User Manual - Page 4
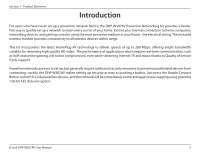
Section 1 - Product Overview PProacdkuacgteOCvoentrevnietsw • D-Link DHP-306AV Powerline AV Network Adapter • D-Link DHP-W306AV Powerline AV Wireless N Extender • CAT5 Ethernet Cable X 2 • CD-ROM with Software and User Manual • Quick Install Guide System Requirements Network Requirements • IEEE - D-Link DHP-W307AV | User Manual - Page 5
Section 1 - Product Overview Introduction For users who have never set up a powerline network before, the DHP-W307AV Powerline Networking Kit provides a hasslefree way to quickly set up a network to reach every corner of your home. Extend your Internet connection to home computers, networking - D-Link DHP-W307AV | User Manual - Page 6
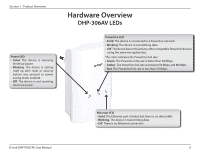
key. The color indicates the Powerline link rate: • Green. The Powerline link rate is faster than 80 Mbps. • Amber. The Powerline link rate is between 50 Mbps and 80 Mbps. • Red. The Powerline link rate is less than 50 Mbps. D-Link DHP-W307AV User Manual Ethernet LED • Solid. The Ethernet - D-Link DHP-W307AV | User Manual - Page 7
network. Refer to page 8 for more information. Reset Button Press and hold the button for 1 second to reset to factory default. RJ-45 10/100BASE-TX Ethernet Port Connects to Digital Media Devices, PCs, Game Consoles, Network Storage Devices CAT5 Ethernet cable. D-Link DHP-W307AV User Manual 7 - D-Link DHP-W307AV | User Manual - Page 8
Hardware Overview DHP-W306AV LEDs Powerline LED • Solid. The device is connected to a Powerline network. • Blinking. The device is transmitting data. • Off. The device has not found any other compatible Powerline devices using the same encryption key. D-Link DHP-W307AV User Manual Power LED - D-Link DHP-W307AV | User Manual - Page 9
Section 1 - Product Overview Hardware Overview DHP-W306AV Connections RJ-45 10/100BASE-TX Ethernet Port Connects to Digital Media Devices, PCs, Game Consoles, Network Storage Devices CAT5 Ethernet cable D-Link DHP-W307AV User Manual ON / OFF button Turns the device on or off. ON: OFF: (active / - D-Link DHP-W307AV | User Manual - Page 10
DHP-W306AV Side Reset Button Press and hold to reset the device back to the factory default settings. Simple Connect Button Push this button to establish a secure powerline network with other Powerline AV the Powerline AV is connected to a Powerline network. D-Link DHP-W307AV User Manual WPS - D-Link DHP-W307AV | User Manual - Page 11
Hardware Installation SET-UP DHP-306AV Plug the DHP-306AV into an AC wall outlet close to your router and connect the included CAT5 Ethernet cable to the Ethernet jack of the DHP-306AV to your router as seen in Room A. Room A Room B DIR-655 DHP-306AV DHP-W306AV D-Link DHP-W307AV User Manual - D-Link DHP-W307AV | User Manual - Page 12
as seen in Room B. 2. Connect one end of the supplied CAT5 Ethernet cable to the Ethernet port of the DHP-W306AV and the other end of the cable to the Ethernet port of your computer. Room A Room B Simple Connect Button DIR-655 DHP-306AV DHP-W306AV D-Link DHP-W307AV User Manual WPS/Eny LED 12 - D-Link DHP-W307AV | User Manual - Page 13
Powerline network. Powerline devices added after the first device will be in the Join State when the Simple Connection Button is pressed. Ungroup state - Hold down the Simple Connection Button for more than 10 seconds to detach the device from its network group. D-Link DHP-W307AV User Manual - D-Link DHP-W307AV | User Manual - Page 14
electrical shock, be sure to plug the power cables into properly grounded electrical outlets. 6. The Powerline device is equipped with a three-pronged plug to help ensure proper grounding. Do not use adapter plugs or remove the grounding prong from the cable. D-Link DHP-W307AV User Manual 14 - D-Link DHP-W307AV | User Manual - Page 15
fans, lights, and home security systems, your wireless connection may degrade dramatically or drop completely. Make sure your 2.4GHz phone base is as far away from your wireless devices as possible. The base transmits a signal even if the phone is not in use. D-Link DHP-W307AV User Manual 15 - D-Link DHP-W307AV | User Manual - Page 16
Follow the simple steps below to run the Setup Wizard to guide you quickly through the installation process. Insert the D-Link DHP-W307AV CD into your CD-ROM drive. If the CD Autorun function does not automatically start on your computer, click Start > Run. In the Run command box type "D:\autorun - D-Link DHP-W307AV | User Manual - Page 17
on your desktop to start the configuration of the DHP-306AV. Double-click the D-Link Powerline AV Utility icon The D-Link Powerline AV Utility provides you the option of setting your own Powerline network and the network information of connected Powerline devices. D-Link DHP-W307AV User Manual 17 - D-Link DHP-W307AV | User Manual - Page 18
connection. • One square - Suitable for data and Internet activity connection. Link Rate: Shows the link rate of the connected device. MAC Address: Shows the MAC address of the connected device. Firmware Version: Shows the firmware version of the connected device. D-Link DHP-W307AV User Manual 18 - D-Link DHP-W307AV | User Manual - Page 19
device name. Factory Reset Button: Select a Powerline device first and then reset to factory default encryption key and firmware version. Firmware Upgrade Button: The firmware upgrade is only for local device. Select the appropriate firmware files and then proceed. D-Link DHP-W307AV User Manual 19 - D-Link DHP-W307AV | User Manual - Page 20
The private encryption key allows you to protect your network from unauthorized access via the Powerline network. Setting your private Encryption Key 1. Enter the device password before changing the : Each device has a unique device password on the device label. D-Link DHP-W307AV User Manual 20 - D-Link DHP-W307AV | User Manual - Page 21
key. 2. You can use Powerline AV Utility to set all devices within existing Powerline network and the new device back Powerline network will securely be configured with a customized encryption key and all devices can communicate with each other after your setting. D-Link DHP-W307AV User Manual - D-Link DHP-W307AV | User Manual - Page 22
.168.0.50 in the address field. http://dlinkap Type Admin as the User Name and then enter your password. Leave the password blank by default. If you receive a "Page Cannot be Displayed" error, please refer to the Troubleshooting section on page 78 for assistance. D-Link DHP-W307AV User Manual 22 - D-Link DHP-W307AV | User Manual - Page 23
Section 3 - Configuration This section will show you how to configure your new D-Link Powerline AV using the web-based configuration utility. D-Link DHP-W307AV User Manual 23 - D-Link DHP-W307AV | User Manual - Page 24
For example, "Jack's room". MAC Address: You can find the MAC address printed on the back of your device. Password: The Password is used to verify that you are authorized to perform changes on a device. You can find the Password printed on the back of your device. D-Link DHP-W307AV User Manual 24 - D-Link DHP-W307AV | User Manual - Page 25
added to the network but it is not ready. Please check its password and make sure the device is powered on. You can configure your Powerline AV devices to give priority to powerline network traffic according to its unique MAC Address. D-Link DHP-W307AV User Manual 25 - D-Link DHP-W307AV | User Manual - Page 26
your access point and skip to the next page. To set up your wireless network, click Add Wireless Device With WPS and skip to page 38. If you would like to enter your settings without running the wizard, click Wireless Setup on the left side and skip to page 40. D-Link DHP-W307AV User Manual 26 - D-Link DHP-W307AV | User Manual - Page 27
for the AP. Changing the Device Name is recommended if there is more than one D-Link device within the same wireless network. If you would like to change the admin account password, enter a new password and click Next. Changing the password is strongly recommended. D-Link DHP-W307AV User Manual 27 - D-Link DHP-W307AV | User Manual - Page 28
For Manual setup, skip to the next page. Click Next to continue. Click Save to save your network settings. In order for your network settings to take effect the AP will reboot automatically. When the device has finished rebooting the main screen will be displayed. D-Link DHP-W307AV User Manual 28 - D-Link DHP-W307AV | User Manual - Page 29
a network key as the configuration method, enter your network key. This key must be entered on your wireless clients. For WEP encryption, enter a Network Key exactly 5 or 13 characters long or exactly 10 or 26 characters using 0-9 and A-F. Click Next to continue. D-Link DHP-W307AV User Manual 29 - D-Link DHP-W307AV | User Manual - Page 30
Section 3 - Configuration The following screen will display you the network key to enter on your wireless clients. Click Save to finish the Setup Wizard. D-Link DHP-W307AV User Manual 30 - D-Link DHP-W307AV | User Manual - Page 31
secure. Adding a Wireless Device Using the PIN Method Select PIN to use your PIN number from your wireless device to connect to your network. Click Connect to continue. Start WPS on the wireless device you are adding to you wireless network to complete the setup. D-Link DHP-W307AV User Manual 31 - D-Link DHP-W307AV | User Manual - Page 32
Adding a Wireless Device Using the PBC Method Select PBC to use Push Button Configuration in order to connect to your network. Click Connect to continue. Press the WPS Button on the wireless device that you are adding to your network to complete the setup. D-Link DHP-W307AV User Manual 32 - D-Link DHP-W307AV | User Manual - Page 33
, this option will be grayed out. 802.11 Mode: Select one of the following: 802.11n Only - Select if you are only using 802.11n wireless clients. Mixed 802.11n, 802.11g and 802.11b - Select if you are using a mix of 802.11n, 11g, and 11b wireless clients. D-Link DHP-W307AV User Manual 33 - D-Link DHP-W307AV | User Manual - Page 34
the user interface PIN: of the user. Reset PIN to Restores the default PIN of the access point. Default: Reset to Resets Wi-Fi Protected Status to Not Configured. The Vista WPS icon will only be displayed when the Wi-Fi Protected status is Not Unconfigured: Configured. D-Link DHP-W307AV User Manual - D-Link DHP-W307AV | User Manual - Page 35
Section 3 - Configuration LAN Setup - DHCP This section will allow you to change the local network settings of the access point and to Enter the Device Name of the AP. Changing the Device Name is recommended if there is more than one D-Link device within the subnet. D-Link DHP-W307AV User Manual 35 - D-Link DHP-W307AV | User Manual - Page 36
one D-Link device within the subnet. You can enter the device name of the AP into your web browser to access it instead of IP address for configuration. If you are using the device name to connect, make sure that your PC and your DHP-W306AV are on the same network. D-Link DHP-W307AV User Manual 36 - D-Link DHP-W307AV | User Manual - Page 37
are currently using to configure the access point first or you will not be able to access the configuration utility once you click Save Settings. MAC Filter List: Displays the list of clients in the filter list. D-Link DHP-W307AV User Manual 37 - D-Link DHP-W307AV | User Manual - Page 38
data flow is a problem, only a minor modification Quality of Service (QoS) system for your wireless network. Enabling wireless stations connecting to the Access Point. If this is disabled, wireless clients are not allowed to exchange data through the Access Point. D-Link DHP-W307AV User Manual - D-Link DHP-W307AV | User Manual - Page 39
that can connect at one time to your access point. Enable User Check the Enable User Limit box to enable this Limit: feature. User Limit: Enter the maximum number of clients, between 1 and 32. Save Settings: Click Save Settings to save and activate the new changes. D-Link DHP-W307AV User Manual 39 - D-Link DHP-W307AV | User Manual - Page 40
which will Graphical require users to type letters or numbers from a Authentication: distorted image displayed on the screen to prevent online hackers and unauthorized users from gaining access to your device's configuration. This feature is disabled by default. D-Link DHP-W307AV User Manual 40 - D-Link DHP-W307AV | User Manual - Page 41
. If you would like to save the current access point configuration settings, use the Save button above. Note: Restoring the factory default settings will not reset the Wi-Fi Protected Status to Not Configured. Reboot the Click to reboot the access point. Device: D-Link DHP-W307AV User Manual 41 - D-Link DHP-W307AV | User Manual - Page 42
computer. Note: Language pack file extension will be *.lng 2. Once you have found the file, click the Upload button to begin the language pack upgrade process. This can take a minute or more. 3. Wait for the device to reboot. This process can take about 75 seconds. D-Link DHP-W307AV User Manual 42 - D-Link DHP-W307AV | User Manual - Page 43
dropdown menu. Date and Time: To manually input the time, enter the values in these fields for the Year, Month, Day, Hour, Minute, and Second and then click Save Settings. You can also click the Copy Your Computer's Time Settings button at the bottom of the screen. D-Link DHP-W307AV User Manual 43 - D-Link DHP-W307AV | User Manual - Page 44
The list of schedules will be listed here. Click the List: Edit icon to make changes or click the Delete icon to remove the schedule. D-Link DHP-W307AV User Manual 44 - D-Link DHP-W307AV | User Manual - Page 45
information. General: Displays the access point's time and firmware version. LAN: Displays the MAC address and the private (local) IP settings for the access point. Wireless LAN: Displays the wireless MAC address and your wireless settings such as SSID and Channel. D-Link DHP-W307AV User Manual 45 - D-Link DHP-W307AV | User Manual - Page 46
Section 3 - Configuration Logs The DHP-W306AV keeps a running log of events and activities occurring on the AP. If the AP is rebooted, the logs Settings: This button opens a new menu where you can configure the log settings. Refresh: This button refreshes the log. D-Link DHP-W307AV User Manual 46 - D-Link DHP-W307AV | User Manual - Page 47
3 - Configuration Statistics The DHP-W306AV keeps statistics of the traffic that passes through it. You can view the amount of packets that pass through the LAN and wireless portions of the network. The traffic counter will reset if the access point is rebooted. D-Link DHP-W307AV User Manual 47 - D-Link DHP-W307AV | User Manual - Page 48
you to view the wireless clients that are connected to your wireless access point. Connection Time: Displays the amount of time the wireless client has been connected to the access point. MAC Address: Displays the Ethernet ID (MAC address) of the wireless client. D-Link DHP-W307AV User Manual 48 - D-Link DHP-W307AV | User Manual - Page 49
Section 3 - Configuration Help D-Link DHP-W307AV User Manual 49 - D-Link DHP-W307AV | User Manual - Page 50
Section 4 - Security Wireless Security This section will show you the different levels of security you can use to protect your data from intruders. The DHP-W306AV offers the following types of security: • WPA2 ( can be defined so that you can change keys easily. D-Link DHP-W307AV User Manual 50 - D-Link DHP-W307AV | User Manual - Page 51
on your wireless bridge or access point. WPA/WPA2 incorporates user authentication through the Extensible Authentication Protocol (EAP). EAP is built on a more secure public key encryption system to ensure that only authorized network users can access the network. D-Link DHP-W307AV User Manual 51 - D-Link DHP-W307AV | User Manual - Page 52
keys. 7. Click Save Settings at the top of the window to save your settings. If you are configuring the access point with a wireless adapter, you will lose connectivity until you enable WEP on your adapter and enter the same WEP key as you did on the access point. D-Link DHP-W307AV User Manual 52 - D-Link DHP-W307AV | User Manual - Page 53
6. Click Save Settings at the top of the window to save your settings. If you are configuring the access point with a wireless adapter, you will lose connectivity until you enable WPA-PSK on your adapter and enter the same passphrase as you did on the access point. D-Link DHP-W307AV User Manual 53 - D-Link DHP-W307AV | User Manual - Page 54
50). Click on Setup and then click Wireless Settings on the left side. 2. Next to Security Mode, select Enable WPA Wireless Security, Enable WPA2 Wireless Security, or Enable WPA2-Auto Wireless Security. 3. Next key. 8. Click Save Settings to save your settings. D-Link DHP-W307AV User Manual 54 - D-Link DHP-W307AV | User Manual - Page 55
you are joining an existing network, you will need to know the security key or passphrase being used. 1. Click on the wireless icon in your system tray (lower-right corner). 2. The utility will display any available wireless networks in your area. Wireless Icon D-Link DHP-W307AV User Manual 55 - D-Link DHP-W307AV | User Manual - Page 56
get a good signal but cannot access the Internet, check your TCP/IP settings for your wireless adapter. Refer to the Networking Basics section in this manual for more information. 4. The following window appears while your computer tries to connect to the router. D-Link DHP-W307AV User Manual 56 - D-Link DHP-W307AV | User Manual - Page 57
connect by pushing the WPS button on the router. It may take 20-30 seconds to connect to the wireless network. If the connection fails, please verify that the security settings are correct. The key or passphrase must be exactly the same as on the wireless router. D-Link DHP-W307AV User Manual 57 - D-Link DHP-W307AV | User Manual - Page 58
The WPS feature of the DHP-W306AV can be configured using Windows® 7. Carry out the following steps to use Windows® 7 to configure the WPS feature of the DHP-W306AV: 1. Click the Start button and select Computer from the Start menu. 2. Click the Network option. D-Link DHP-W307AV User Manual 58 - D-Link DHP-W307AV | User Manual - Page 59
Section 5 - Connecting to a Wireless Network 3. Double-click the DHP-W306AV. 4. Input the WPS PIN number (displayed in the WPS window on the Router's LCD screen or in the Setup > Wireless Setup menu in the Router's Web UI) and click Next. D-Link DHP-W307AV User Manual 59 - D-Link DHP-W307AV | User Manual - Page 60
Section 5 - Connecting to a Wireless Network 5. Type a name to identify the network. 6. To configure advanced settings, click the icon. Click Next to continue. D-Link DHP-W307AV User Manual 60 - D-Link DHP-W307AV | User Manual - Page 61
following window informs you that WPS on the DHP-W306AV has been setup successfully. Make a note of the security key as you may need to provide this security key if adding an older wireless device to the network in the future. 9. Click Close to complete WPS setup. D-Link DHP-W307AV User Manual 61 - D-Link DHP-W307AV | User Manual - Page 62
menu, go to Control Panel, and then click on Network and Sharing Center. The utility will display any available wireless networks in your area. Click on a network (displayed using the SSID) under Select a network to connect to and then click the Connect button. D-Link DHP-W307AV User Manual 62 - D-Link DHP-W307AV | User Manual - Page 63
Section 5 - Connecting to a Wireless Network Click Connect Anyway to continue. The utility will display the following window to indicate a connection connection. The next two pages display the windows used to connect to either a WEP or a WPA-PSK wireless network. D-Link DHP-W307AV User Manual 63 - D-Link DHP-W307AV | User Manual - Page 64
Network Configure WEP It is recommended to enable WEP on your wireless bridge or access point before configuring your wireless adapter. If you are joining an existing network, you will need to passphrase in the field provided and then click the Connect button. D-Link DHP-W307AV User Manual 64 - D-Link DHP-W307AV | User Manual - Page 65
Network Configure WPA-PSK It is recommended to enable WEP on your wireless bridge or access point before configuring your wireless adapter. If you are joining an existing network, you will need to in the field provided and then click the Connect button. D-Link DHP-W307AV User Manual 65 - D-Link DHP-W307AV | User Manual - Page 66
using the SSID) and click the Connect button. If you get a good signal, but cannot access the Internet, check you TCP/IP settings for your wireless adapter. Refer to the Networking Basics section in this manual for more information. D-Link DHP-W307AV User Manual 66 - D-Link DHP-W307AV | User Manual - Page 67
the Windows® XP Wireless Utility by right-clicking on the wireless computer icon in your system tray (lower-right corner of screen). Select View Available Wireless Networks. 2. Highlight the wireless network (SSID) you would like to connect to and click Connect. D-Link DHP-W307AV User Manual 67 - D-Link DHP-W307AV | User Manual - Page 68
WEP key that is on your access point and click Connect. It may take 20-30 seconds to connect to the wireless network. If the connection fails, please verify that the WEP settings are correct. The WEP key must be exactly the same as on the wireless access point. D-Link DHP-W307AV User Manual 68 - D-Link DHP-W307AV | User Manual - Page 69
the Windows® XP Wireless Utility by right-clicking on the wireless computer icon in your system tray (lower-right corner of screen). Select View Available Wireless Networks. 2. Highlight the wireless network (SSID) you would like to connect to and click Connect. D-Link DHP-W307AV User Manual 69 - D-Link DHP-W307AV | User Manual - Page 70
the WPA-PSK passphrase and click Connect. It may take 20-30 seconds to connect to the wireless network. If the connection fails, please verify that the WPA-PSK settings are correct. The WPA-PSK passphrase must be exactly the same as on the wireless access point. D-Link DHP-W307AV User Manual 70 - D-Link DHP-W307AV | User Manual - Page 71
. Software firewalls such as Zone Alarm, Black Ice, Sygate, Norton Personal Firewall, and Windows® XP firewall may block access to the configuration pages. Check the help files included with your firewall software for more information on disabling or configuring it. D-Link DHP-W307AV User Manual - D-Link DHP-W307AV | User Manual - Page 72
Section 6 - Troubleshooting • Configure your Internet settings: • Go Make sure nothing is checked. Click OK. • Go to the Advanced tab and click the Reset... button to restore these settings to their defaults. Click OK three times. • Close your web password box empty. D-Link DHP-W307AV User Manual 72 - D-Link DHP-W307AV | User Manual - Page 73
AV device via webbased configuration utility. 4. I can not start my Powerline AV device. Please check your power supply is working. Powerline AV device operates from the power supplied by the home electrical wiring and can not operate without a working power supply. D-Link DHP-W307AV User Manual - D-Link DHP-W307AV | User Manual - Page 74
many circumstances, it may be desirable for mobile network devices to link to a conventional Ethernet LAN in order to use servers, printers or an Internet connection supplied through the wired LAN. A Wireless Access point is a device used to provide this link. D-Link DHP-W307AV User Manual 74 - D-Link DHP-W307AV | User Manual - Page 75
products. D-Link delivers the performance you need at a price you can afford. D-Link has all the products you need to build your network. How does wireless work? Wireless works similar , airports, golf courses, and many other outdoor venues. Who uses wireless? D-Link DHP-W307AV User Manual 75 - D-Link DHP-W307AV | User Manual - Page 76
recent years that almost everyone is using it, whether it's for home, office, business, D-Link has a wireless solution for it. Home • Gives everyone at home broadband access • Surf the web, check printer with multiple computers • No need to dedicate office space D-Link DHP-W307AV User Manual 76 - D-Link DHP-W307AV | User Manual - Page 77
home appliances such as cordless telephones, microwaves, wireless speakers, and televisions as far away as possible from the bridge/access point. This would significantly reduce any interference that the appliances might cause since they operate on same frequency. D-Link DHP-W307AV User Manual 77 - D-Link DHP-W307AV | User Manual - Page 78
Point or wireless bridge. All the wireless devices, or clients, will connect to the wireless bridge or access point. An Ad-Hoc network contains only clients, such as laptops with wireless cardbus adapters. All the adapters must be in Ad-Hoc mode to communicate. D-Link DHP-W307AV User Manual 78 - D-Link DHP-W307AV | User Manual - Page 79
firewall software programs may block a DHCP request on newly installed adapters. If you are connecting to a wireless network at a hotspot (e.g. hotel, coffee shop, airport), please contact an employee or administrator to verify their wireless network settings. D-Link DHP-W307AV User Manual 79 - D-Link DHP-W307AV | User Manual - Page 80
Places > Properties. Step 2 Right-click on the Local Area Connection which represents your D-Link network adapter and select Properties. Step 3 Highlight Internet Protocol (TCP/IP) and click Properties from your ISP. Step 5 Click OK twice to save your settings. D-Link DHP-W307AV User Manual 80 - D-Link DHP-W307AV | User Manual - Page 81
Appendix C - Technical Specifications Technical Specifications DHP-306AV Ethernet Interface • 10/100BASE-TX Ethernet Port with auto MDI/ MDIX • RJ-45 Connector • 0°C ~ 40°C Storage Temperature • -10°C ~ 70°C Humidity • Operation: 10% ~ 90% RH • Storage: 5% ~ 90% RH D-Link DHP-W307AV User Manual 81 - D-Link DHP-W307AV | User Manual - Page 82
Technical Specifications DHP-W306AV STANDARDS • IEEE 802.3 • IEEE 802.3u • IEEE 802.11b • IEEE 802.11g • IEEE 802.11n • HomePlug AV POWERLINE INTERFACE • Power will adversely affect wireless signal range. 2. Range varies depending on country's regulation. D-Link DHP-W307AV User Manual 82
-
 1
1 -
 2
2 -
 3
3 -
 4
4 -
 5
5 -
 6
6 -
 7
7 -
8
-
9
-
10
-
11
-
12
-
13
-
14
-
15
-
16
-
17
-
18
-
19
-
20
-
21
-
22
-
23
-
24
-
25
-
26
-
27
-
28
-
29
-
30
-
31
-
32
-
33
-
34
-
35
-
36
-
37
-
38
-
39
-
40
-
41
-
42
-
43
-
44
-
45
-
46
-
47
-
48
-
49
-
50
-
51
-
52
-
53
-
54
-
55
-
56
-
57
-
58
-
59
-
60
-
61
-
62
-
63
-
64
-
65
-
66
-
67
-
68
-
69
-
70
-
71
-
72
-
73
-
74
-
75
-
76
-
77
-
78
-
79
-
80
-
81
-
82
 |
 |
