D-Link DPH-128MS Product Manual - Page 79
Router/Bridge, to save and activate the changes, or
 |
UPC - 790069320286
View all D-Link DPH-128MS manuals
Add to My Manuals
Save this manual to your list of manuals |
Page 79 highlights
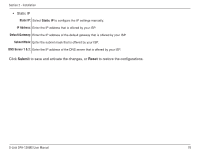
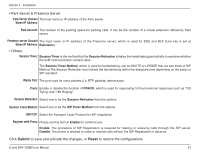
Section 2 - Installation Router/Bridge The VoIP phone allows you to connect the network device (e.g. a laptop PC) to the LAN port. When the phone is set at Router mode and the integrated DHCP Server is enabled, the phone will allocate an IP address to the connected device. It can also modify the received network packets (i.e. to translate the network address) and forward them to the Internet through its WAN interface. On the other hand, the received network packets from LAN port will be forwarded without modification if the VoIP phone is set at Bridge mode. Note: We strongly recommend that you should connect only one device to the LAN port since the VoIP phone is not designed for the purpose of constructing a local area network like a SOHO or an enterprise network router does. NAT Mode: Set the VoIP phone at Router or Bridge mode. DHCP Server: Enable or disable the integrated DHCP Server. LAN IP: Allocate an IP address to the LAN interface (e.g. 192.168.xxx.xxx). IP Subnet Mask: An unchangeable subnet mask that means the VoIP phone allows 254 network terminals in maximum. IP Pool Starting/ IP addresses within the range are available to be allocated to the connected DHCP clients. Ending Address: Lease Time: The valid period of the allocated IP addresses. Domain Name: Domain name for the local area network constructed by the phone. Click Submit to save and activate the changes, or Reset to restore the configurations. D-Link DPH-128MS User Manual 79
-
 1
1 -
2
-
3
-
4
-
5
-
6
-
7
-
8
-
9
-
10
-
11
-
12
-
13
-
14
-
15
-
16
-
17
-
18
-
19
-
20
-
21
-
22
-
23
-
24
-
25
-
26
-
27
-
28
-
29
-
30
-
31
-
32
-
33
-
34
-
35
-
36
-
37
-
38
-
39
-
40
-
41
-
42
-
43
-
44
-
45
-
46
-
47
-
48
-
49
-
50
-
51
-
52
-
53
-
54
-
55
-
56
-
57
-
58
-
59
-
60
-
61
-
62
-
63
-
64
-
65
-
66
-
67
-
68
-
69
-
70
-
71
-
72
-
73
-
 74
74 -
 75
75 -
 76
76 -
 77
77 -
 78
78 -
 79
79 -
 80
80 -
 81
81 -
 82
82 -
 83
83 -
 84
84 -
85
-
86
-
87
-
88
-
89
-
90
-
91
-
92
-
93
-
94
-
95
-
96
-
97
-
98
-
99
-
100
-
101
-
102
-
103
-
104
-
105
-
106
-
107
-
108
-
109
-
110
 |
 |
