D-Link DSM-310 Manual - Page 15
Step 3, The device will power on. - setup
 |
View all D-Link DSM-310 manuals
Add to My Manuals
Save this manual to your list of manuals |
Page 15 highlights
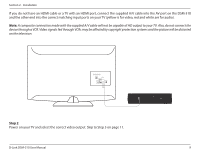
Section 2 - Installation Step 3 Connect an Ethernet cable (not included) to the LAN port on the DSM-310 and other end into your network (via router, gateway, or switch). If you want to use the built-in wireless adapter, do not connect the Ethernet cable. The on-screen setup wizard will allow you configure your wireless settings. 1 2 LAN 3 4 RESET INTERNET USB 5V - - - 3A AV HDMI LAN DC 12V Step 4 Connect the supplied power adapter to the power receptor on the DSM-310 and plug it into a power outlet or surge protector. The device will power on. AV HDMI LAN DC 12V D-Link DSM-310 User Manual 11
-
 1
1 -
2
-
3
-
4
-
5
-
6
-
7
-
8
-
9
-
 10
10 -
 11
11 -
 12
12 -
 13
13 -
 14
14 -
 15
15 -
 16
16 -
 17
17 -
 18
18 -
 19
19 -
 20
20 -
21
-
22
-
23
-
24
-
25
-
26
-
27
-
28
-
29
-
30
-
31
-
32
-
33
-
34
-
35
-
36
-
37
-
38
-
39
-
40
-
41
-
42
-
43
-
44
 |
 |

11
D-Link DSM-310 User Manual
Section 2 - Installation
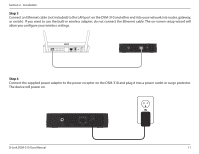
Step 3
Connect an Ethernet cable (not included) to the LAN port on the DSM-310 and other end into your network (via router, gateway,
or switch). If you want to use the built-in wireless adapter, do not connect the Ethernet cable. The on-screen setup wizard will
allow you configure your wireless settings.
HDMI
LAN
DC 12V
AV
5V
---
3A
1
2
LAN
3
4
INTERNET
USB
RESET
Step 4
Connect the supplied power adapter to the power receptor on the DSM-310 and plug it into a power outlet or surge protector.
The device will power on.
HDMI
LAN
DC 12V
AV