D-Link DSM-310 Manual - Page 30
Wired (Ethernet
 |
View all D-Link DSM-310 manuals
Add to My Manuals
Save this manual to your list of manuals |
Page 30 highlights
Section 4 - Configuration Wired (Ethernet) Step 1 - Select Wired to use an Ethernet connection and press the OK button on your remote. Step 2 - Select Auto IP to receive your network settings from a DHCP-enabled router or gateway. If you want to manually set your network settings, select Manual IP and continue to step 3 below. Step 3 - Enter an IP address for the DSM-310, the subnet mask of your network, the default gateway IP address (usually the IP address of your router), and a DNS server. To enter your settings, select a box using the arrow buttons and press the OK button to bring up the on-screen keyboard. Select Save Configuration and press OK on your remote. D-Link DSM-310 User Manual 26
-
 1
1 -
2
-
3
-
4
-
5
-
6
-
7
-
8
-
9
-
10
-
11
-
12
-
13
-
14
-
15
-
16
-
17
-
18
-
19
-
20
-
21
-
22
-
23
-
24
-
 25
25 -
 26
26 -
 27
27 -
 28
28 -
 29
29 -
 30
30 -
 31
31 -
 32
32 -
 33
33 -
 34
34 -
 35
35 -
36
-
37
-
38
-
39
-
40
-
41
-
42
-
43
-
44
 |
 |

26
D-Link DSM-310 User Manual
Section 4 - Configuration
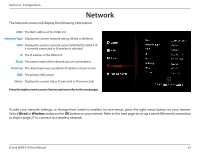
Wired (Ethernet)
Step 1
- Select
Wired
to use an Ethernet connection and press
the
OK
button on your remote.
Step 2
- Select
Auto IP
to receive your network settings from
a DHCP-enabled router or gateway. If you want to manually
set your network settings, select
Manual IP
and continue to
step 3 below.
Step 3
- Enter an IP address for the DSM-310, the subnet mask
of your network, the default gateway IP address (usually the IP
address of your router), and a DNS server.
To enter your settings, select a box using the arrow buttons
and press the
OK
button to bring up the on-screen keyboard.
Select
Save Configuration
and press
OK
on your remote.