D-Link DXS-3250E Installation Guide - Page 33
Configuration Overview, Initial Configuration
 |
UPC - 790069308420
View all D-Link DXS-3250E manuals
Add to My Manuals
Save this manual to your list of manuals |
Page 33 highlights
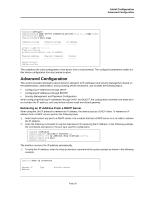
D-Link DXS-3250/DXS-3227P/DXS-3227 User Guide The Startup menu is displayed and contains the following configuration functions: Startup Menu [1] Download Software [2] Erase Flash File [3] Password Recovery Procedure [4] Enter Diagnostic Mode [5] Set Terminal Baud-Rate [6] Stack menu [7] Back Enter your choice or press 'ESC' to exit: 2. On the Startup menu, press "6". The following prompt is displayed: Stack menu [1] Set unit number in stack [2] Add stacking ports [3] Remove stacking ports [4] Stack info [5] Back 3. On the Stack menu, press "1". The following prompt is displayed: Enter your choice or press 'ESC' to exit: Unit number in stack: [0-16] 1 4. Enter the unit stack number. Note that number "1" designates the device as the Master, and "2" designates the device as the Backup Master. 5. Press . The device is defined within the stack. 6. On the Stack menu, press "5". The Startup menu is displayed. 7. On the Startup menu, press "7". The Startup menu is closed and the device continues the Startup process. Configuration Overview Before assigning a static IP address to the device, obtain the following information from the network administrator: • A specific IP address allocated by the network administrator for the switch to be configured • Network mask for the network There are two types of configuration: Initial configuration consists of configuration functions with basic security considerations, whereas advanced configuration includes dynamic IP configuration and more advanced security considerations. After making any configuration changes, the new configuration must be saved before rebooting. To save the configuration, enter the following CLI command: Console# copy running-config startup-config Initial Configuration Initial configuration, which starts after the device has booted successfully, includes static IP address and subnet mask configuration, and setting user name and privilege level to allow remote management. If the device is to be managed from an SNMP-based management station, SNMP community strings must also be configured. The following configurations are completed: • Static IP Address and Subnet Mask Page 33
-
 1
1 -
2
-
3
-
4
-
5
-
6
-
7
-
8
-
9
-
10
-
11
-
12
-
13
-
14
-
15
-
16
-
17
-
18
-
19
-
20
-
21
-
22
-
23
-
24
-
25
-
26
-
27
-
 28
28 -
 29
29 -
 30
30 -
 31
31 -
 32
32 -
 33
33 -
 34
34 -
 35
35 -
 36
36 -
 37
37 -
 38
38 -
39
-
40
-
41
-
42
-
43
-
44
-
45
-
46
-
47
-
48
-
49
-
50
-
51
-
52
-
53
-
54
-
55
-
56
-
57
-
58
-
59
-
60
-
61
-
62
-
63
-
64
-
65
-
66
-
67
-
68
-
69
-
70
-
71
-
72
-
73
-
74
-
75
-
76
-
77
-
78
-
79
-
80
-
81
-
82
-
83
-
84
-
85
-
86
-
87
-
88
-
89
-
90
-
91
-
92
-
93
-
94
-
95
-
96
-
97
-
98
-
99
-
100
-
101
-
102
-
103
-
104
-
105
-
106
-
107
-
108
-
109
-
110
-
111
-
112
-
113
-
114
-
115
-
116
-
117
-
118
-
119
-
120
-
121
-
122
-
123
-
124
-
125
-
126
-
127
-
128
-
129
-
130
-
131
-
132
-
133
-
134
-
135
-
136
-
137
-
138
-
139
-
140
-
141
-
142
-
143
-
144
-
145
-
146
-
147
-
148
-
149
-
150
-
151
-
152
-
153
-
154
-
155
-
156
-
157
-
158
-
159
-
160
-
161
-
162
-
163
-
164
-
165
-
166
-
167
-
168
-
169
-
170
-
171
-
172
-
173
-
174
-
175
-
176
-
177
-
178
-
179
-
180
-
181
-
182
-
183
-
184
-
185
-
186
-
187
-
188
-
189
-
190
-
191
-
192
-
193
-
194
-
195
-
196
-
197
-
198
-
199
-
200
-
201
-
202
-
203
-
204
-
205
-
206
-
207
-
208
-
209
-
210
-
211
-
212
-
213
-
214
-
215
-
216
-
217
-
218
-
219
-
220
-
221
-
222
-
223
-
224
-
225
-
226
-
227
-
228
-
229
-
230
-
231
-
232
-
233
-
234
-
235
-
236
-
237
-
238
-
239
-
240
-
241
-
242
-
243
-
244
-
245
-
246
-
247
-
248
-
249
-
250
-
251
-
252
-
253
-
254
-
255
-
256
-
257
-
258
-
259
-
260
-
261
-
262
-
263
-
264
-
265
-
266
-
267
-
268
-
269
-
270
-
271
-
272
-
273
-
274
-
275
-
276
-
277
-
278
-
279
-
280
-
281
-
282
-
283
-
284
-
285
-
286
-
287
-
288
-
289
-
290
-
291
-
292
-
293
-
294
-
295
-
296
-
297
-
298
-
299
-
300
-
301
-
302
-
303
-
304
-
305
-
306
-
307
-
308
-
309
-
310
-
311
 |
 |
